|
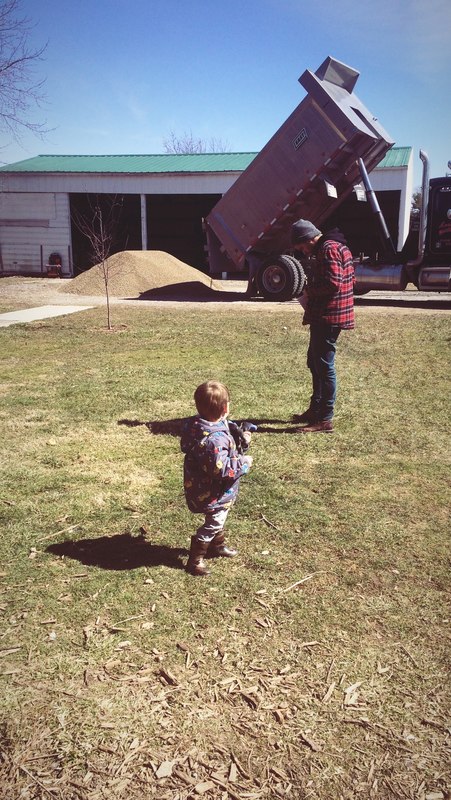
The new gravel has been wonderful and made everything look so much better. We used part of the pile for the new chicken coop path and for the veggie garden and the rest was for the driveway and garage. Unfortunately not all of the garage was able to be filled, but part of the inside was bare dirt so it was nice to be able to get that part covered.  Little Danny and Elmer loved playing in the gravel pile every day but they weren't making much of a dent in actually spreading it out. I was worried Danny was going to be really upset when we finally spread out his "grabel," but when our friend showed up with his skid steer to do the work, Danny couldn't have been more excited.
What we expected to take hours of work was done in a matter of minutes, and little Danny is still talking about it. He regularly calls Josiah on his toy phone, requesting the skidsteer to come back. He now drives his own little dump truck around the driveway and doesn't seem to be bothered at all that his rock mountain is gone. 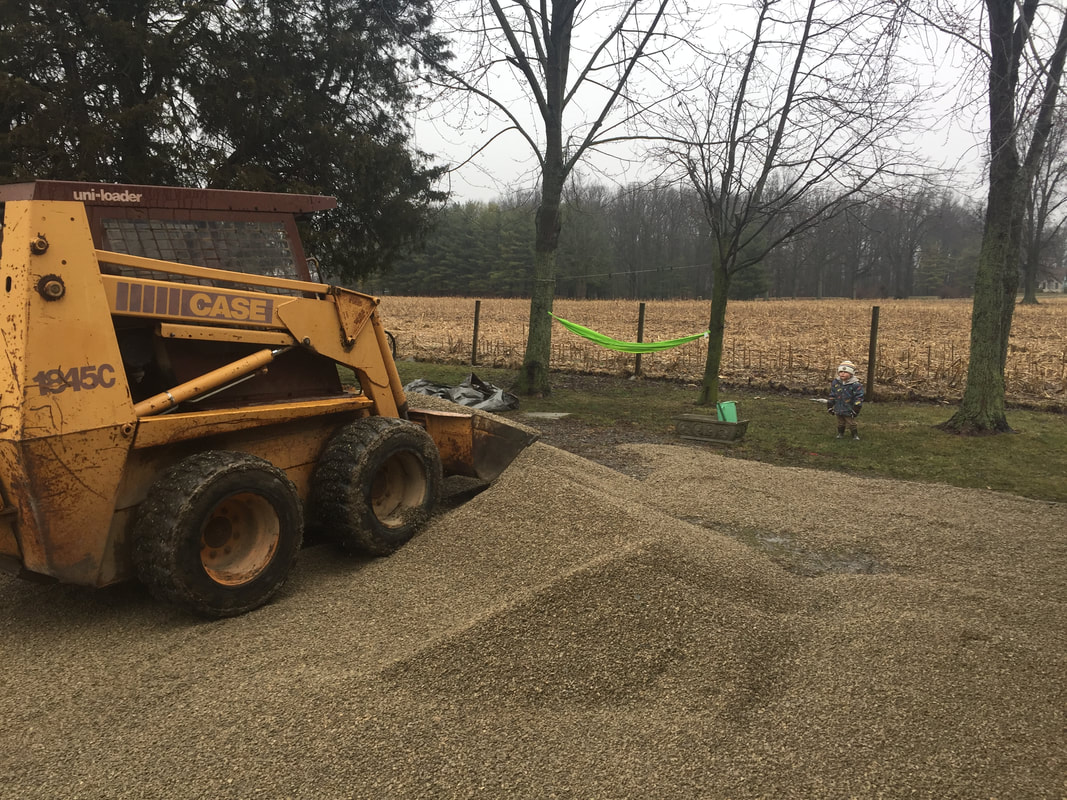  Our garage was just a dirt mess, especially under the workbench, and the barn cats had been caught using the loose dirt as a litterbox (barf). We fixed their little cookies and gave them a nice layer of gravel so now they can go back out in the field. 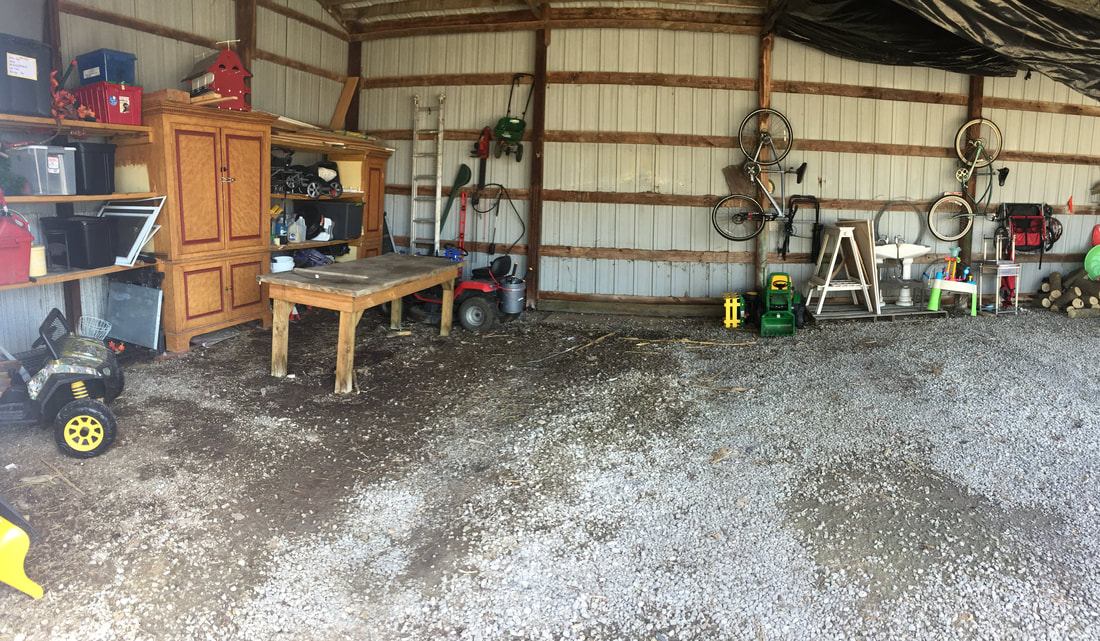  The kittens seem to enjoy playing with Danny's dump truck as well, and now just see the area is a new playground, which is much better.
The driveway puddles are gone and now you can tell where the driveway ends and the yard starts, instead of it all just oozing together. Little Danny's vehicles sometimes get stuck in the gravel, but he's gotten pretty good at figuring out how to get them out. 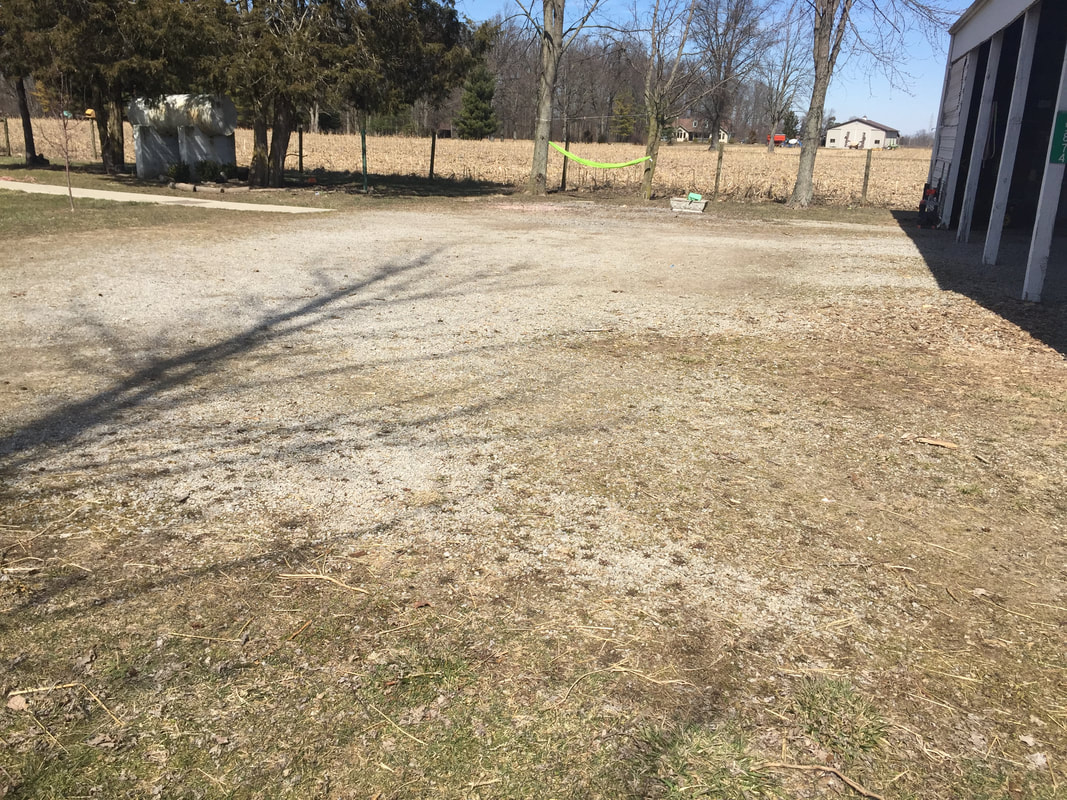  Currently the mission is to stop all the weeds from poking through and ruining the new look. It is a constant battle, but things still look so much better. 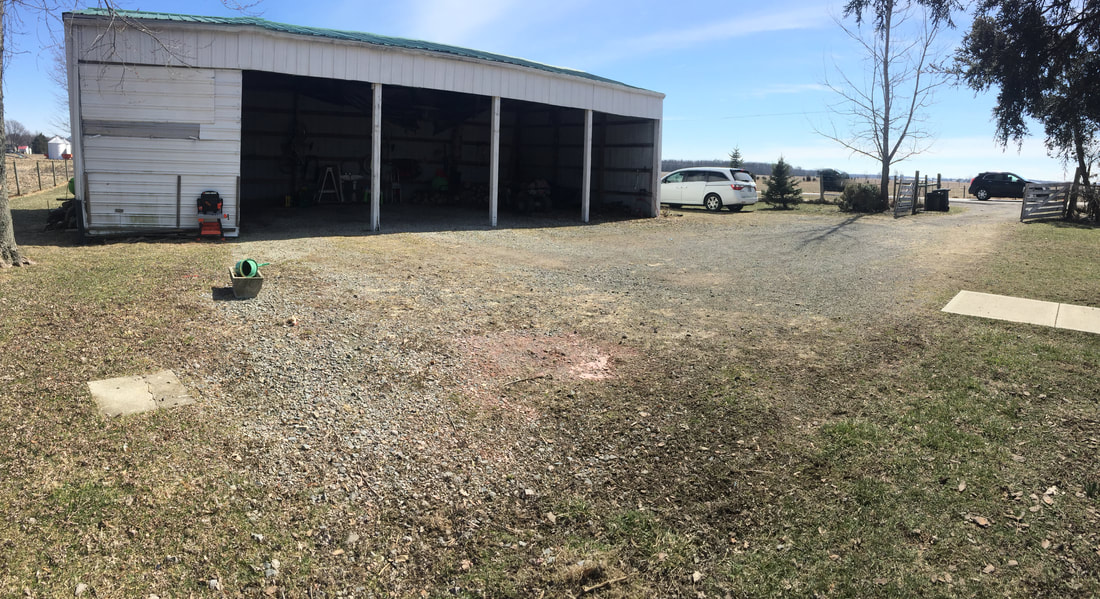  People have told us how unfortunate it is for us to have a gravel drive, but we actually like it. Everything needs maintenance at some point and while we deal with weeds we don't have to worry about cracks or sealing it. What we like the best is the noise it makes when someone pulls up. No one can sneak a car in the gate with us not knowing because the crunch of gravel gives it away. Even at night if a car turns around at the barn or gate I notice the sound. You could say its our cheap redneck gate alarm. 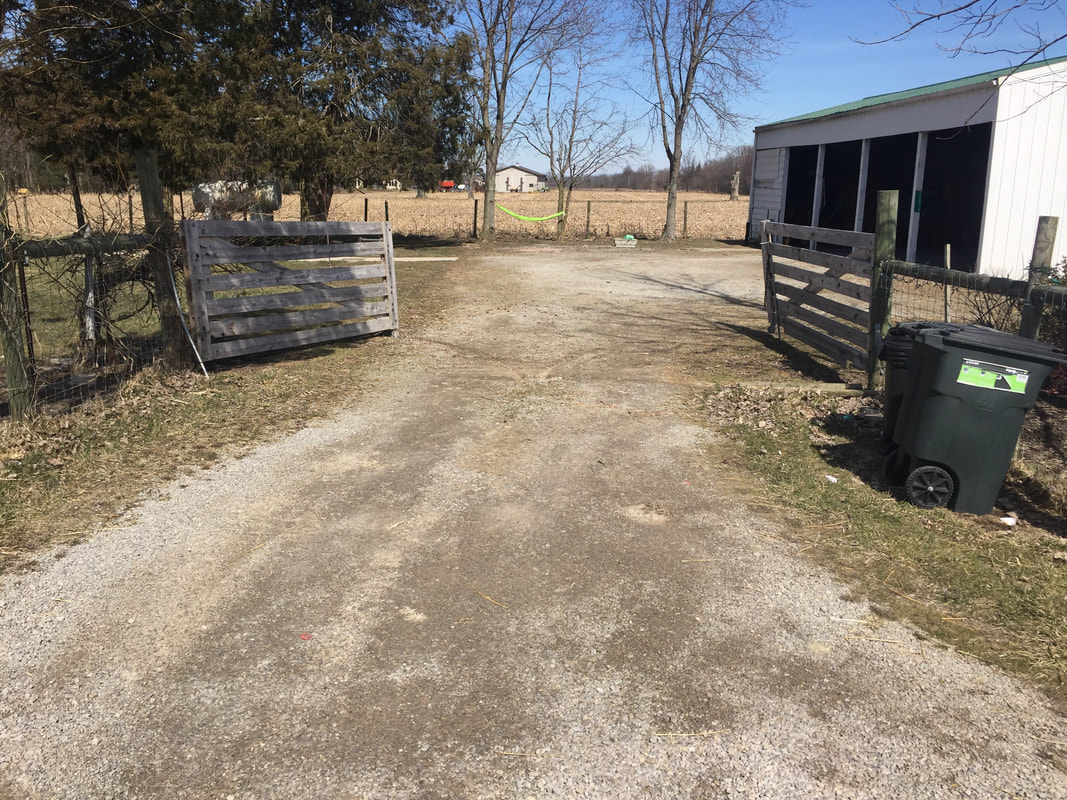 
0 Comments
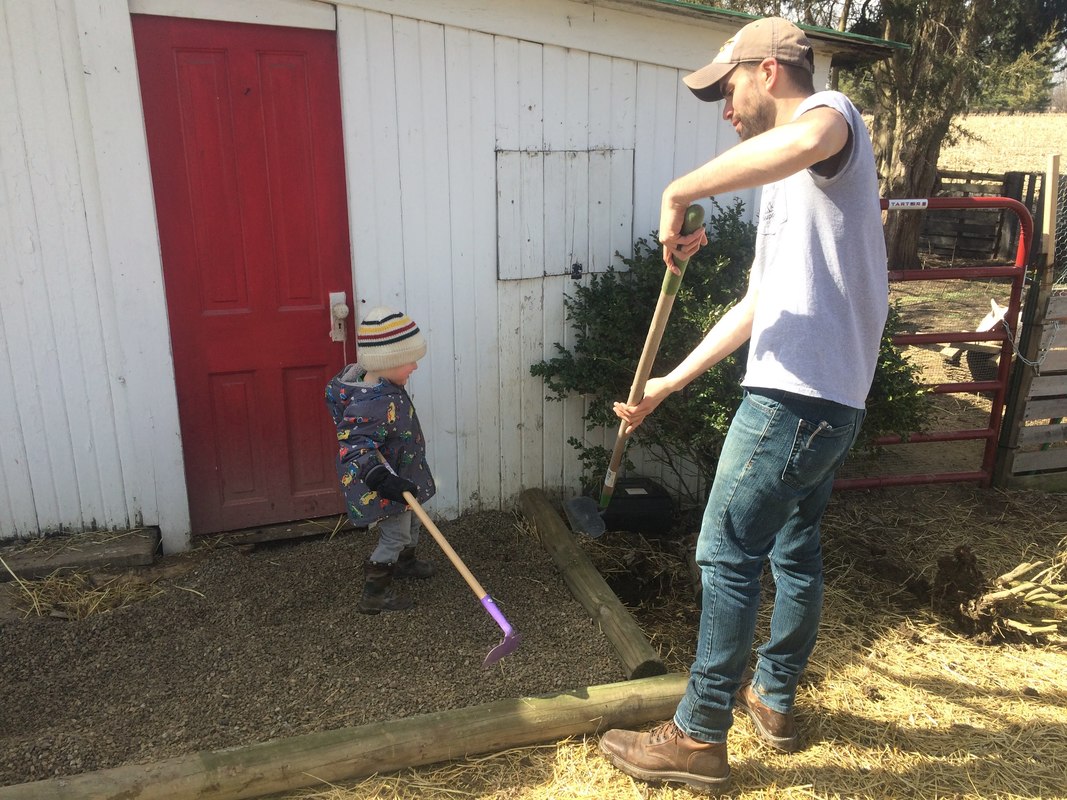
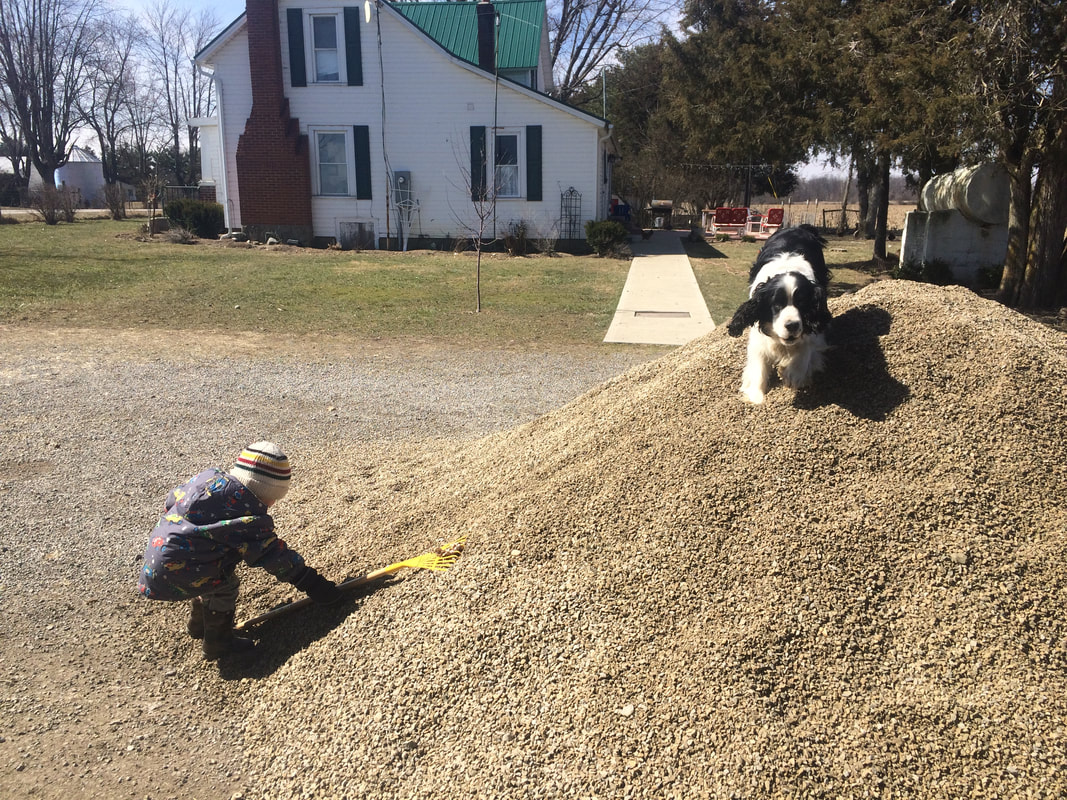
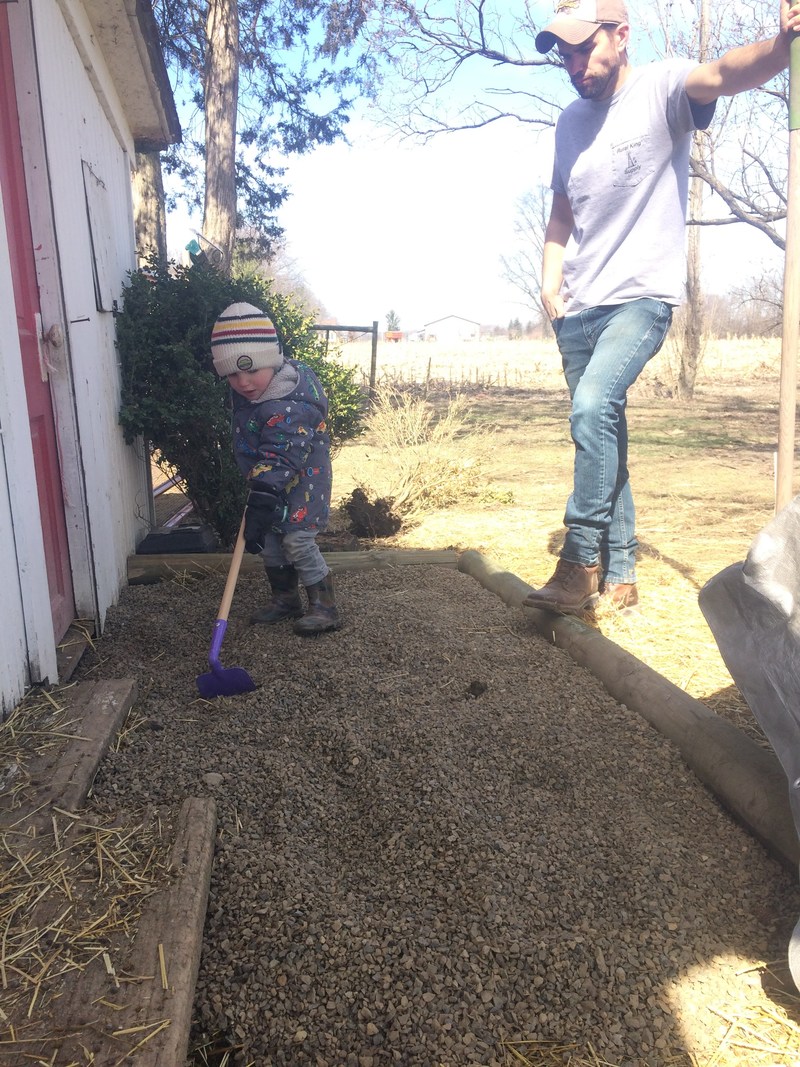
Every winter we have a horrible mud pit out to the coop and always say we HAVE to do something about it. Once summer comes and the grass begins to grow, we forget all about that mud that was sucking to our boots each cold morning. Then, winter comes back and we again have muddy chicken and dog footprints everywhere, and were leap frogging between all the semi-dry spots to get to the coop. The chickens had clumps of mud clinging to their feet (not the best thing for them) and little Danny even lost a boot once, so this isn't just a little mud were talking about. This year we had enough and finally decided it was time to do something about it.  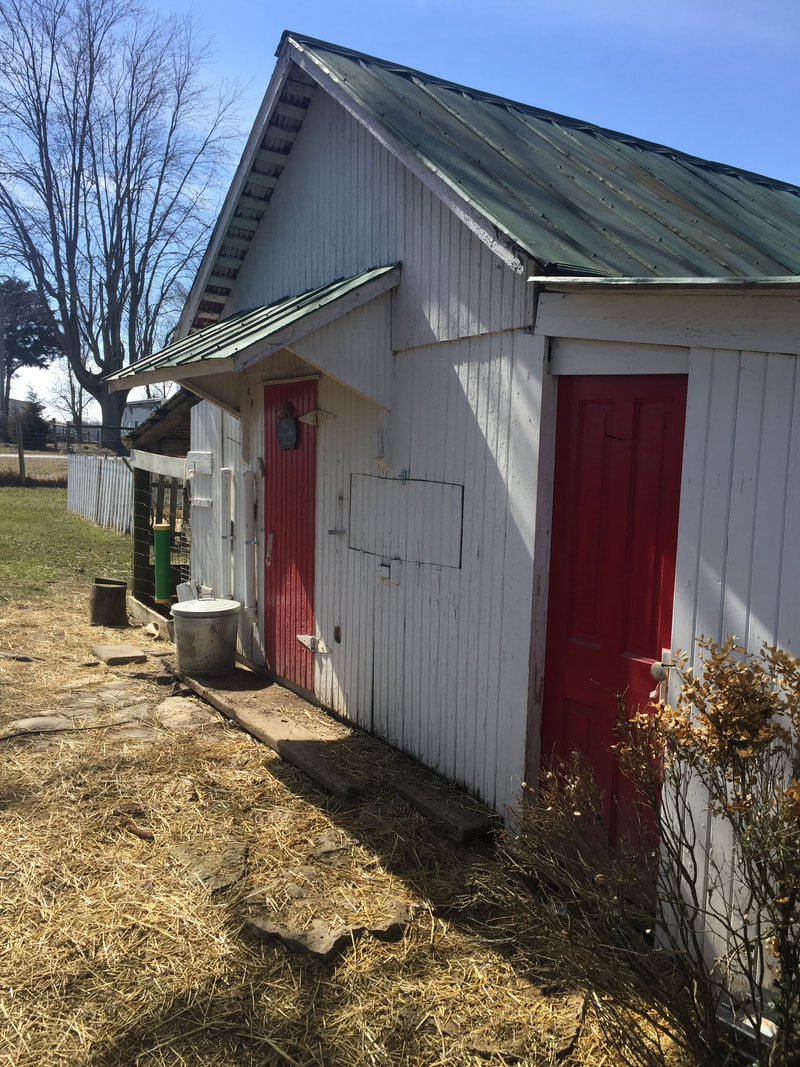 I always wanted a cute stepping stone path out there, but it was never in the budget. The few stones I did have were actually now sinking so deep into the mud that they'd soon be disappearring if we weren't careful. Danny wanted to put some gravel out there and I finally agreed. We needed gravel this year for the veggie garden, driveway, and garage so he said this was the year to do it. 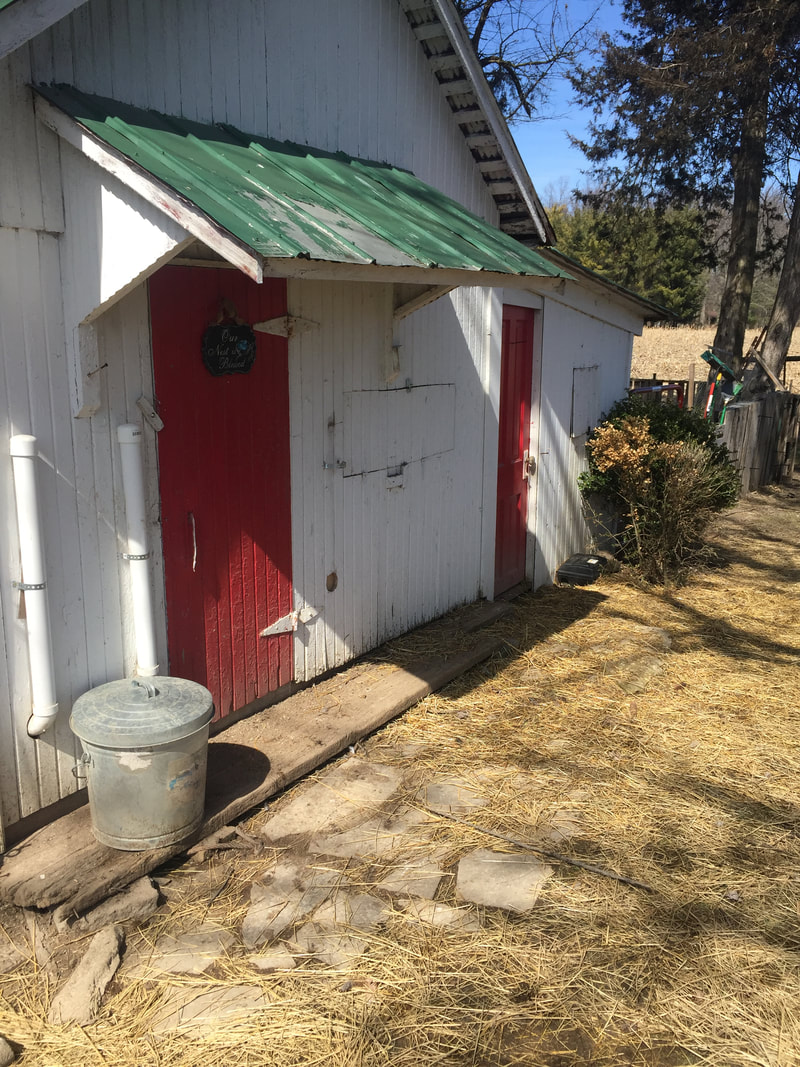 For his spring break project, Danny scheduled a gravel delivery and we had 15 tons dumped on the driveway one afternoon. Little Danny was thrilled, and so was Elmer.
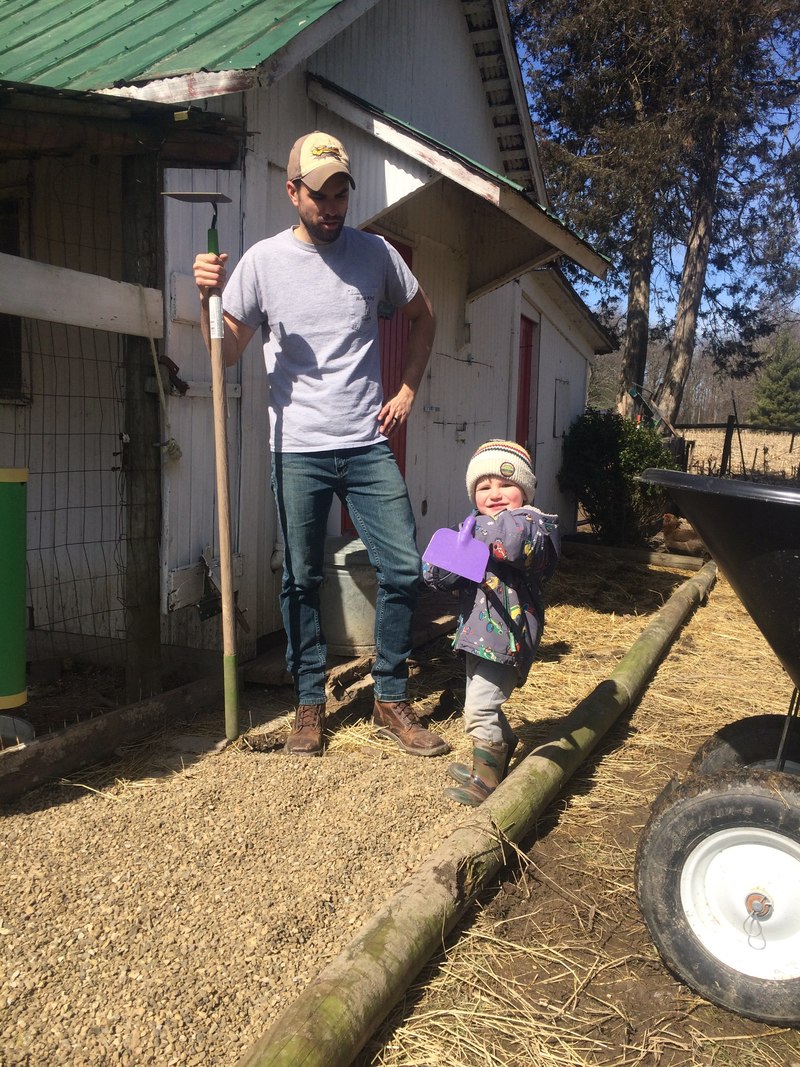
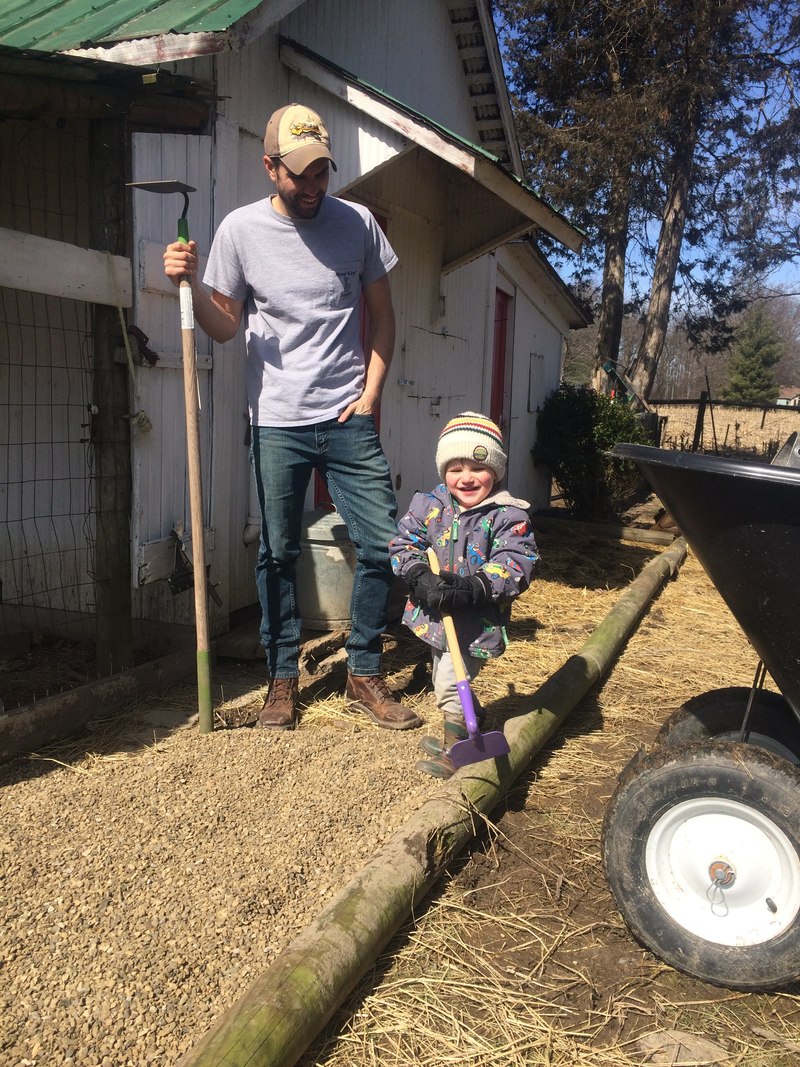
 Using left over fence posts we had, Danny created a frame to hold the gravel in place, securing them by driving some 10 in long hex bolts into the ground along their edges.  Then the Dannys then filled the inside of the frame with gravel, creating a nice dry path all along the front of the coop and goat shed. Little Danny loved helping shovel the gravel and help take loads over to the coop. He got out his own little garden hoe and followed his dad like a little shadow repeating, "I help my dad," over and over again.
The coop looks so much better and we now have clean chicken feet and clean boots. Harvey really seems to enjoy the gravel too and has been laying down in it as his new spot to relax. If we like it, we may extend the gravel path to the house so we have a nice mud-free patch to walk on the entire way out there, but we wanted to try living with it for a bit at first to see if we wanted to do more. 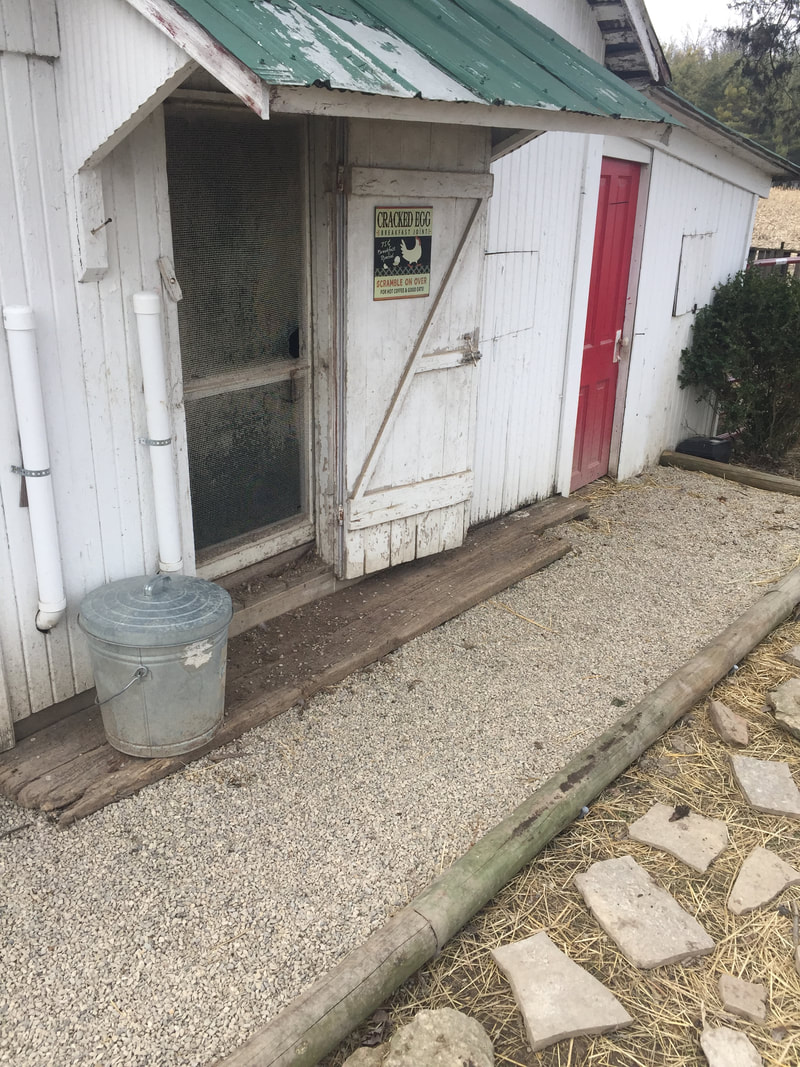 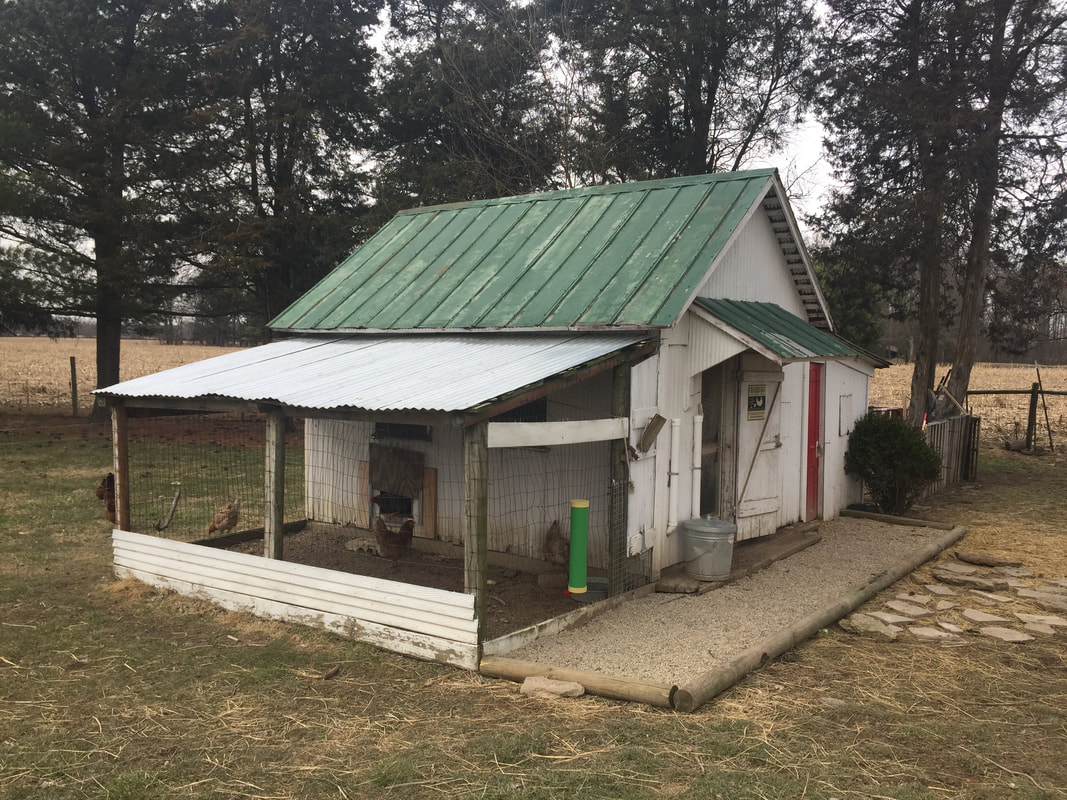 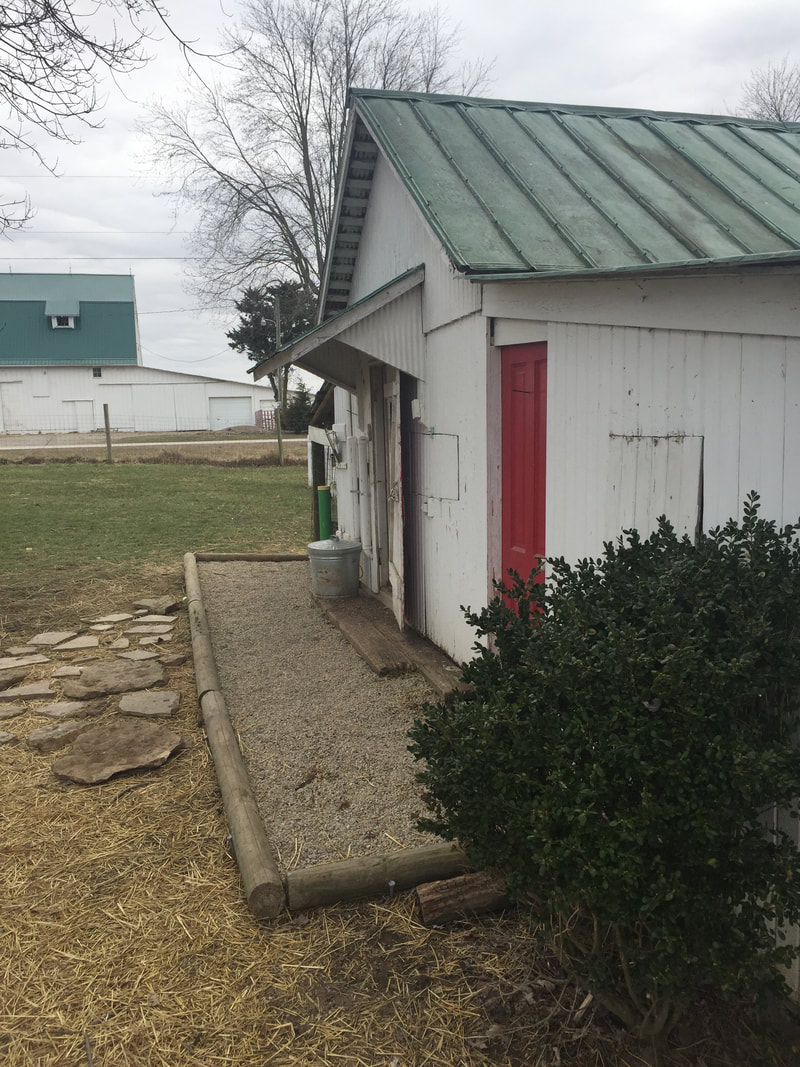 Even if we don't extend the path, it looks so much better and now we don't have to wait for the grass to grow back to get some relief from the mud. We still have the little stones left to make a path with and the gravel now blocks the holes under the coop where the cats (and weasels) liked to hide.
Sometimes husbands just know best.  While it's had taken us a while to get around to writing a post, we greatly enjoyed our new patio this summer and it has been such a wonderful upgrade to the house. Our old deck had been falling apart since we purchased the house, but we never wanted to invest much in maintenance because we always hoped to just put in a patio. It would be low maintenance and baby couldn't fall off, so we just planned on putting one on our house someday and getting rid of the rickety old deck. Well someday came sooner than planned thankfully, because we were a little blind to how bad the deck really was. Here was the state of the old deck:   Our deck was small, and a nasty brown color. I had woven chicken wire along to keep baby from falling through, since the gaps in the rails were so wide, half of them broken. Harvey used the steps as a surface to dive from, taking out anyone or anything below, making it kind of a safety hazard for everyone. I was convinced our mosquito problem was because of the plastic under the deck that held water every time it rained. My mom said it was quite the eyesore, (I think she said one of the trashiest decks she'd seen) but I didn't realize how bad it was until we ripped it off. She was right. 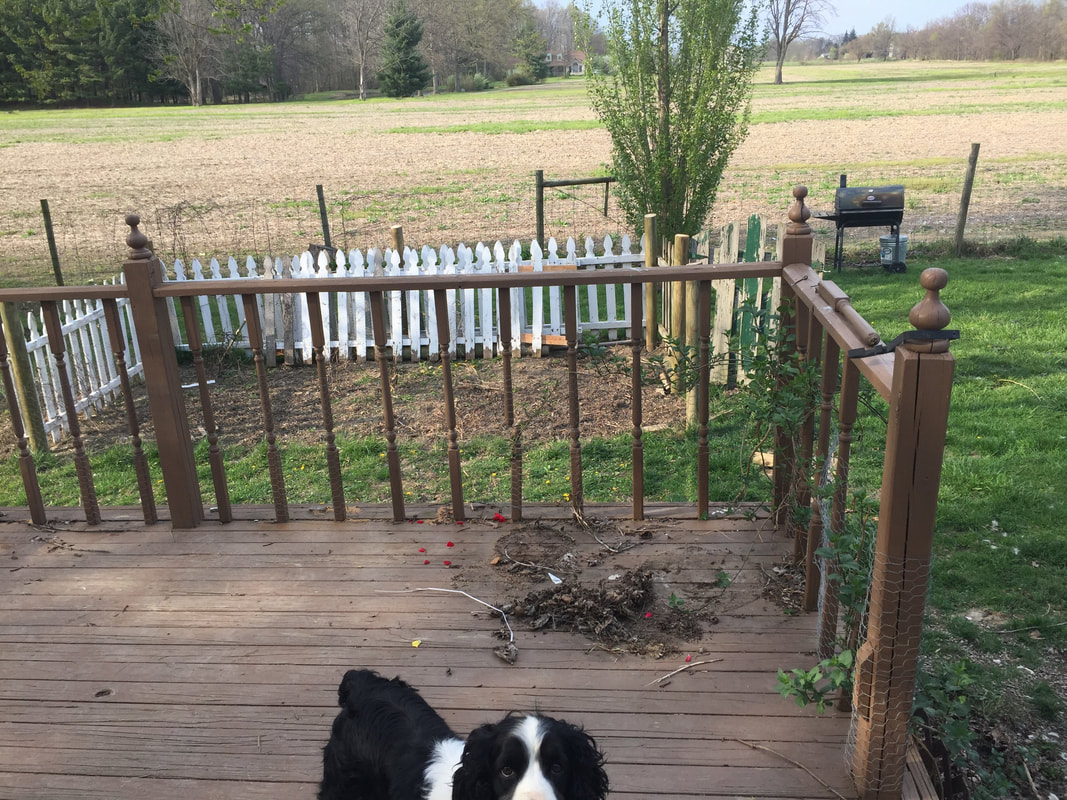  Baby fell off the deck on Easter and my mom told us it was time for a patio even if she had to do the work herself. She called someone the next day to give us a quote. Before we knew it we had a crew out ripping our deck off. The house already looked better with a dirt patch behind. It's amazing how sometimes you just can see what is so obvious. 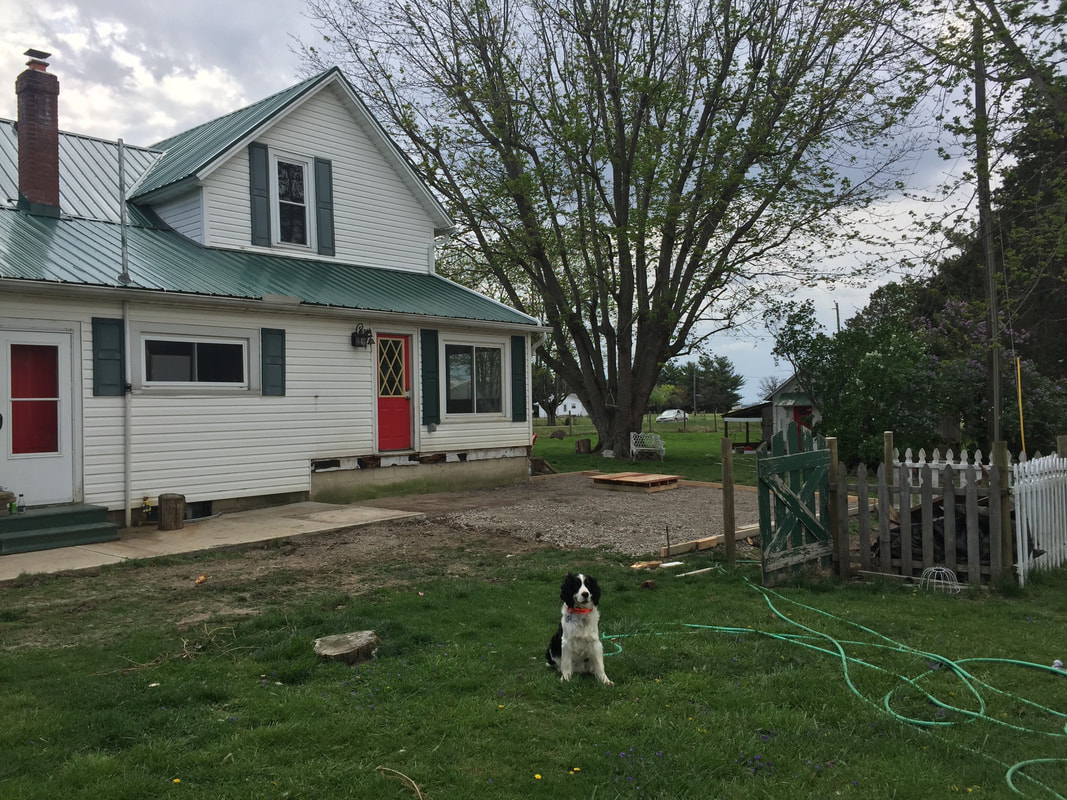 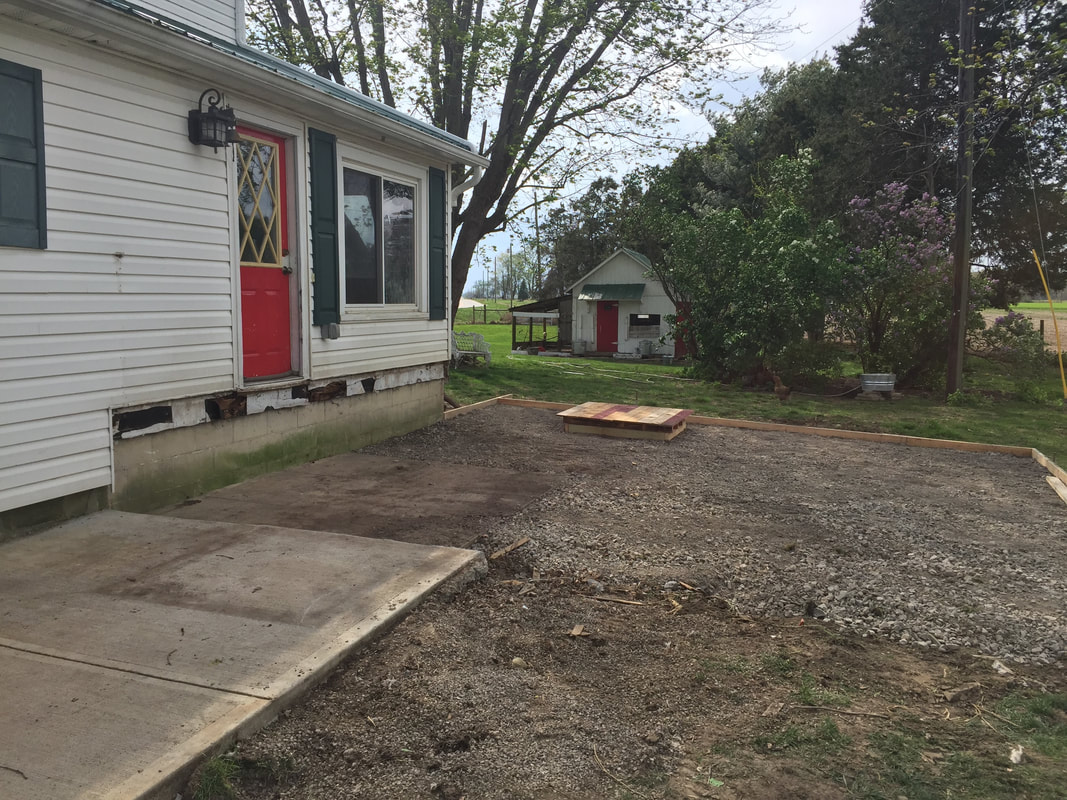 The work provided some much needed distraction and entertainment for everyone, and Danny set up camp with his chair in the mudroom to watch all the machines and tools they brought along.
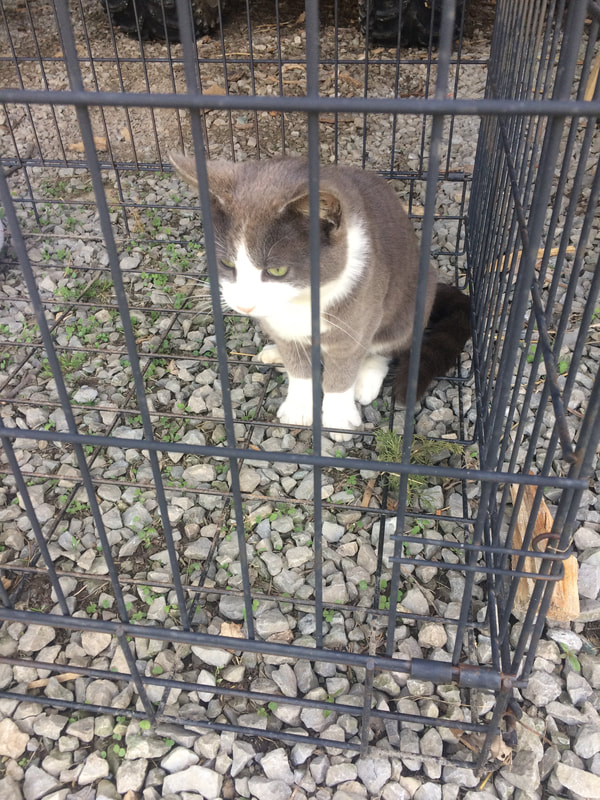
The dogs had no problem hopping up into the house, so we still used the back door until they poured the concrete. We found out we had and 8 in slope from where the patio would start at the house to the back end, which apparently is a lot. After a bit of disagreement with the crew we settled to do a gradual slope of 2 inches instead of the 5 inches they were suggesting. Our decision meant we would have a huge drop off on the back corner, but Danny came up with a great idea for dealing with the issue. After Danny made them come back and change it to what we wanted, the crew admitted we made the right choice, they just weren't going to say so with the manager around. No one wants to feel like they are sliding off their patio. They cleared the spot, leveled it, set the frame and poured the cement. Originally we asked for a nice curve on the one end, which I used the garden hose to show exactly what I meant. I came outside to find this. 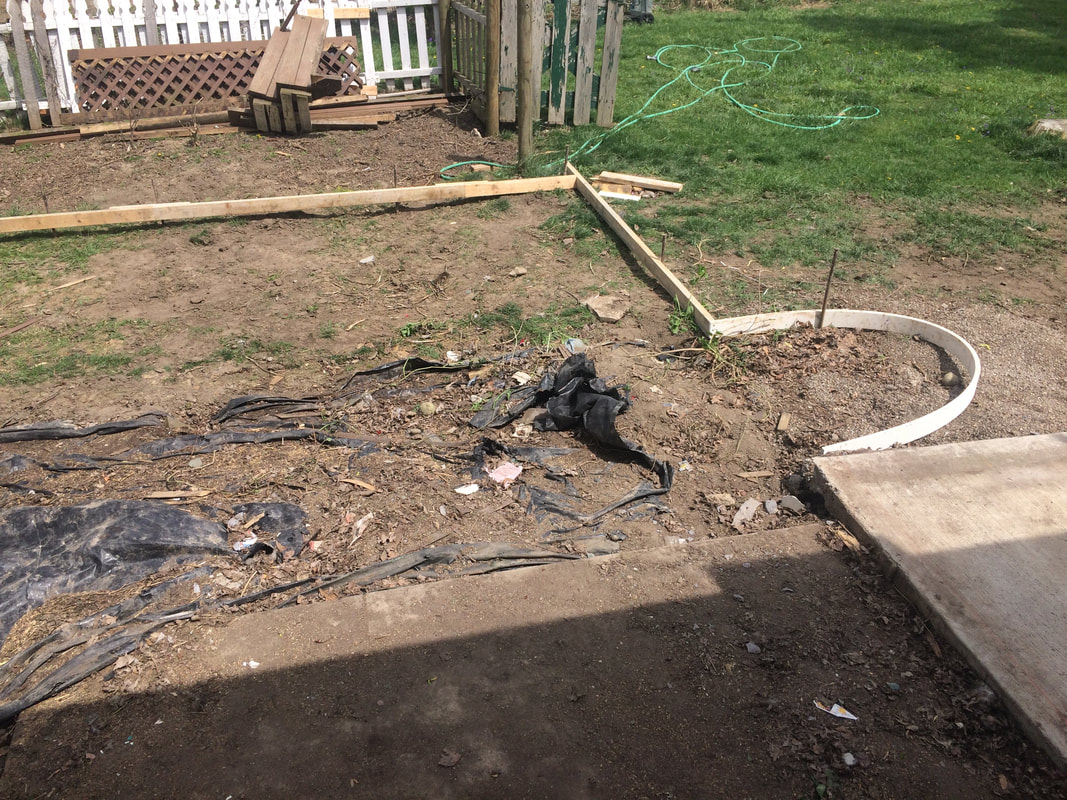 Obviously they weren't getting the idea at all and I decided if they couldn't see the difference between what I did and what they did, it was better to stick with a rectangle and not challenge them beyond what they were used to.  In adding the patio we lost our garden and had to move it to the side yard. We also lost the dirty windows from Harvey standing up and scratching the entire glass with his muddy paws. (See picture below) I couldn't wait to no longer have a muddy sheepdog swimming against my windows and scratching the screens all up.  While the cement was wet, all the critters weren't allowed out so I had angry chickens locked in the coop, dogs in the house, and two cats locked in the dog cage in the garage losing their minds. I happened to look out the window after they poured and smoothed the patio and saw huge craters in the fresh cement. I ran to the other window and saw only one cat in the cage. Miss Polly, who had unknown, hidden kittens at the time, managed to finally squeeze through the holes in the cage, and run right through their work. The workers pointed me in the right direction and I found her with red up to her belly. I failed to wash her in the tub, quickly deciding I rather have a red cat than scratches all over me and put her back under the coop where she just HAD to be. It at least provided some entertainment for baby and the dogs later.
 They finished stamping, and then came back to cut it and pour the steps. The guy who did the stamping wasn't happy with the turn out. Due to the shade from the tree, it dried unevenly making the stamping very difficult, but we actually like the depth variation. A real brick patio would settle and not be a perfect slab so it seems more authentic. Everything drains away from the house without puddling so we're happy.
 Danny had the amazing idea to build raised beds around the high parts with a railroad tie in the middle for a step. He quickly constructed them got them in place and I filled them with herbs, strawberries, and morning glories.
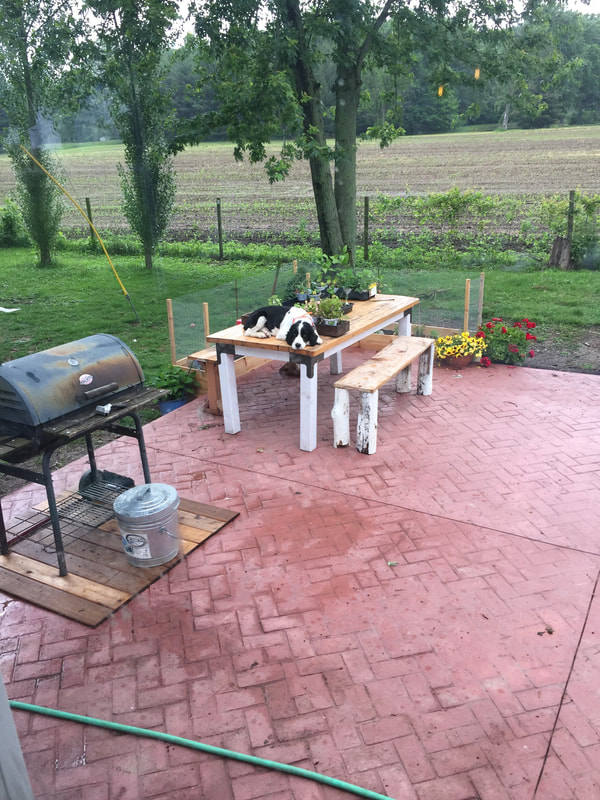
Eventually we will have a boxwood hedge on the ones side and our grill sits on the wood cover Danny made to go over our well. 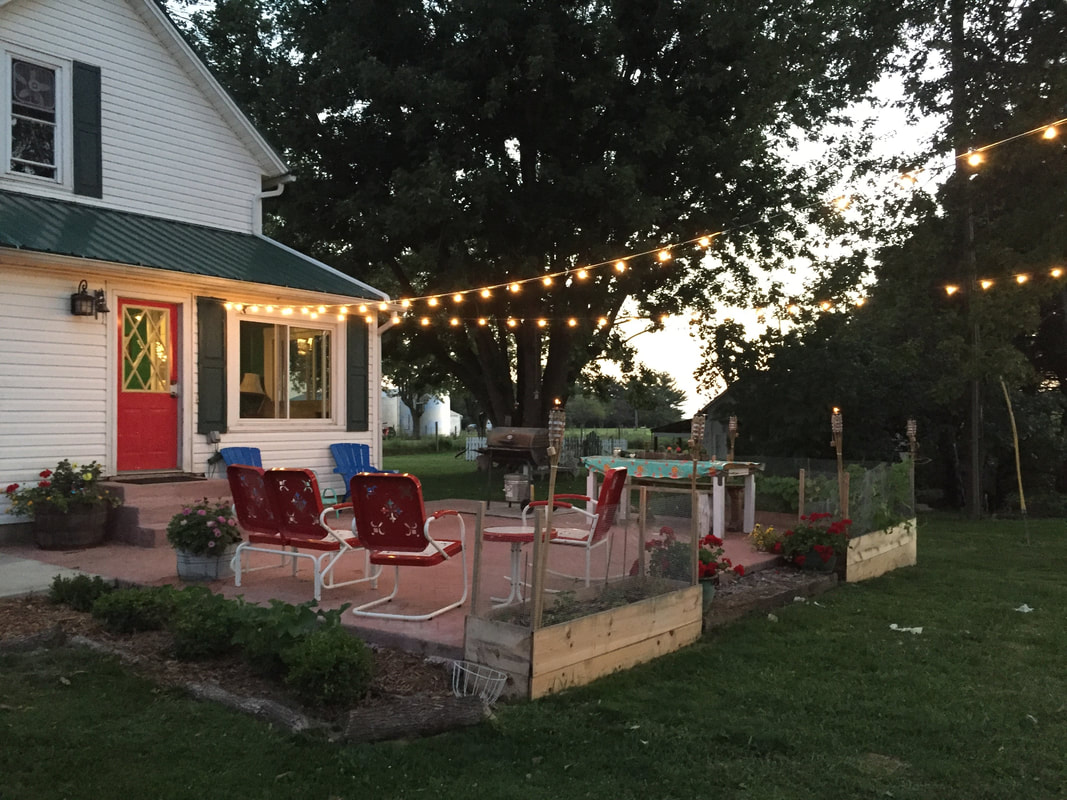 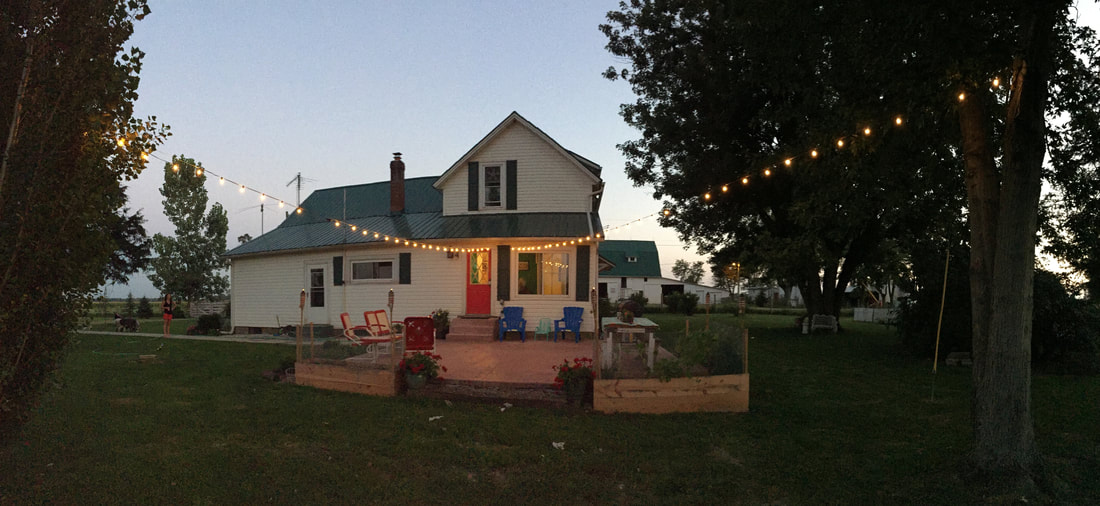 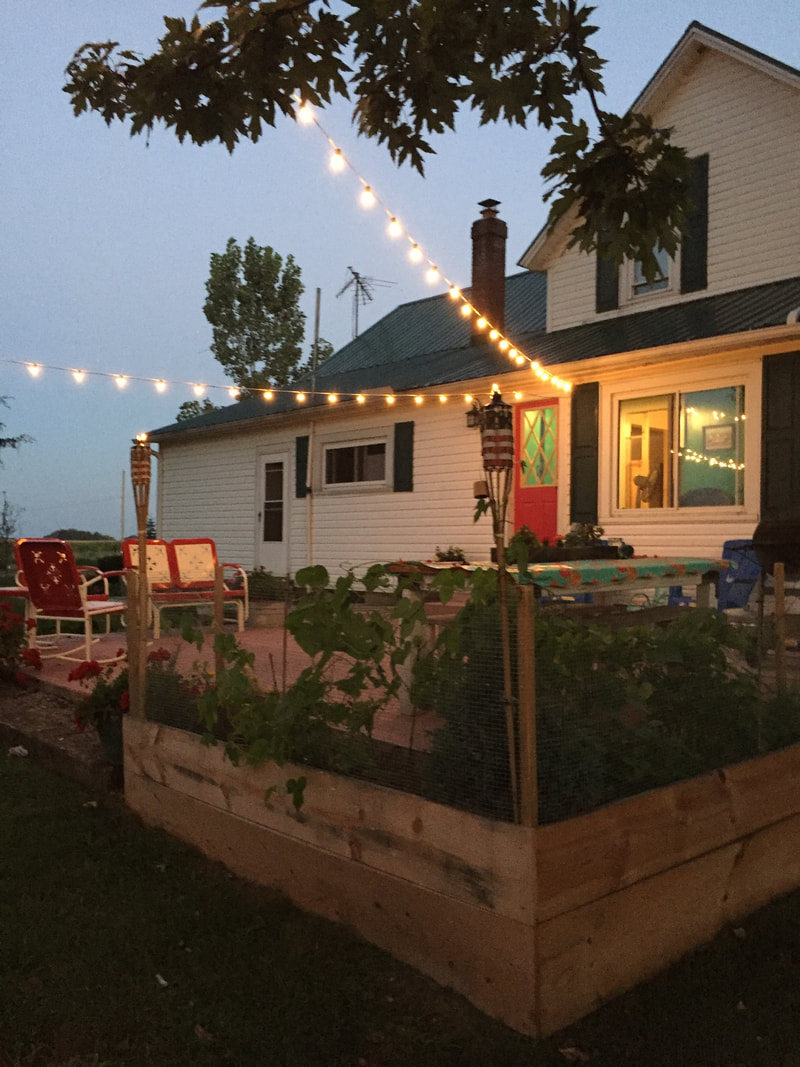 Day or night the patio has been a great place to relax. Danny's table fits wonderfully and there's plenty of room for people to sit. The string lights were just the final touch and are so pretty to look at every night. We added tiki torches to the gardens and plan to add an additional railroad tie on the edge going to the chicken coop to give a more finished look.
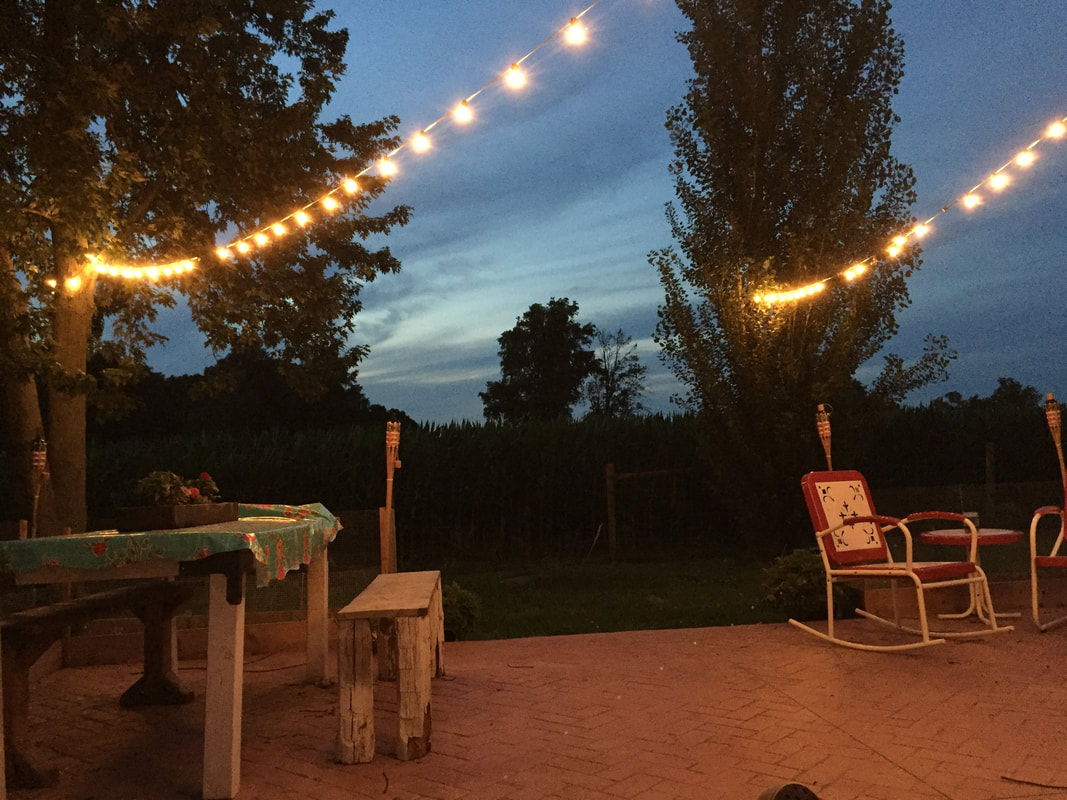 Baby loves coloring on it with chalk and taking summer baths in the shade. I've begun going out there to workout in the morning and Harvey can no longer stand and scratch our entire window and screens to come in. The patio was such an improvement on the house and has been a space the entire family has enjoyed, goats and dogs included.
Our Very First Look when we visited the house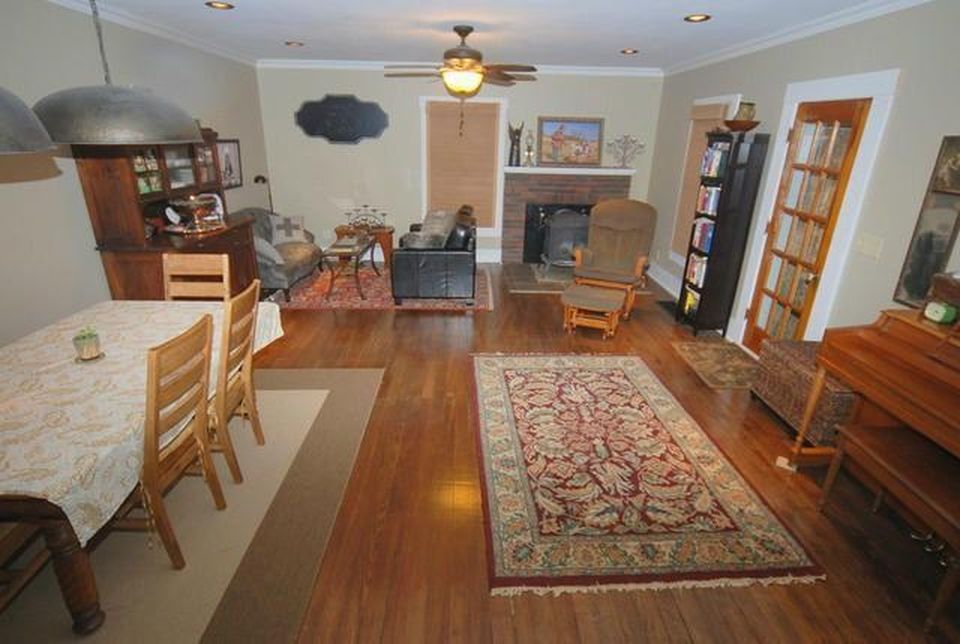 move in and lightened floors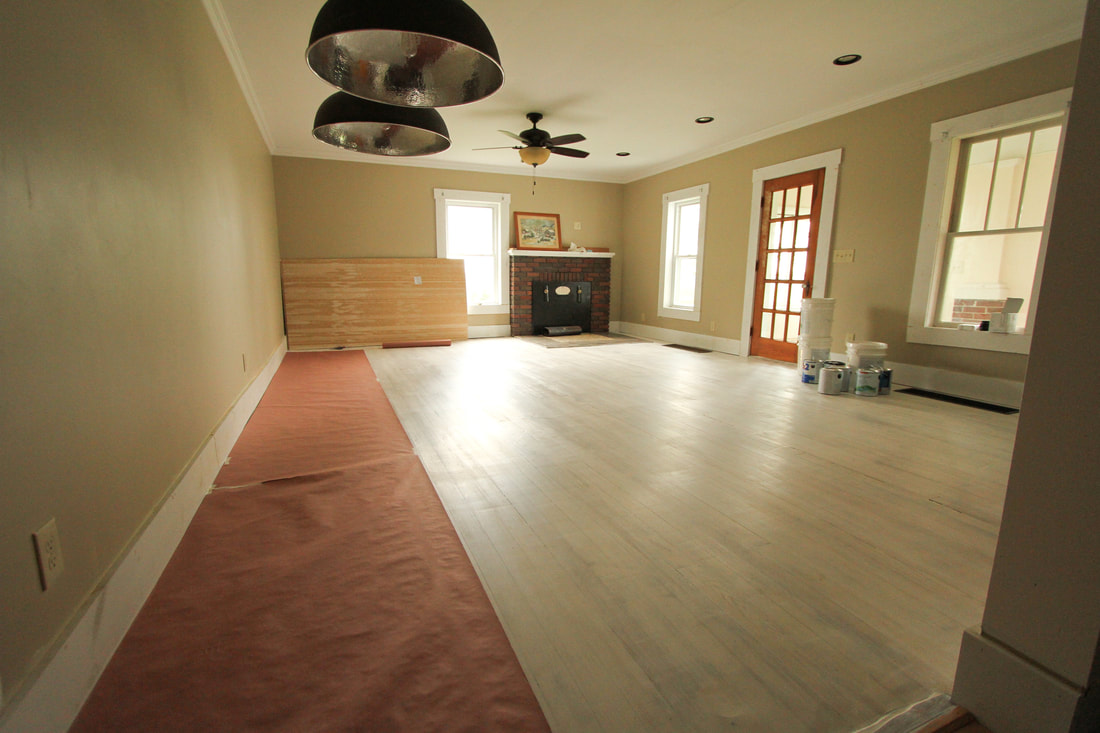  New Wood Stove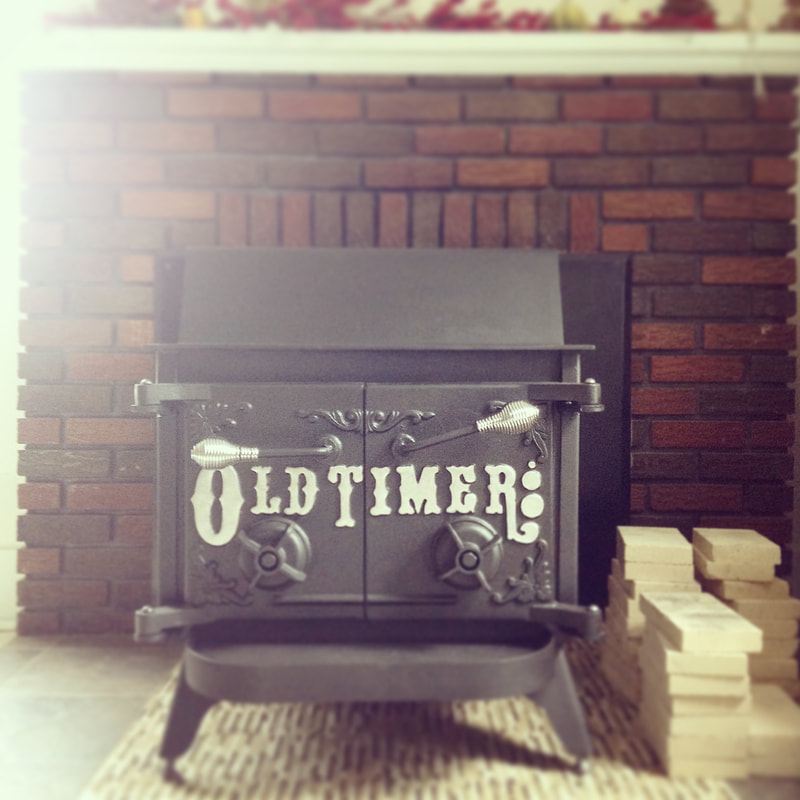 First Christmas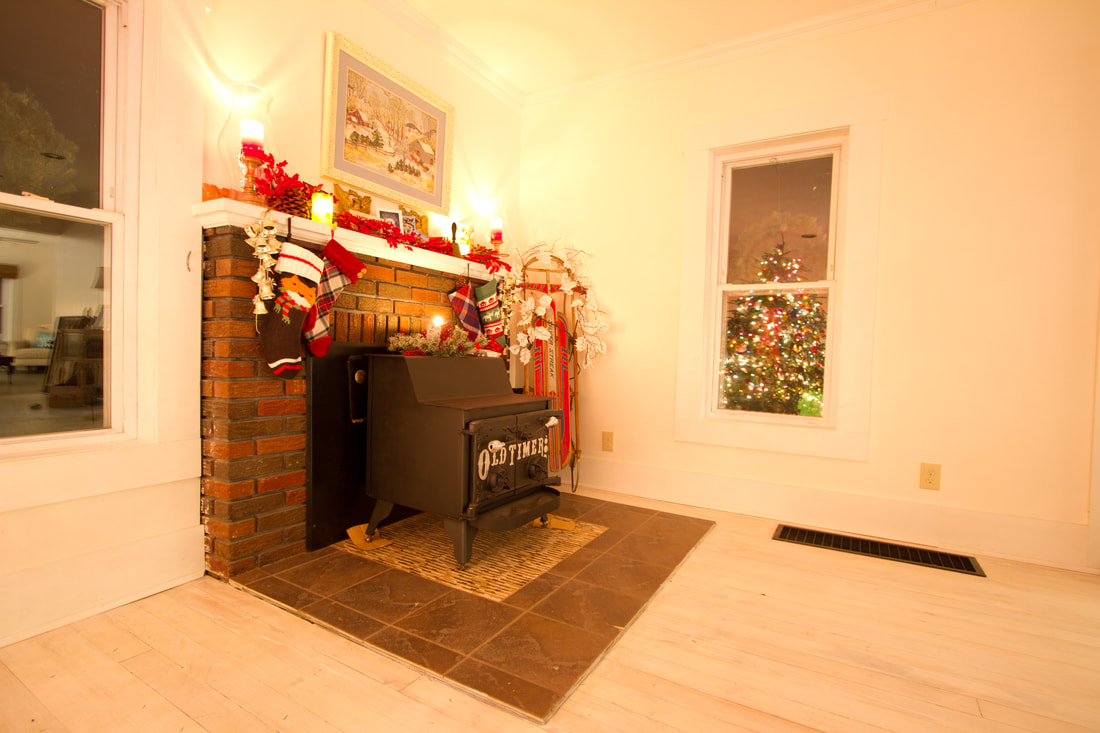  Finished Project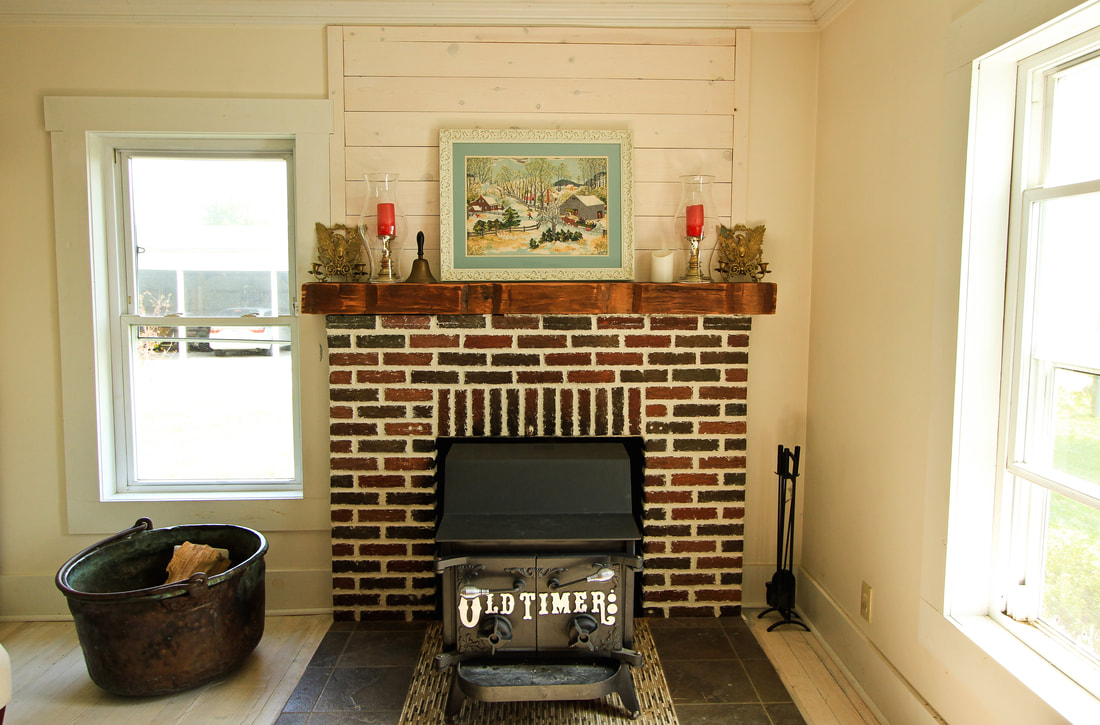 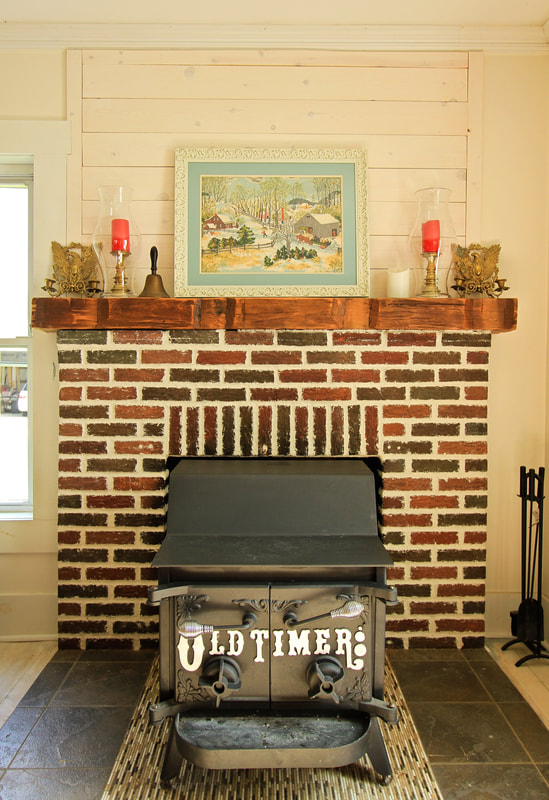 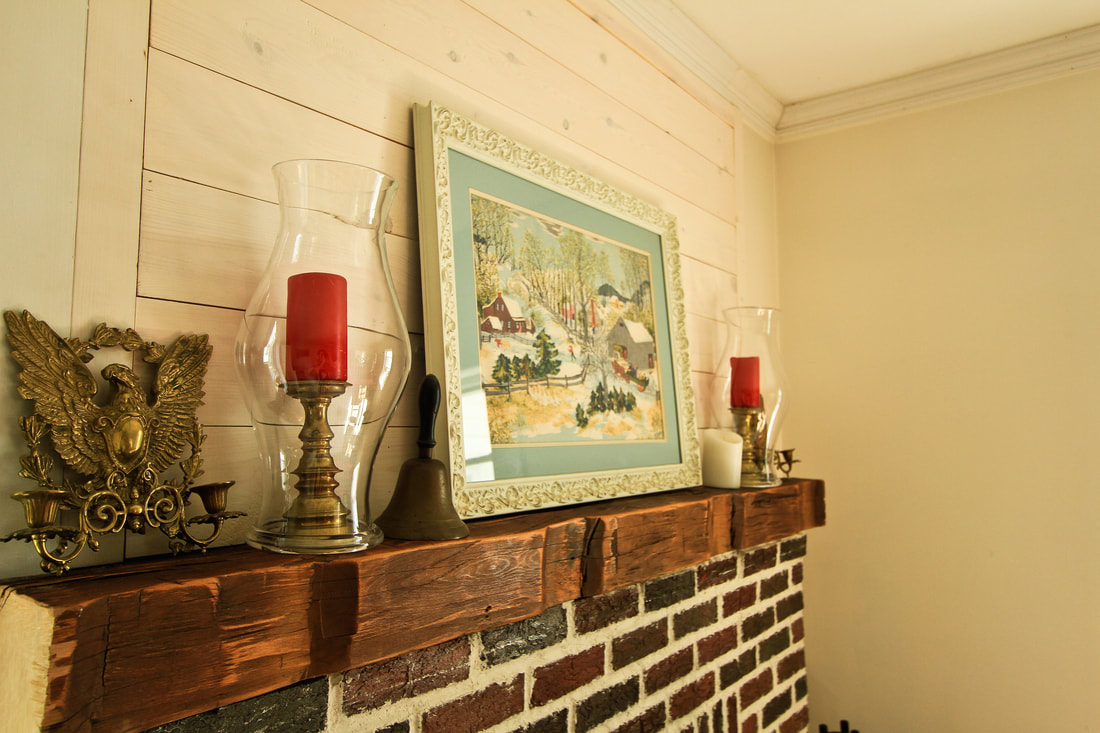
Oh my this may be my most favorite project we've done yet. I love when you vision actually works out just how you want!
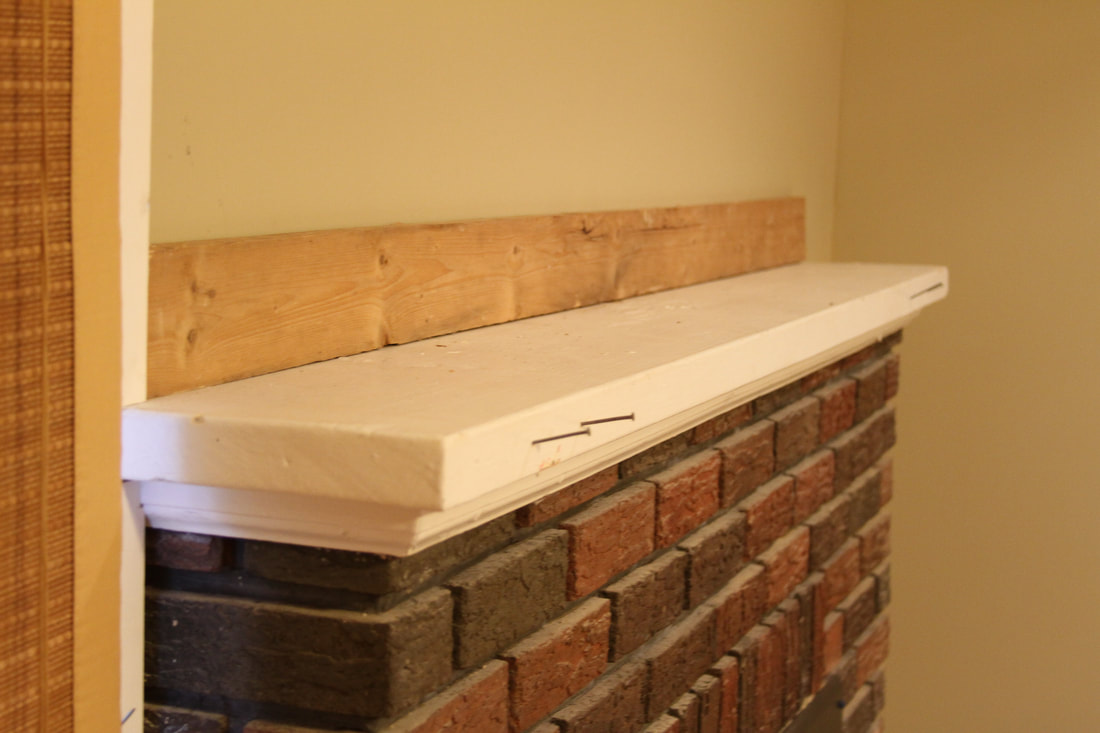
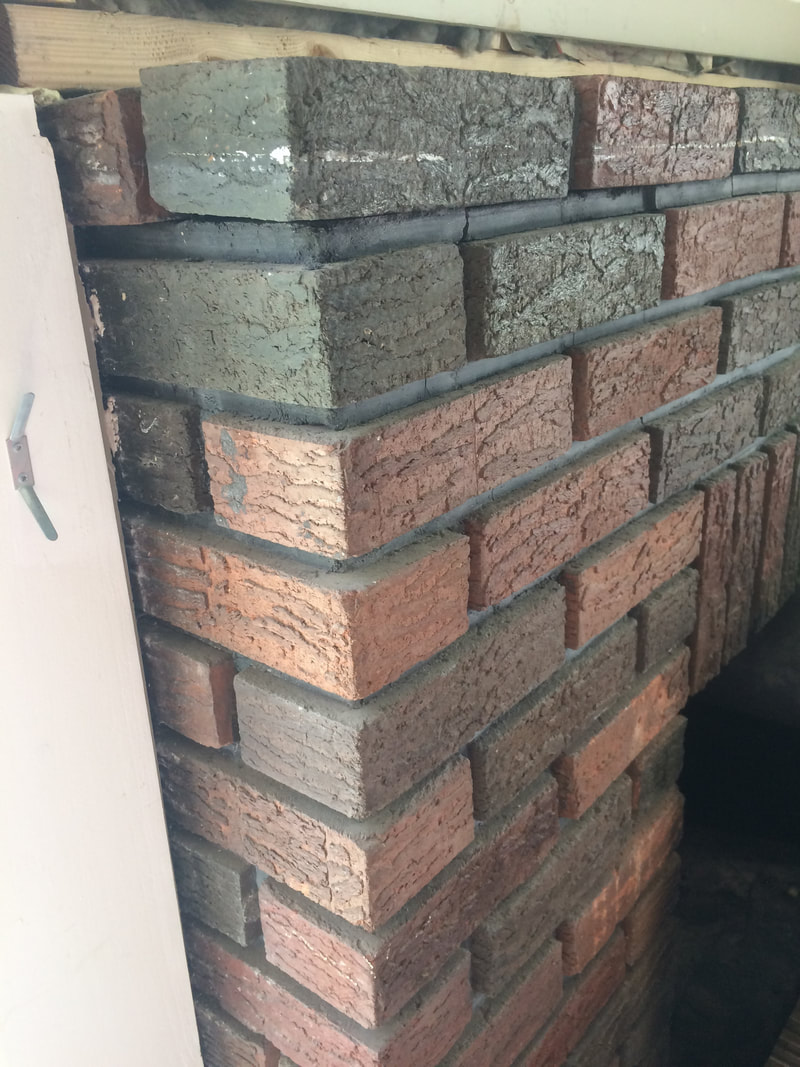
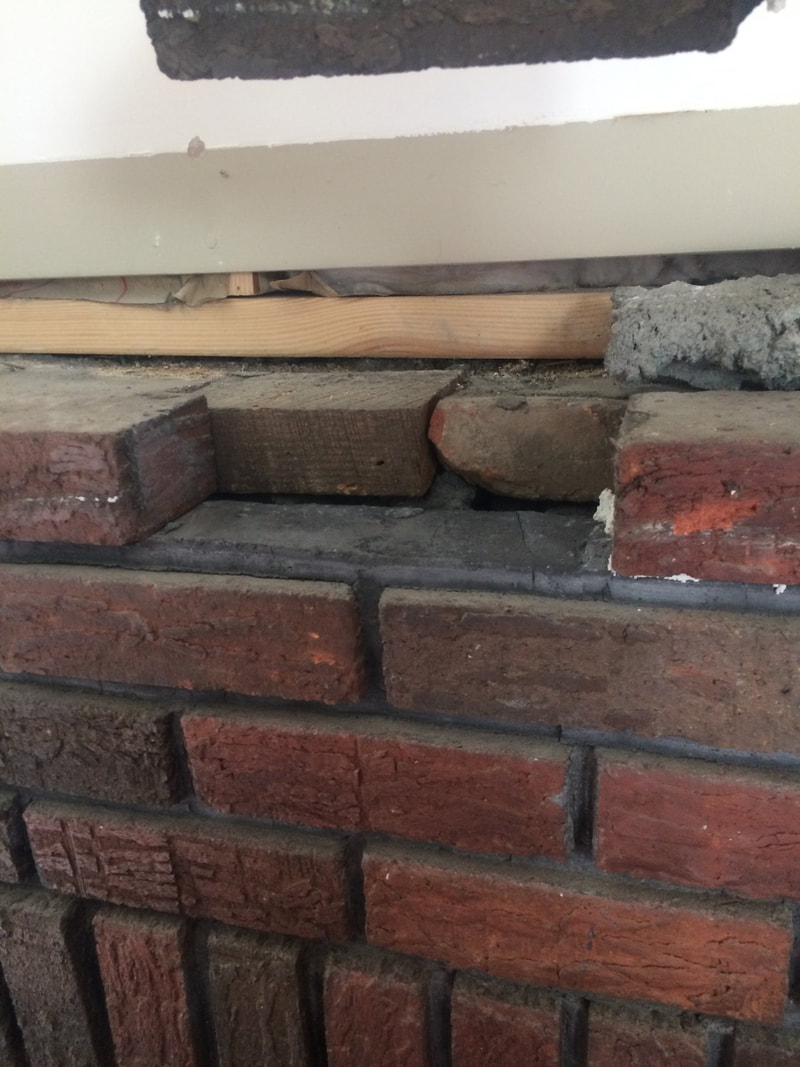
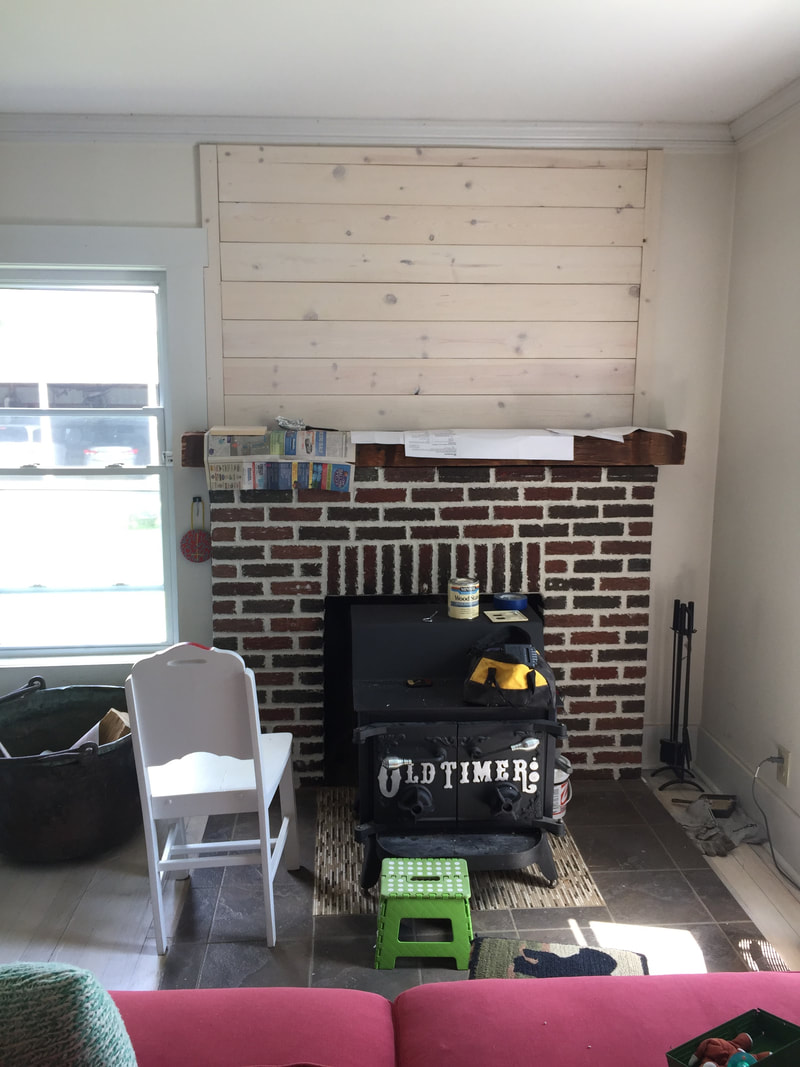
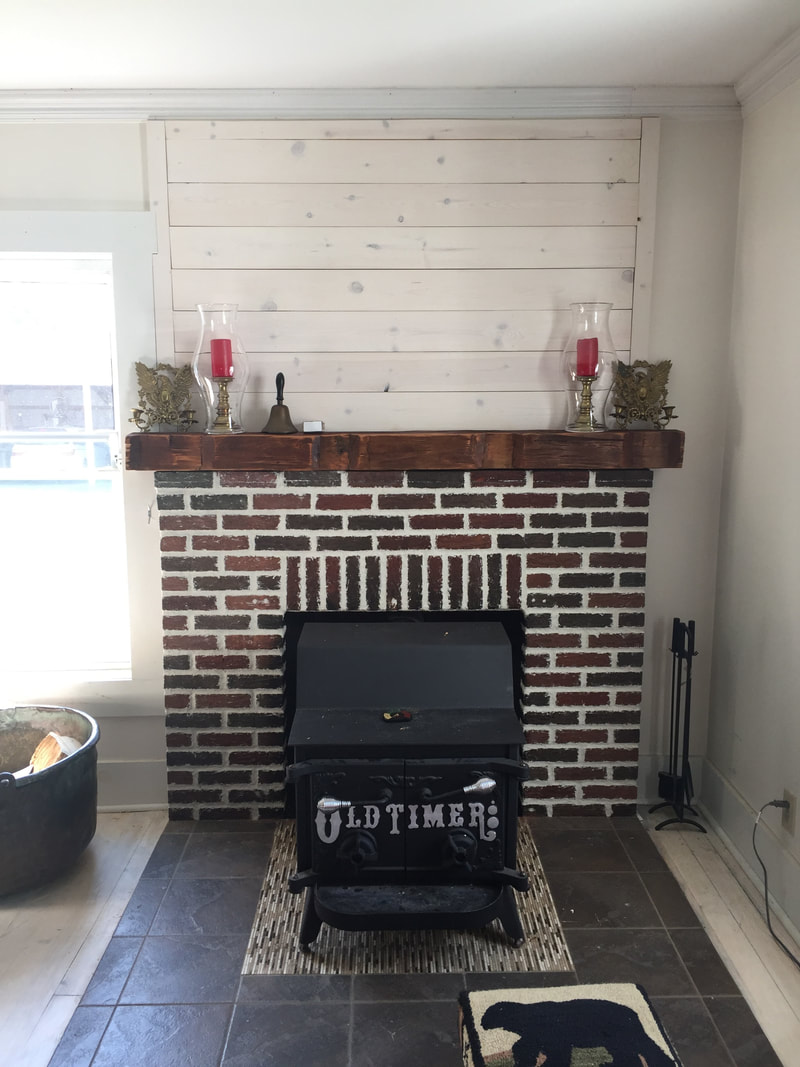
 I never was a huge fan of our fireplace, which was a shame, because a real wood burning fireplace was a must have on our list when we bought the house. The brick and mantel just looked cheap and it didn't have that old home feel, but it was a working fireplace so we figured someday we could fix it up to our liking. The mortar was grey and didn't come to the edge of the bricks, which meant spiders and dust filled the gaps. The mantel was just a white board with nails poking out and a 2x4 covering up a hole in the drywall.
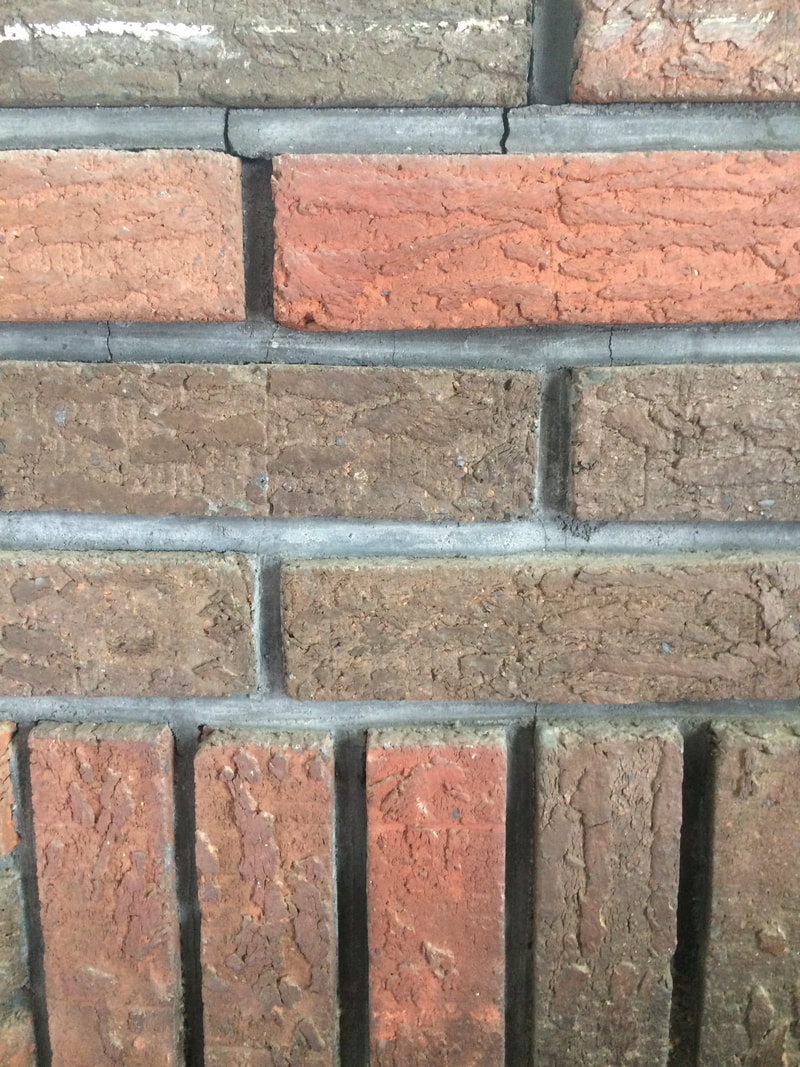
I love red brick with white mortar, and our brick, although cheap looking was the right color. Originally I thought it was one of those fake brick sheet things, but when Danny took the mantel down I found out the mantel was actually made of real bricks, and the top row was completely loose! 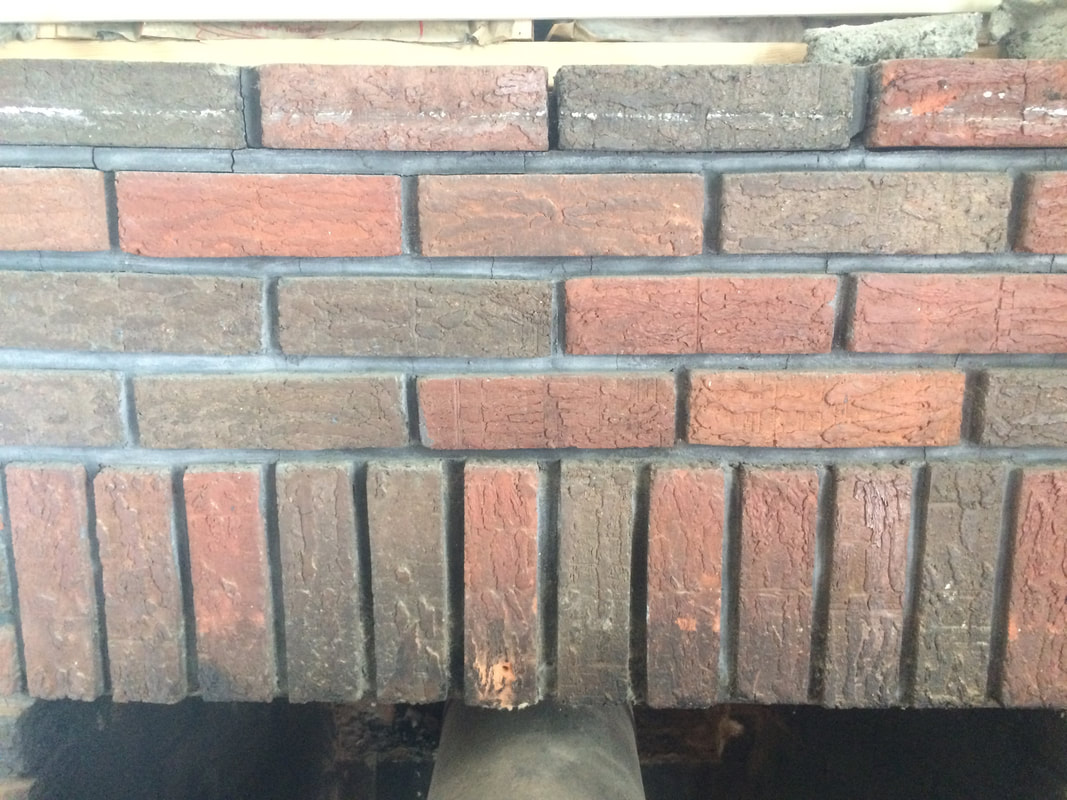 I had this idea to try to re-mortar the brick and just simply cover up the old, gray mortar. I knew I wanted it white and messy, the cleanest acceptable look was the butter joint look, but I also loved the german smear look. I decided to take the risk and if it didn't turn out I'd just paint the mortar and brick all white.
This project kind of became my baby. I knew exactly the look I wanted, researched it to death, and made sure I really had made my decision, and then told Danny I wanted to do it.
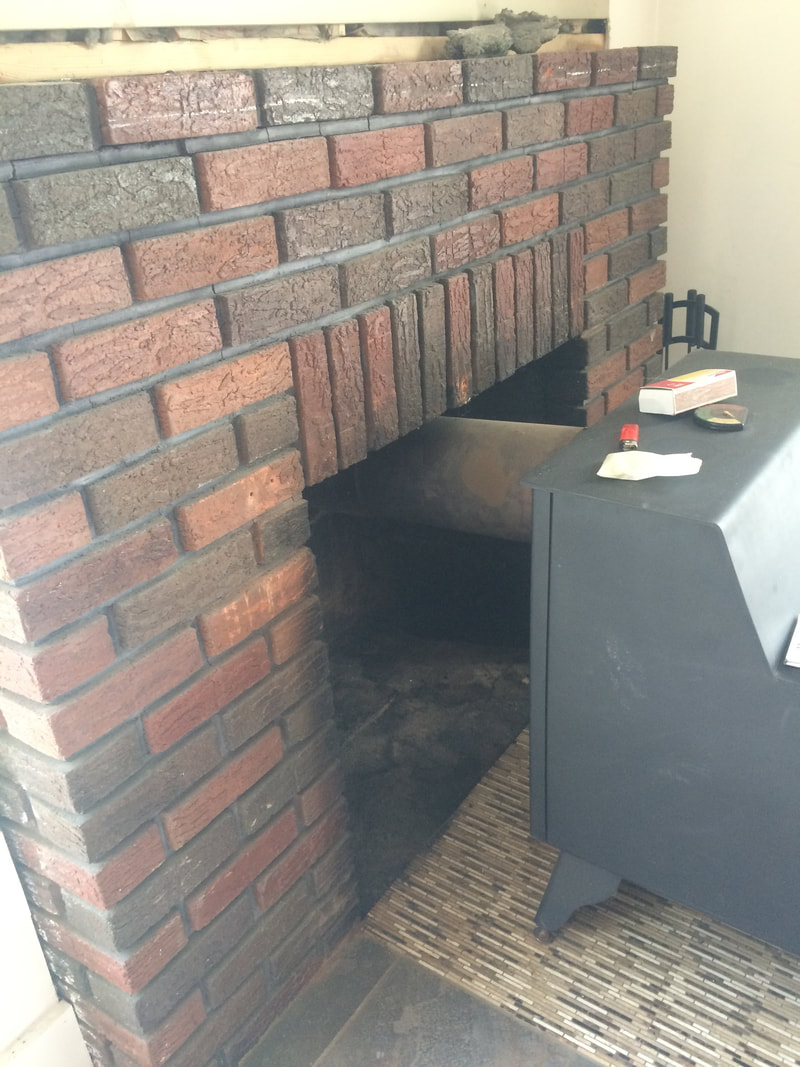
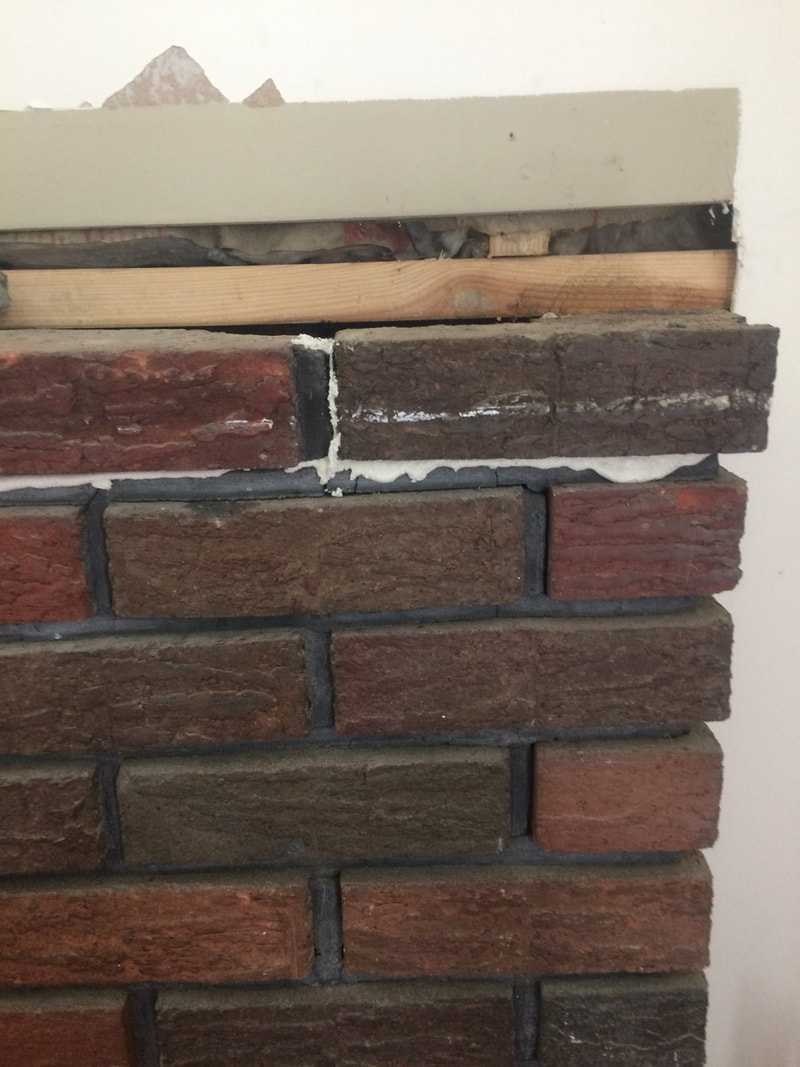
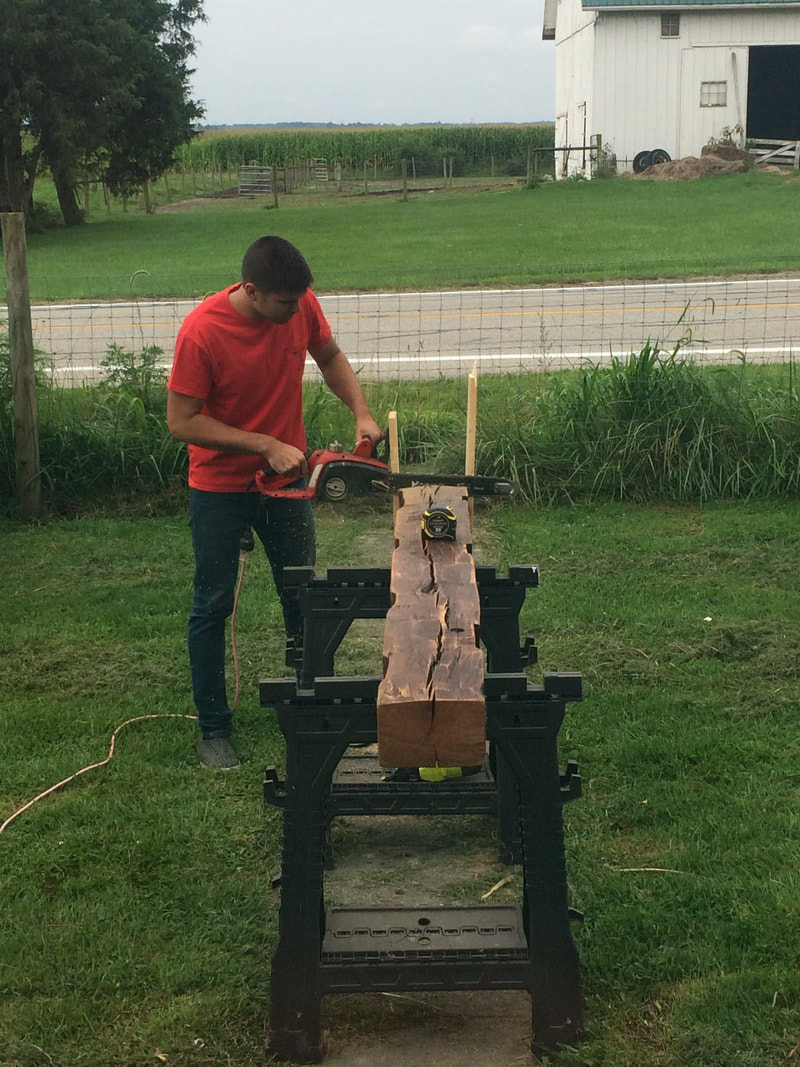
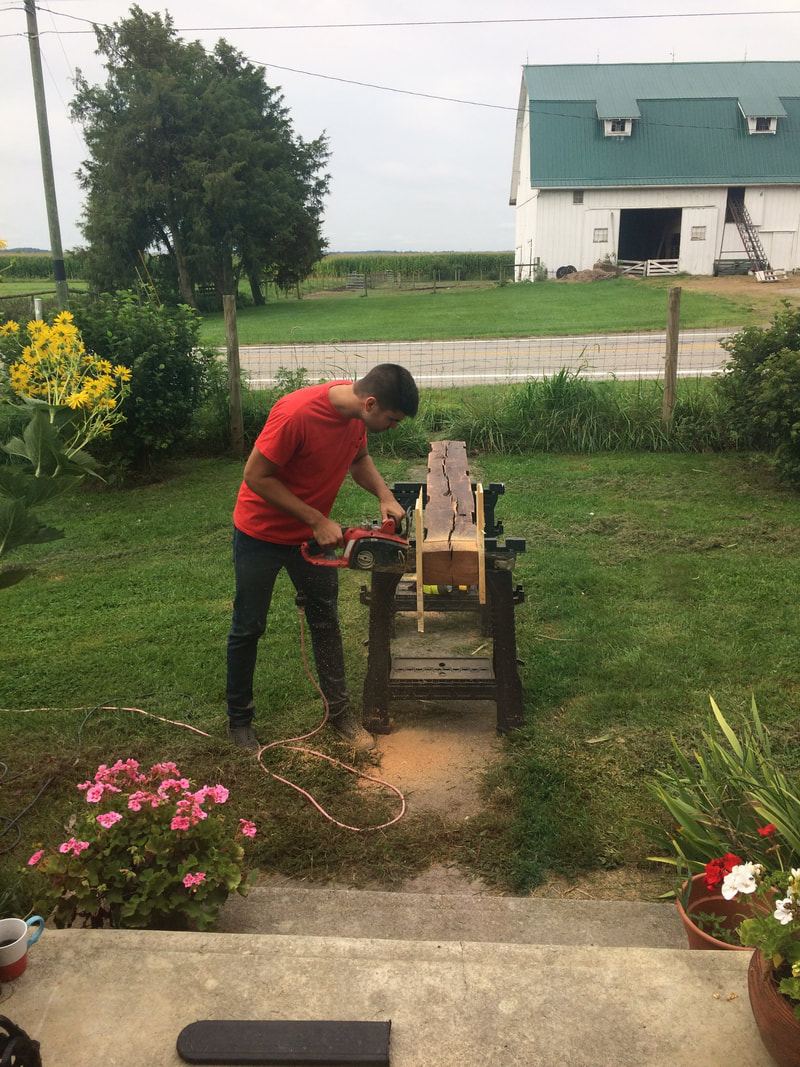
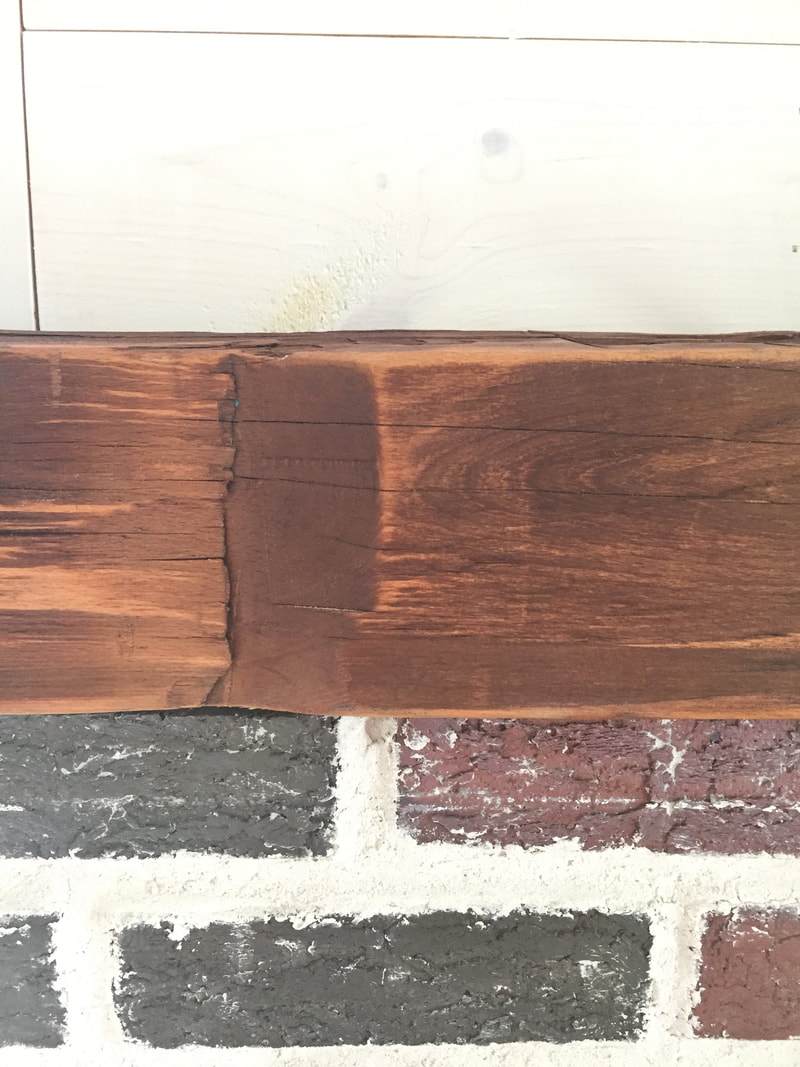
I couldn't find anywhere online where someone just grouted over for cosmetic reasons, so I went out on a limb and decided to just try it. I pulled up my favorite blog post I found of a fireplace with a similar look, ordered my mortar, brush, piping bag, and trowel from Lowe's and set to work. I had to reset the entire top row since it was loose, crossing my fingers in hopes that I could figure out how to set brick. Halfway through the project, I ran out of mortar, being that the gaps in the bricks were much deeper than I thought. But, it was looking good. Unfortunately, the next morning all the mortar had cracked. Almost every spot I had spread the mortar had cracking all through. While it didn't look horrible, it wasn't what I wanted and I felt it looked very DIY. Of course in my frustration, I forgot to snap a fail photo. The day I worked became very humid so for the second round I waited for some cool days of low humidity in the forecast. I filled all the cracks from the first round of mortar and then finished up the areas where I had run out. The cooler weather did the trick and now the mortar was strong and smooth. Of the new areas I filled, there was some mild cracking, but I went back in and just lightly covered the cracks with more mortar and that did the trick. All in all, it took 4 different days for mortaring, had I had enough I could have done it in 3. The vertical bricks had to be done in layers because the mortar would gloop if I filled it too much. 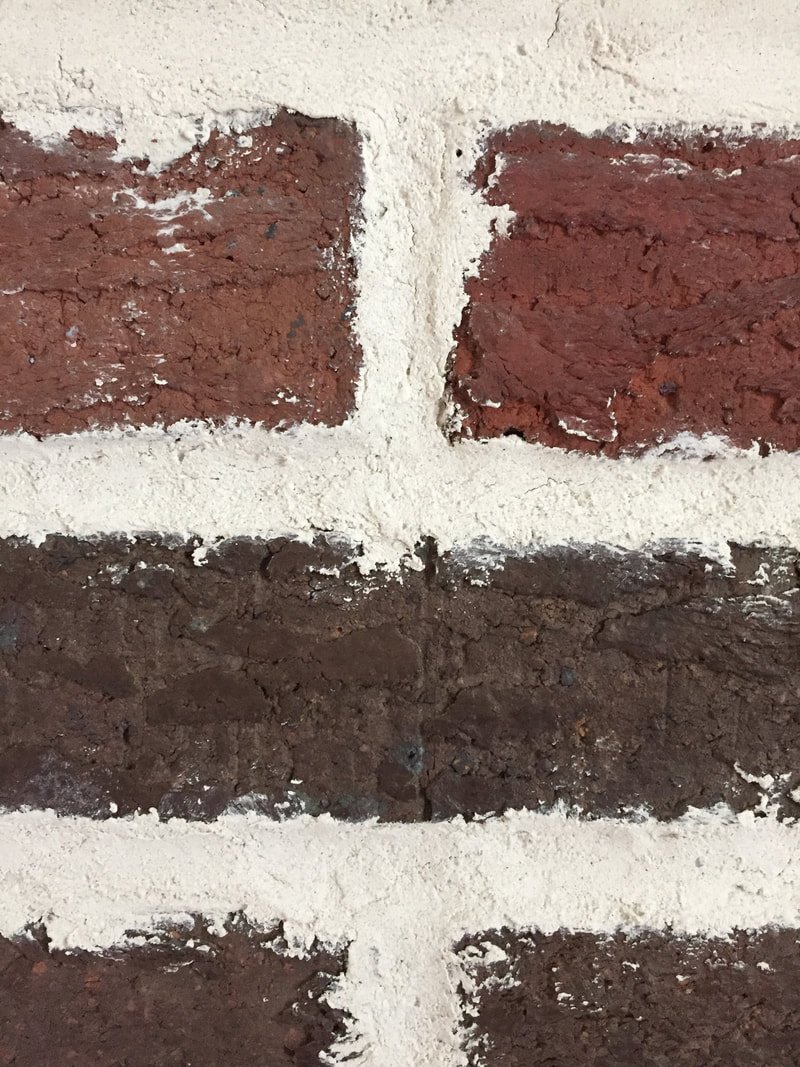 I wasn't sure how I felt until I saw it finished, but I love it! I thought I'd go back and brush some mortar on the face of the bricks, but I tested the view for a few days and decided it was perfect. The mortaring was my project, but the the mantel was Danny's, so he took over getting the beam installed. The old beam was a Christmas gift from my parents and was exactly what we wanted. Danny had to trim down the edges a bit using his chainsaw which made me nervous, but he did a great job.
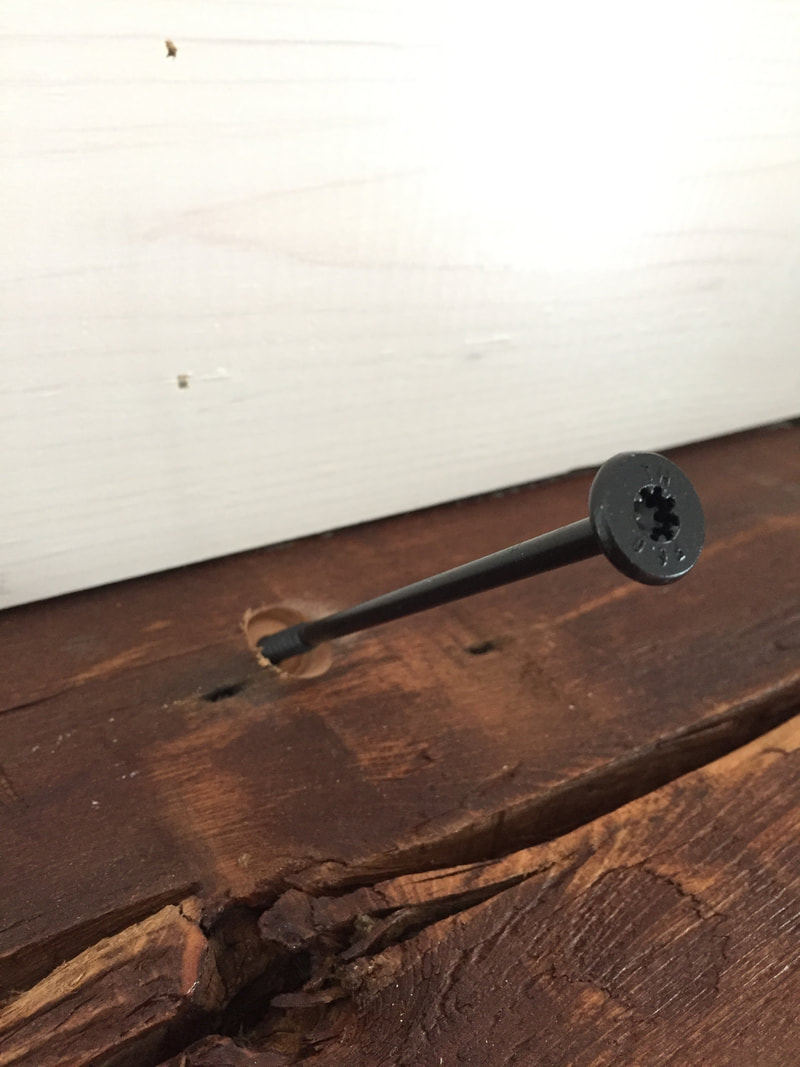
He secured it with some structural wood screws and I went back in and filled the gaps between the beam and brick with our leftover mortar, which of course I ran out. When it's in the budget, we'll purchase a third tub of mortar to finish it off. It's one of those things that we only really notice, but it is just that final step to make it look perfectly complete.
My mom suggested finishing it off by doing shiplap up to the ceiling to unify the fireplace and wall. We decided we liked that idea. Danny cut some pine boards to size, nailed them up, and whitewashed them all in a day. I honestly can't believe it is the same fireplace!
I just love how it turned out and we can't wait to get some fires roaring in the fireplace!    The picture will be hung, but we didn't have the right anchors and I was too excited to wait to share.
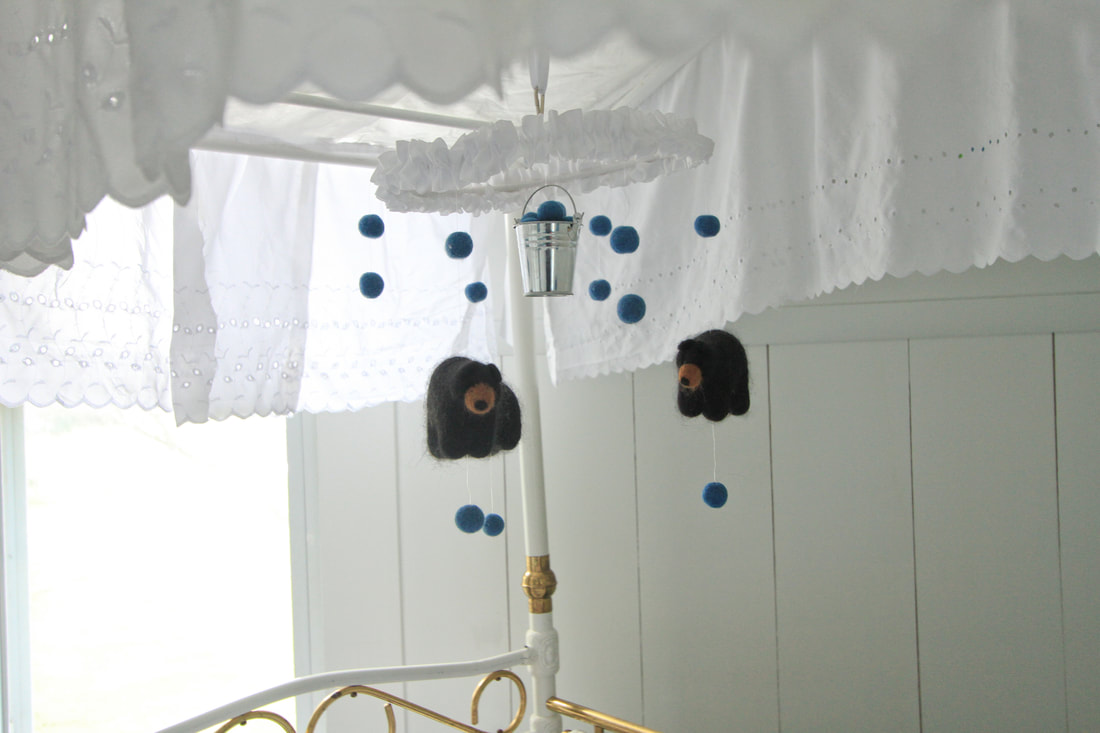
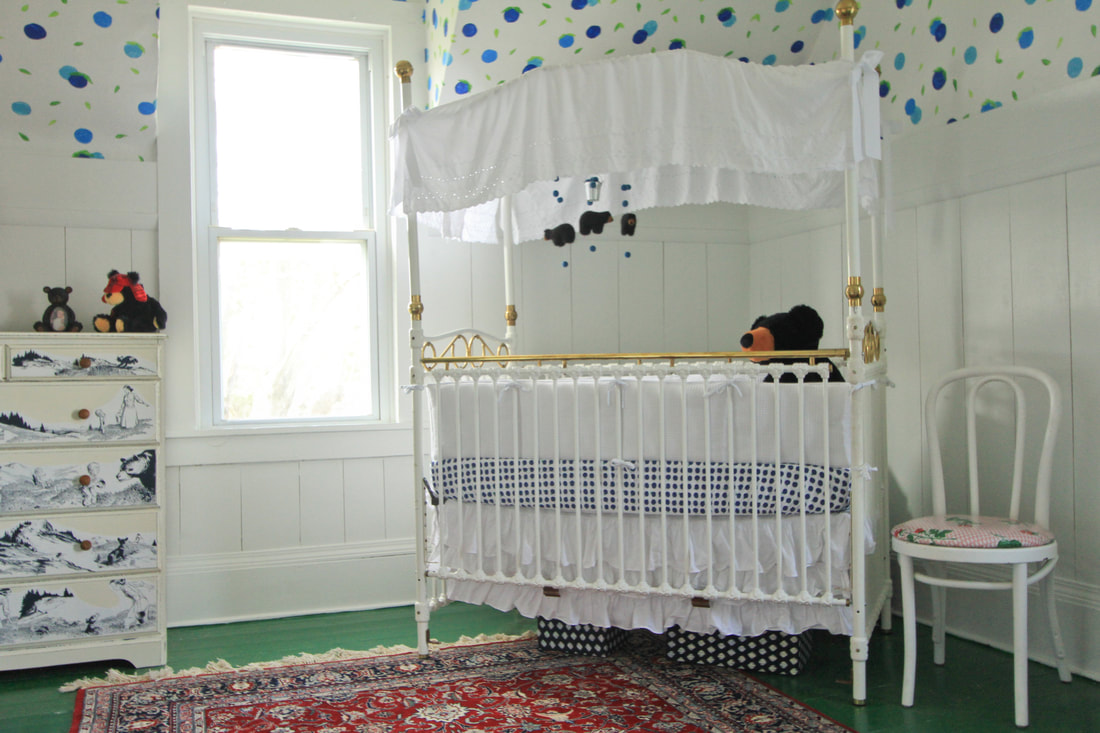
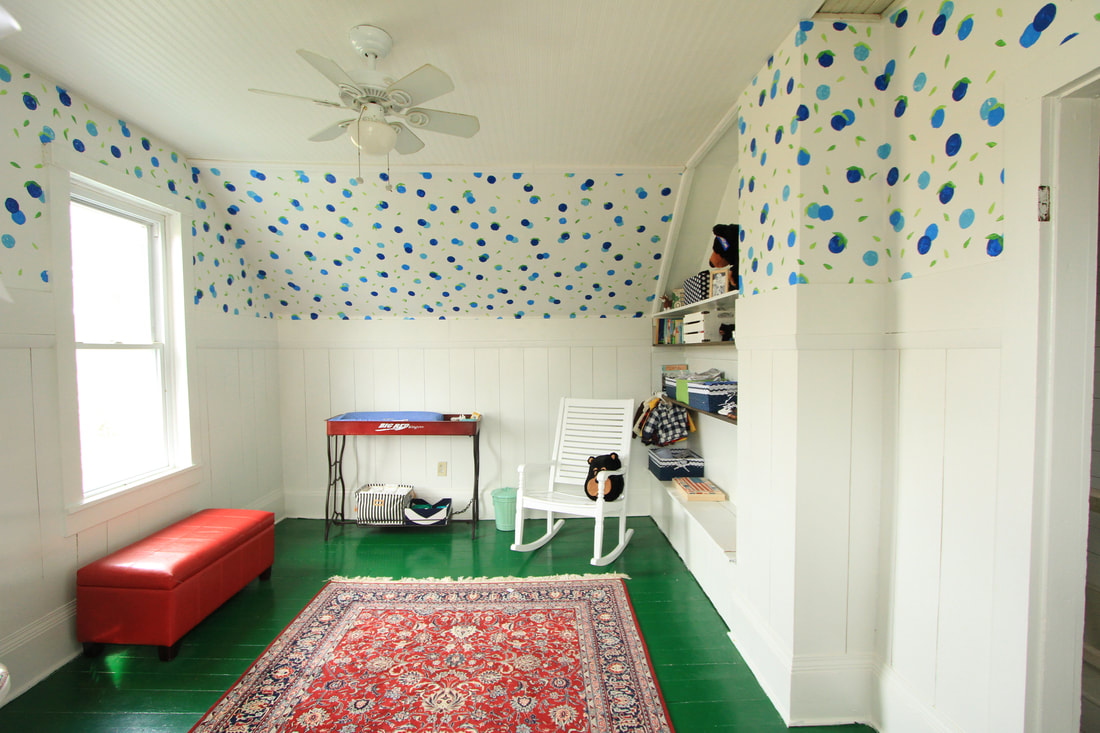
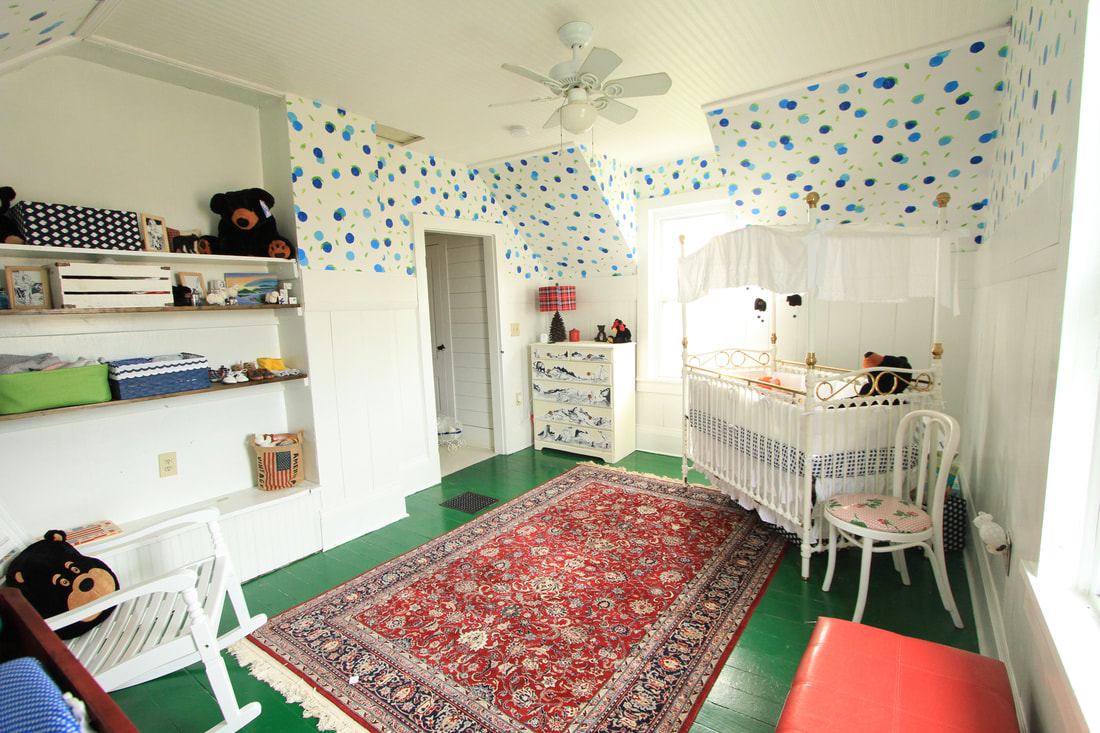
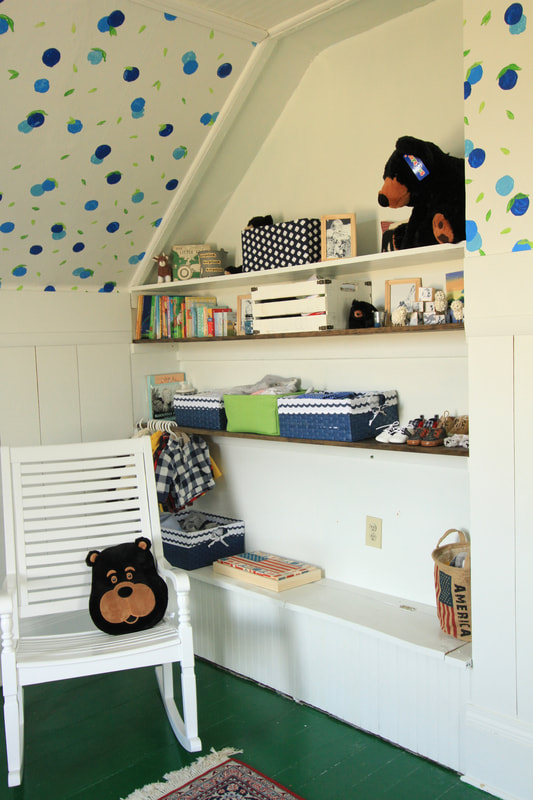
Archived From CHICKENS CHALKBOARDS // MARCH 22, 2016We are still loving our nursery and baby Danny is enthralled with our DIY wallpaper. I never considered how he might love gazing at it, but they say babies like contrast so it makes sense. He seems to have a thing for polka dots, so he's got the right room. Of course I still want to tweak things here and there, but I figured I'd better share it, because who knows when I will really call it complete. The room is so happy, bright, and youthful. These pictures just make me smile. 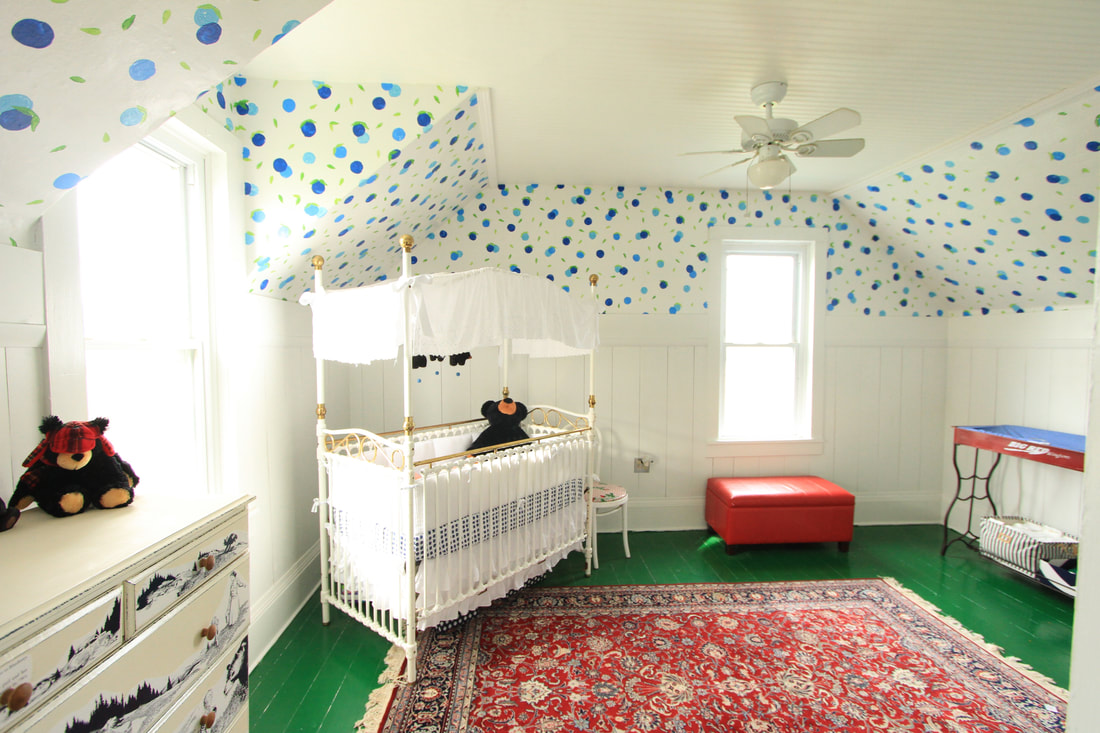  The changing table is one of my all time favorites. It was being sold at a local garden store as a potting table and my mom had the great idea to use it as a changing table. It reminds me of the old wagon we had as kids and is perfect for our nursery. I mean, can you get any cuter than that?! 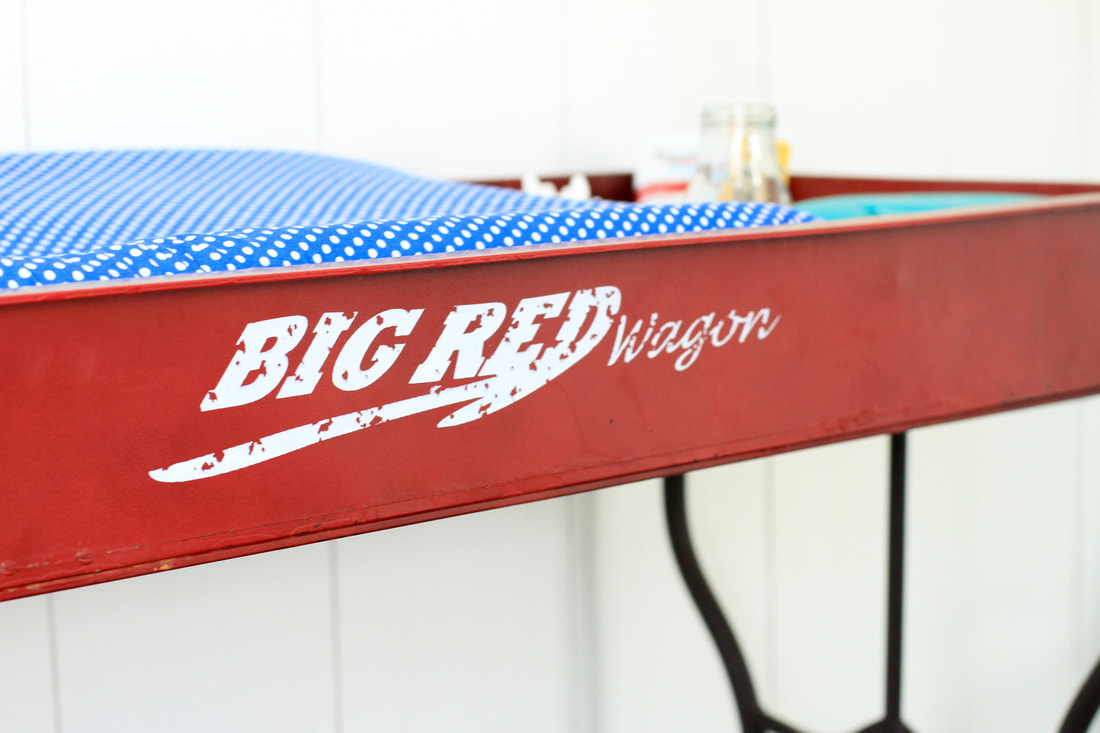 I used some pails that I ordered to store q-tips, and a cute sweater looking bowl stores lotions and diaper cream. In the tray beneath are disposable and cloth diapers, wipes, and trash bags. Everyone told me I'd want a much bigger trash can for dirty diapers but this compost pail has been just fine. I wasn't into the idea of a huge pail with diaper sausages fermenting for weeks. We used a bigger one for the newborn weeks, but he was in our room in the bassinet so we still didn't need one for the nursery.   Danny replaced the shelves in the bookshelf, since the other ones were warped, and I got some navy baskets to store things. Eventually, I'd like to add a pipe bar (like our pantry) to hang shirts, but the shelf is doing fine for now. Thanks to dear friends I had plenty of cute things to decorate the shelves with. The blocks and frames were the perfect addition (Thanks Sarah). 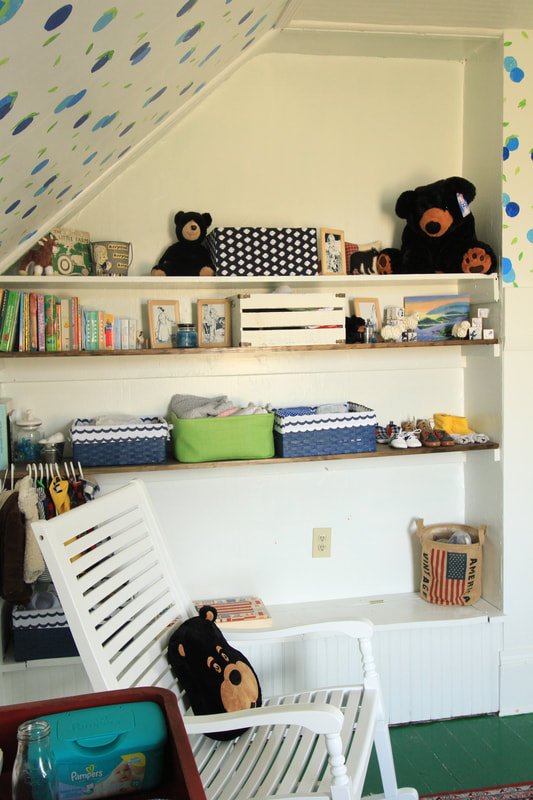  Yeah, he has a shoe collection  Of course living on a farm means you need some classic farm toys. I love this book my grandma found.  The baskets store puzzles, extra linens, toys, and whatever else needs stored. The white built in still has the original warped board on top which is quite heavy to open so thats where old baby clothes are being stored so I don't have to worry about smooshed baby fingers someday trying to get toys in and out. The red storage bench will hold frequently used toys someday that he can easily access and have safe fingers.  Since my tailbone is still bothering me, the original rocker for the nursery was too uncomfortable for me to sit in so it has been moved downstairs where it can get broken in. The plan was to eventually move it back up when I could use it but my grandma recently found this wonderful white rocker, so we will probably leave things how they are. (Danny enjoys using the rocker downstairs) 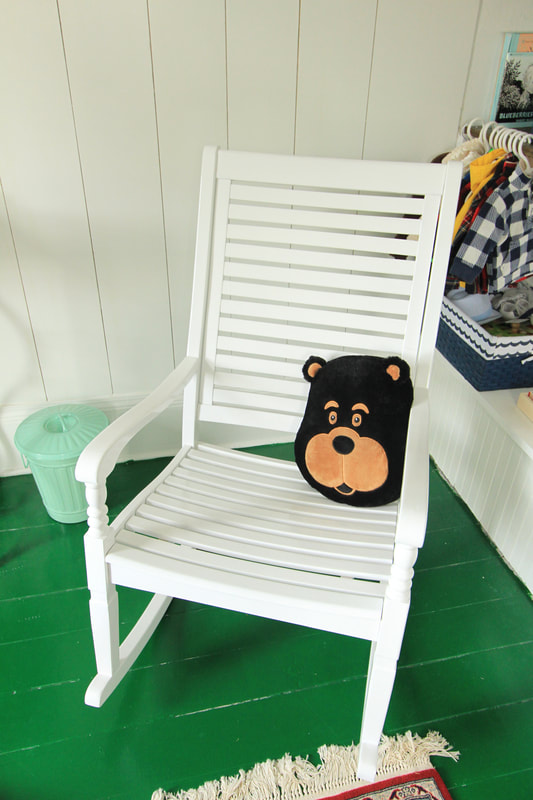 The crib is another favorite of mine, the one we all used as babies when I was a kid. It took quite a bit of elbow grease to buff the brass and get all the dust out of the details, but I love it. I originally thought I was going to have to do blue polka dot sheets but Land of Nod just happened to be selling blueberry crib sheets in their Farmers Market collection, which really made the look. 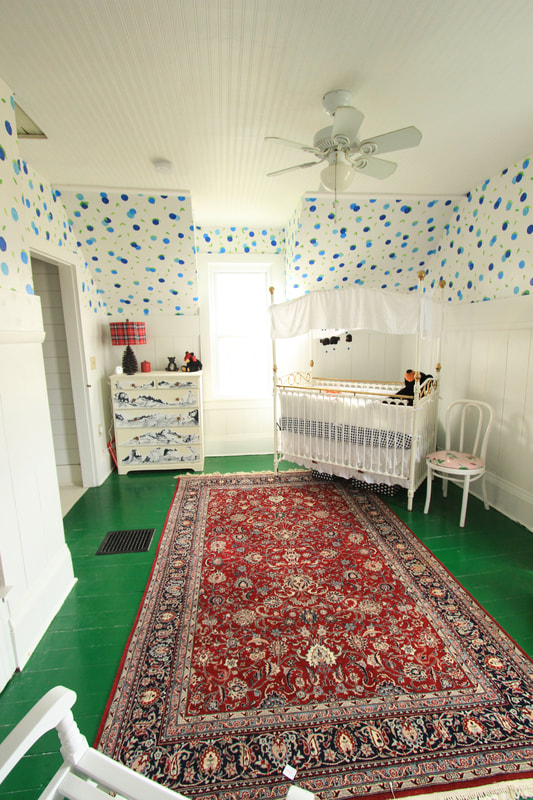 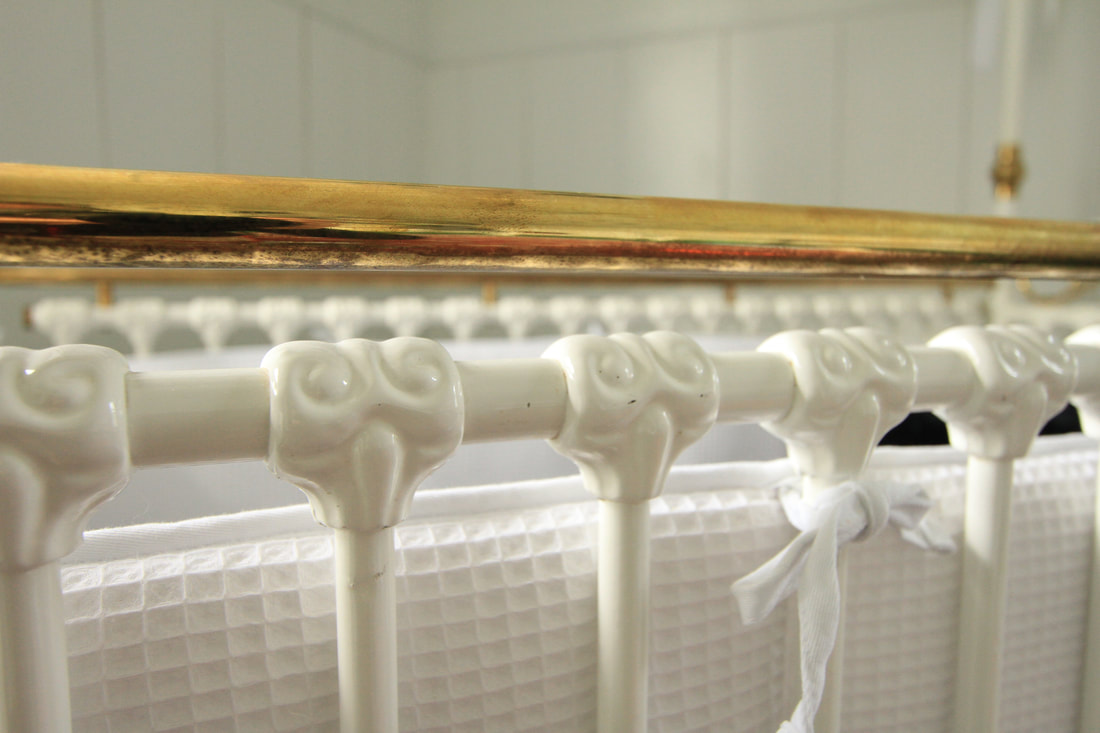 Aren't those blueberry sheets adorable?! And of course that baby too! 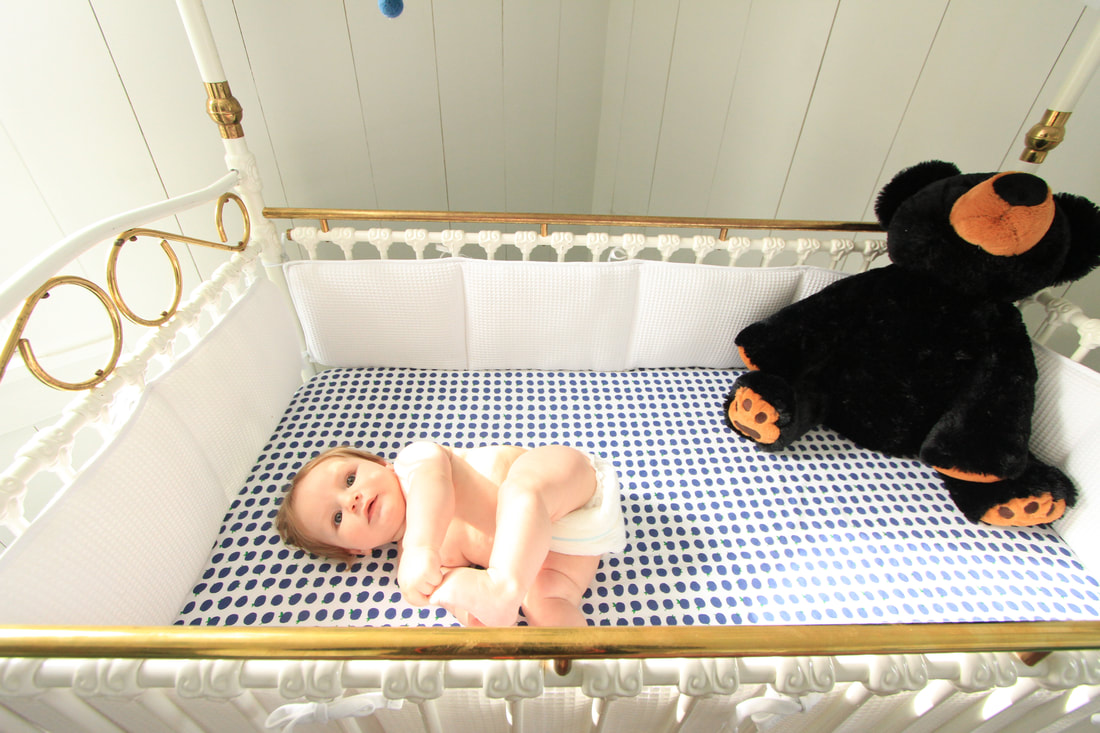 I hung the mobile, which baby Danny loves, and it looks so cute. Unfortunately, I didn't hang it so it can turn but he doesn't seem to mind.
The original canopy my mom had didnt make it through 25 years and 3 kids and was thrown out a long time ago, so I had to make my own. I can't sew a stitch so I had to make due with some scissors, ribbon, and hemming tape. The canopy is actually a twin bed dust ruffle that I cut down to size and is similar to the one I remember my mom having when we were kids. It turned out okay but this is where I keep wanting to tweak things. I want to add some big blue fabric bows to the top of the canopy and maybe do some gathers in the center so it doesn't hang so flat in the middle.
Of course my dresser is perfect and I love how I see it when I come up the stairs. It is one of those pieces that I can honestly say I am really proud of my work. It looks amazing! 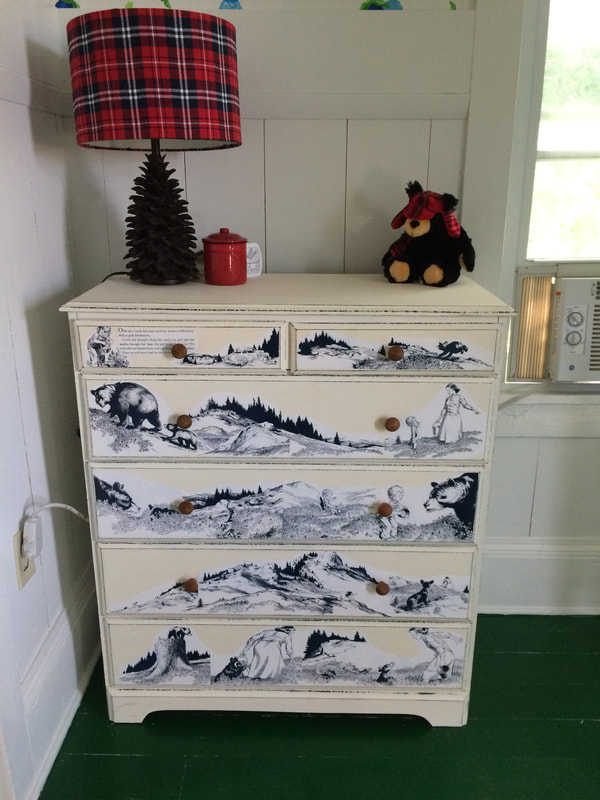  I meant to order blue gingham curtains this winter and completely forgot, so that is still on the list to be done before next winter. I'd love to someday have a cushion for the built in bench. Ideally, I'd like it to look like a Hudson Bay blanket, but Ill have to figure out how to DIY a cheaper version because I know that is not in the budget. The nursery has a great view of the field behind us and is perfect for watching thunderstorms. In the morning you can hear the chickens clucking and demanding to be let out, and late at night you can hear the chirping of the tree frogs. I can't wait to open up those windows and let nugget enjoy the country sounds, and I can see myself snuggling up in there someday. If it wasn't for my walk-in closet I might make the little babe trade rooms with me. 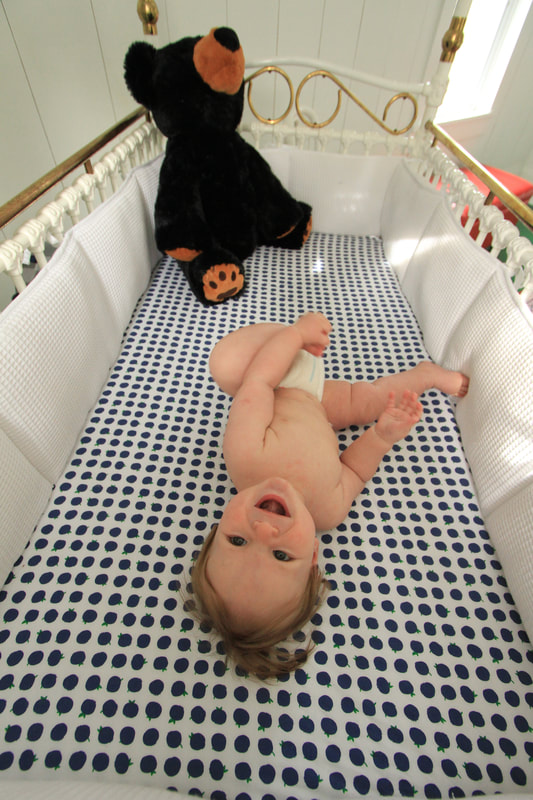 Check out those chubby legs!  Despite the frustrations along the way, I love how the nursery turned out, and looking at where we began really reminds me how far it has come!  Here's some Before and Afters:
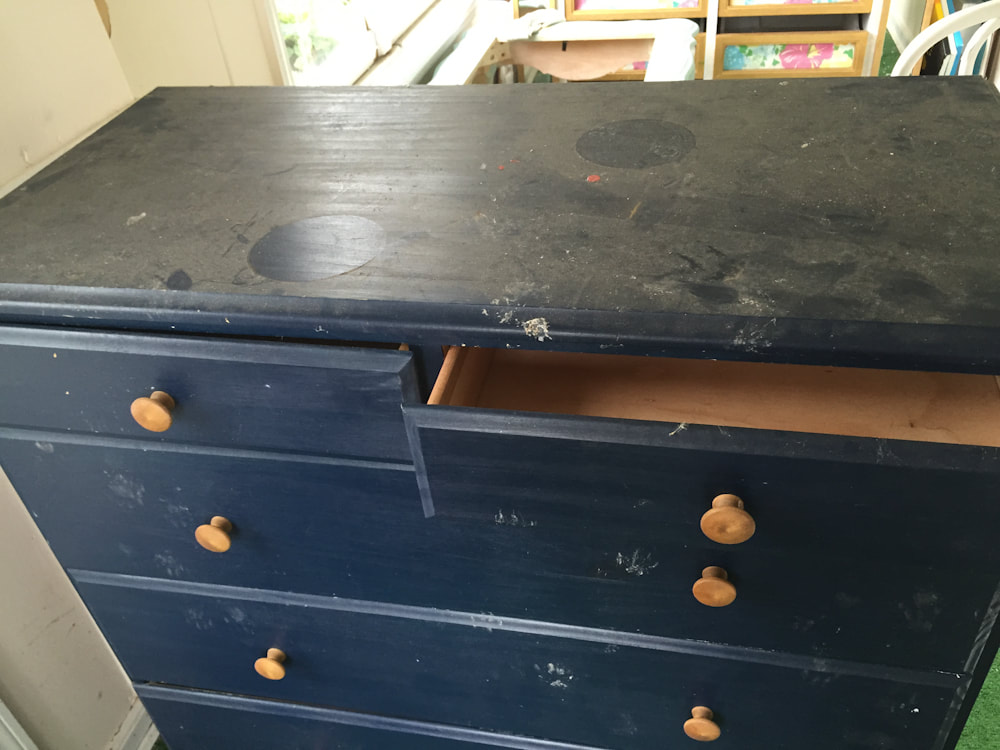
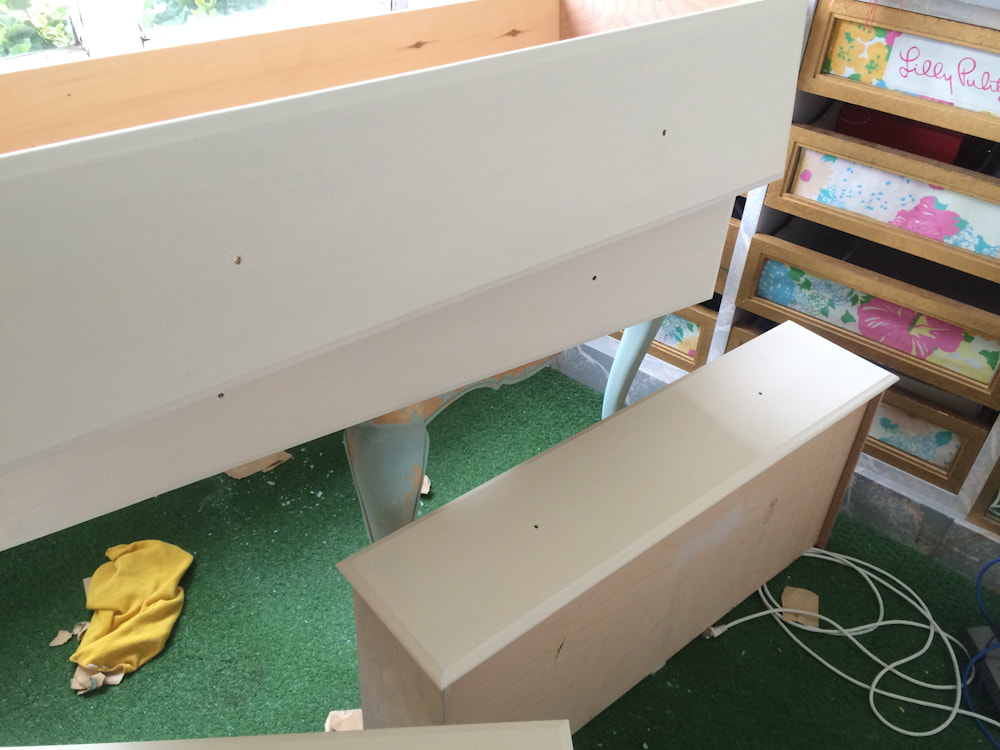
by Chickens Chalkboards // September 14, 2015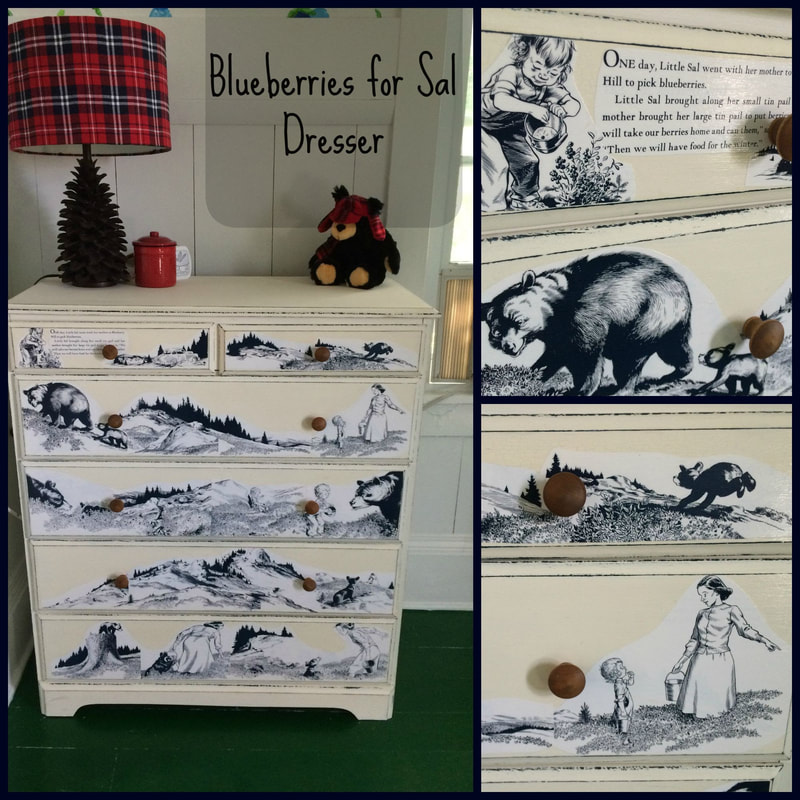 When at out apartment Danny and I had three dressers, but when we moved we found our bedroom was too small for any of them and since we have a walk-in closet we could kind of go without. However, the two additional bedrooms in our home don't have closets, so knowing we were going to eventually need those dressers down the line they have sat neglected, waiting to be cleaned out and refinished. I decided to give the baby Danny's old dresser because the size was nice, my old one has an annoying drawer that sticks, and I hated the finish on his so I felt I wouldn't ruin it. It had been in the garage being used as a kitty climber by the cats for the past year and definitely needed some help. 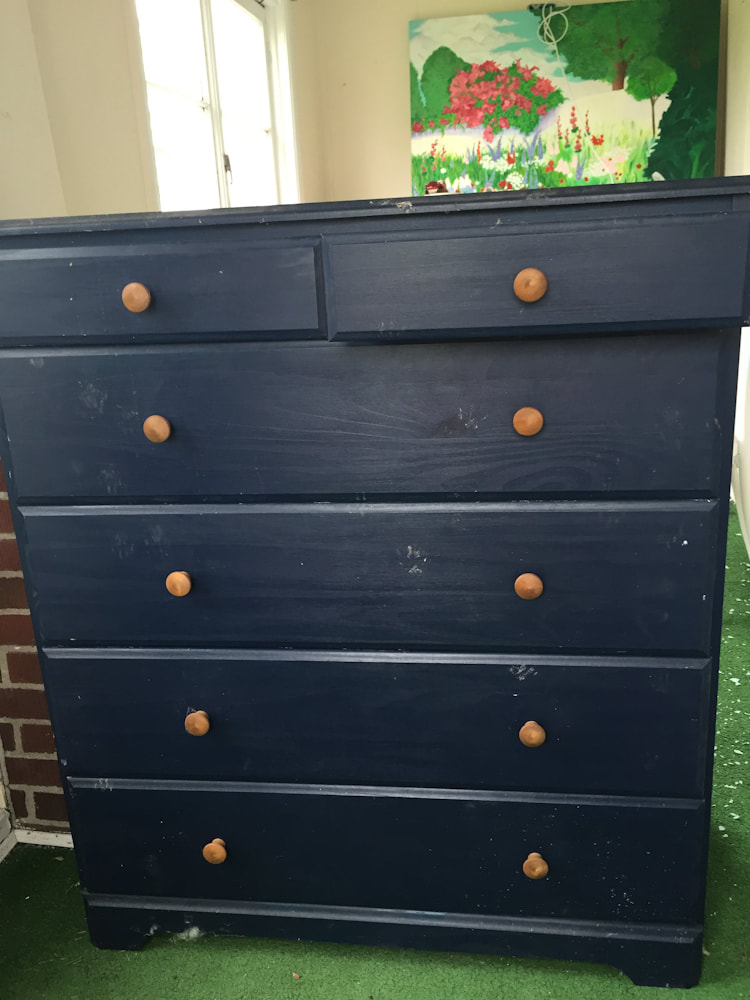
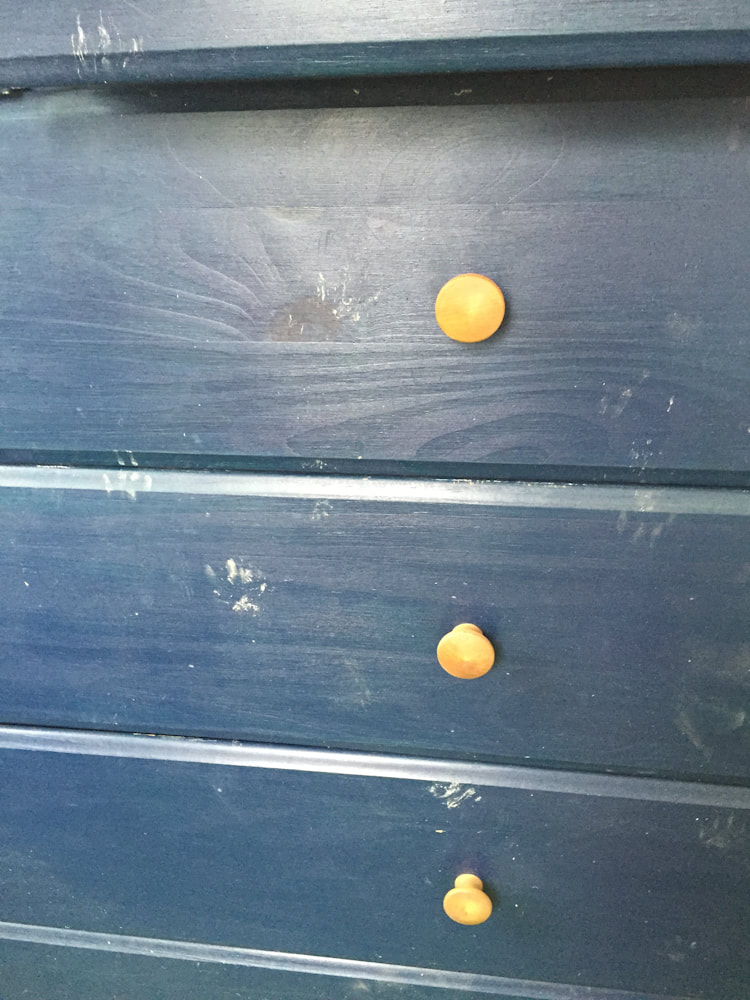
The dresser was already a navy blue, but it looked as if it only had one or two coats of cheap paint. The color was thin, uneven, and the dresser itself still had that rough unfinished wood feel. Since I was using a lot of navy in the nursery I decided to try using the dresser to my advantage and milk paint over the blue, hoping the paint would chip a bit, revealing the navy underneath in spots. I was a bit worried the paint would stick and not chip, since the dresser had no finish, so I took the time to rub beeswax where I knew I wanted it to chip, focusing on the edges, around the knobs and spots on the top and bottom where it would make sense to see wear and tear. 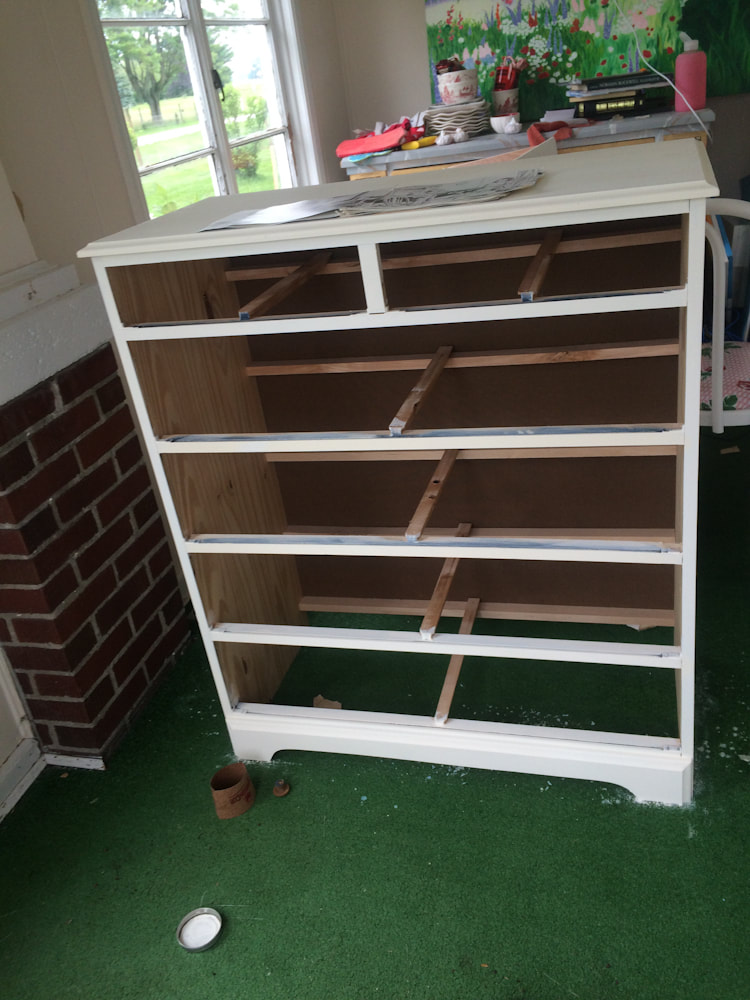 I then covered it in several coats of Miss Mustard Seeds Milk Paint in Linen, really trying hard to make sure I applied it smoothly without bubbles, crumbles, or unevenness in the color. When using the paint I have come to learn that I cannot seem to be able to use the very last part in the bottom because the color is always a bit yellower. I try to keep stirring it, but after having to repaint the top two drawers due to a coloration difference, I find it is easier for me to just throw out the last little bit. (Also not painting at night would have probably helped me catch the color difference sooner).
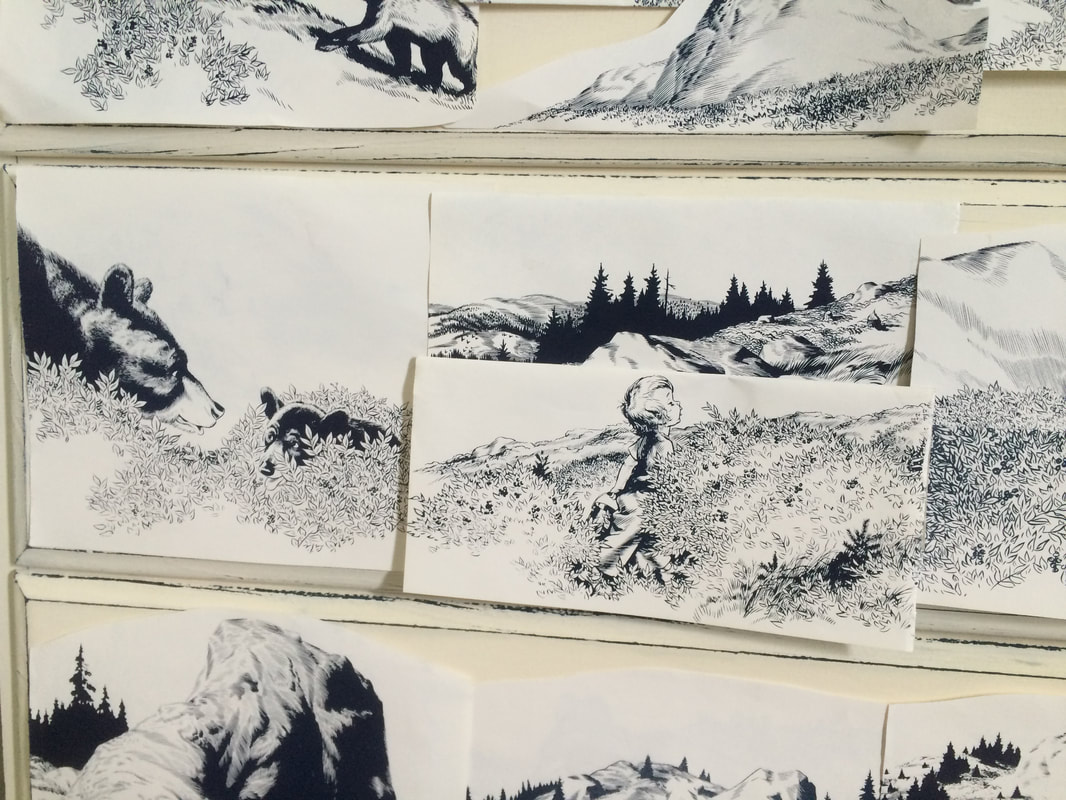
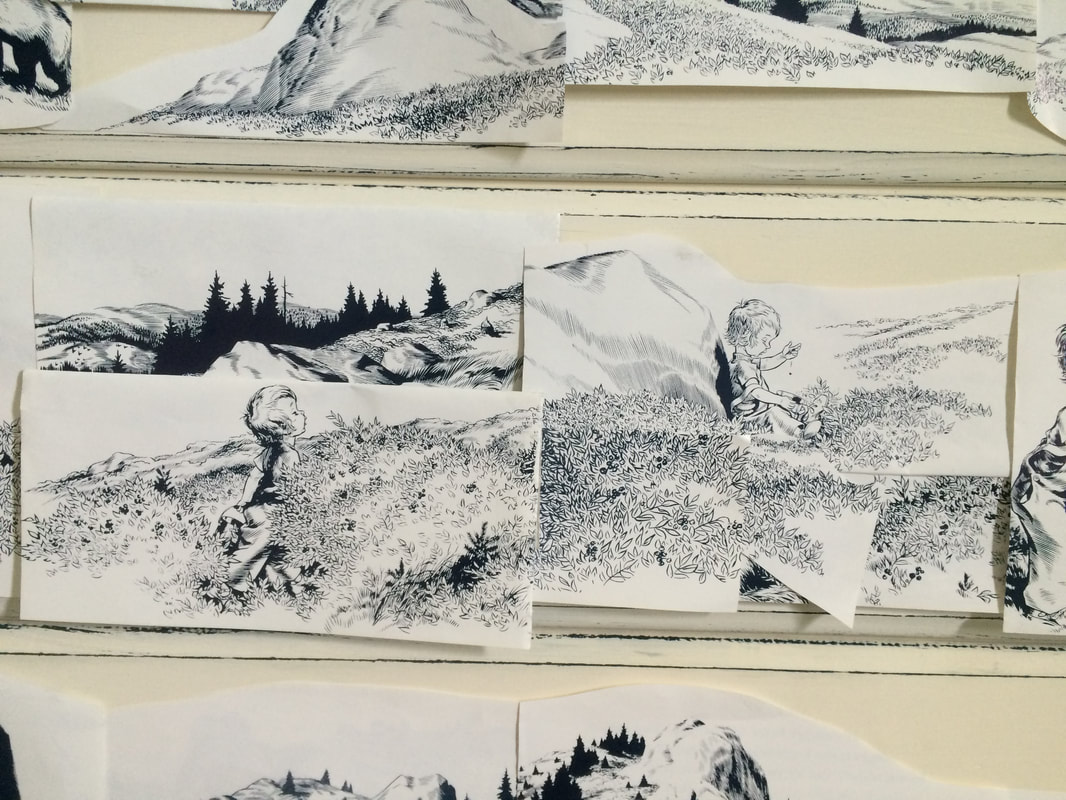
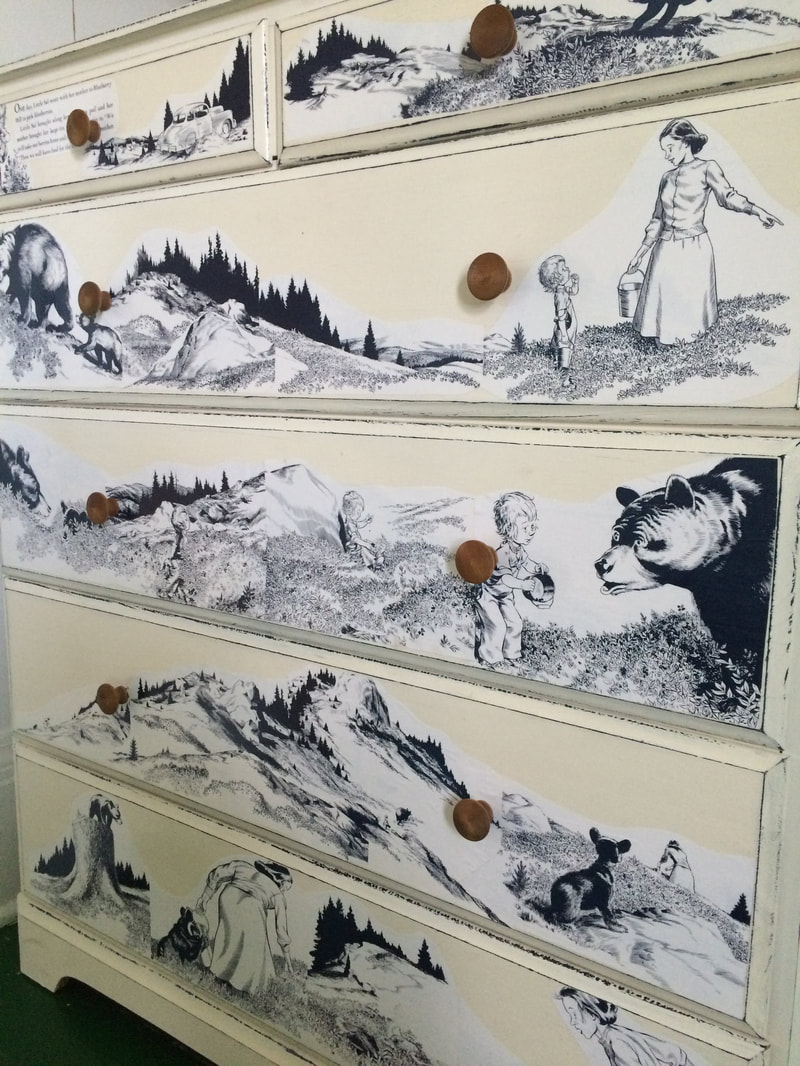
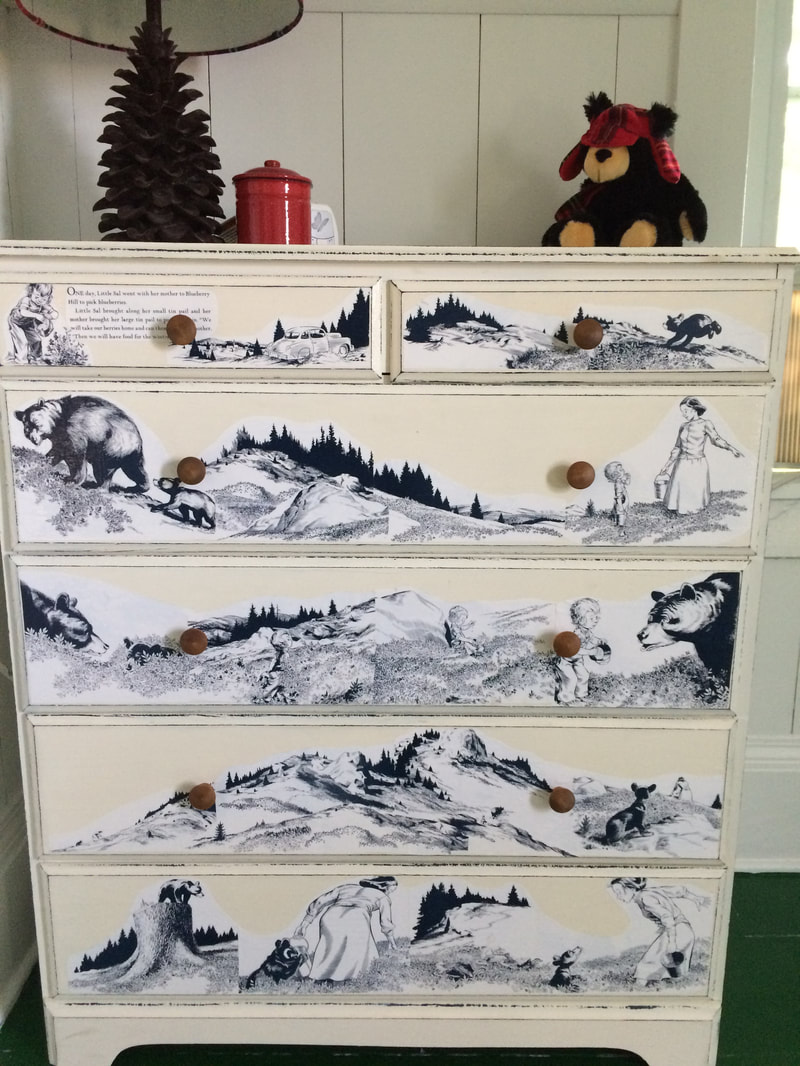
Once the paint dried I finely sanded everything to get a smooth finish and remove any small bubbles or crumbs and then began to try to get it to chip. Thank goodness I decided to use the wax, because I had to sand it just as hard to get down to the blue paint as I did to get to the bare wood on the highchair. Although I put the wax in various spots, the only place I could sand down to the blue was the edges. Had I not used the wax I probably would have gone straight down to the wood. The paint stuck even better than I expected, refusing to come off in any other spots, but I did get a bit of a crackle look when you see it up close. 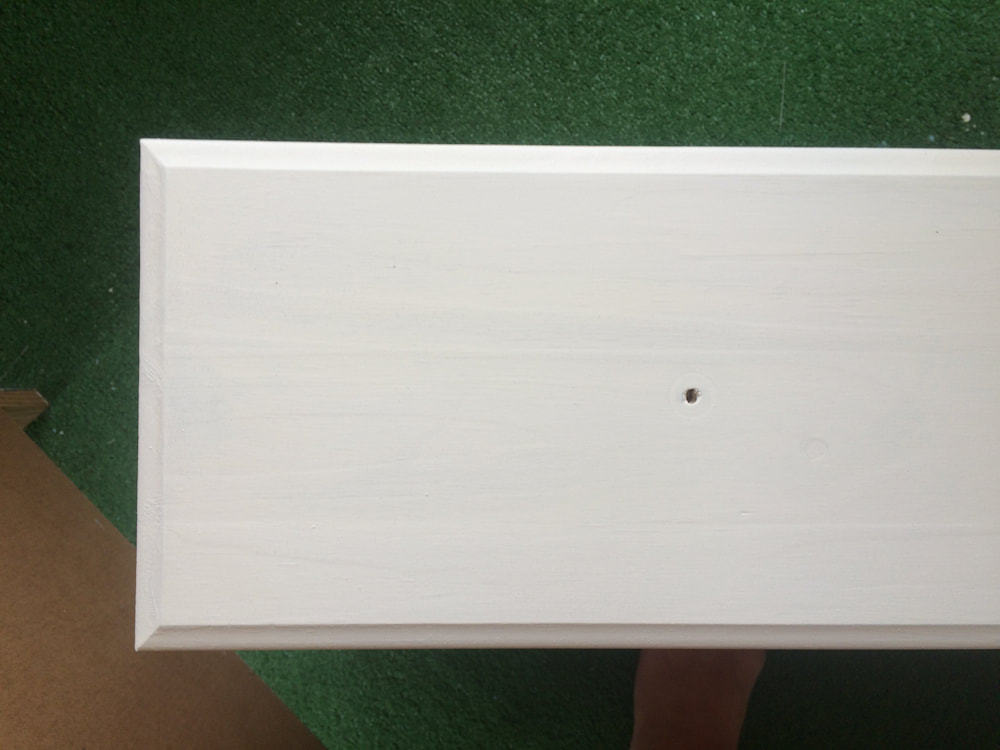 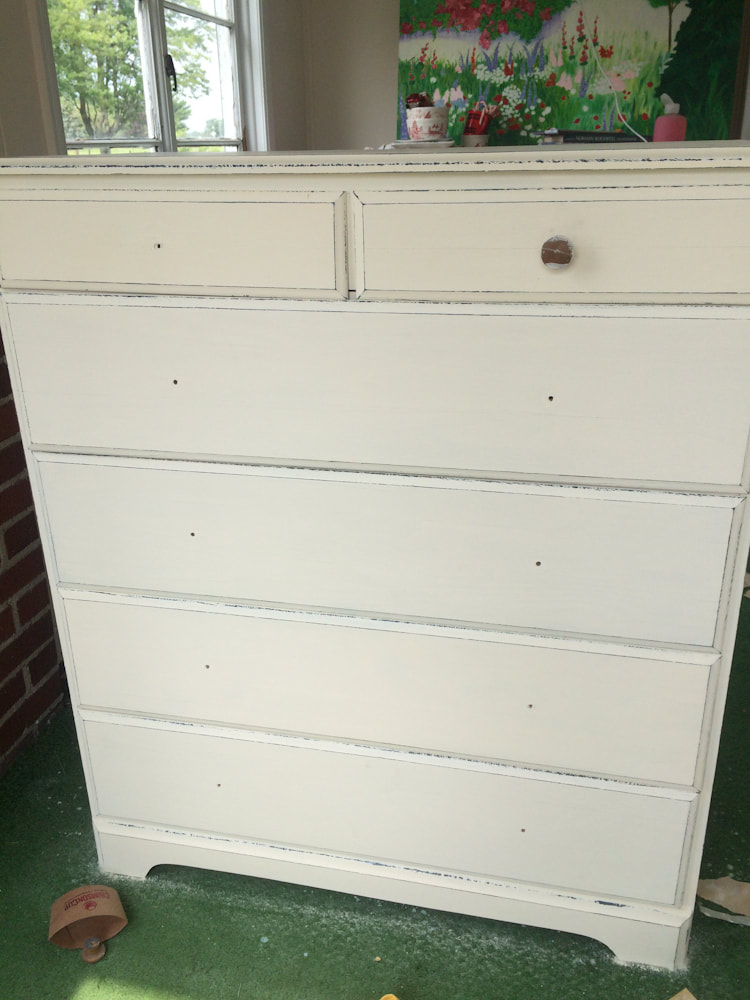 The final step to the project was using pictures from the book Blueberries for Sal to help tie the dresser in to our nursery theme. I disassembled a 1 cent book I purchased on amazon and began trying to piece the pictures on without it looking like a hodgepodge mess. I knew the look I wanted but Im limited with my ability to visualize things and was really was struggling getting it. Thankfully my mom can picture just about anything and everything and helped tie my favorite pictures in using the landscape pages so it had a nice flow. What I couldnt figure out with several days work, she got it all figured out in about an hour and it looked great. 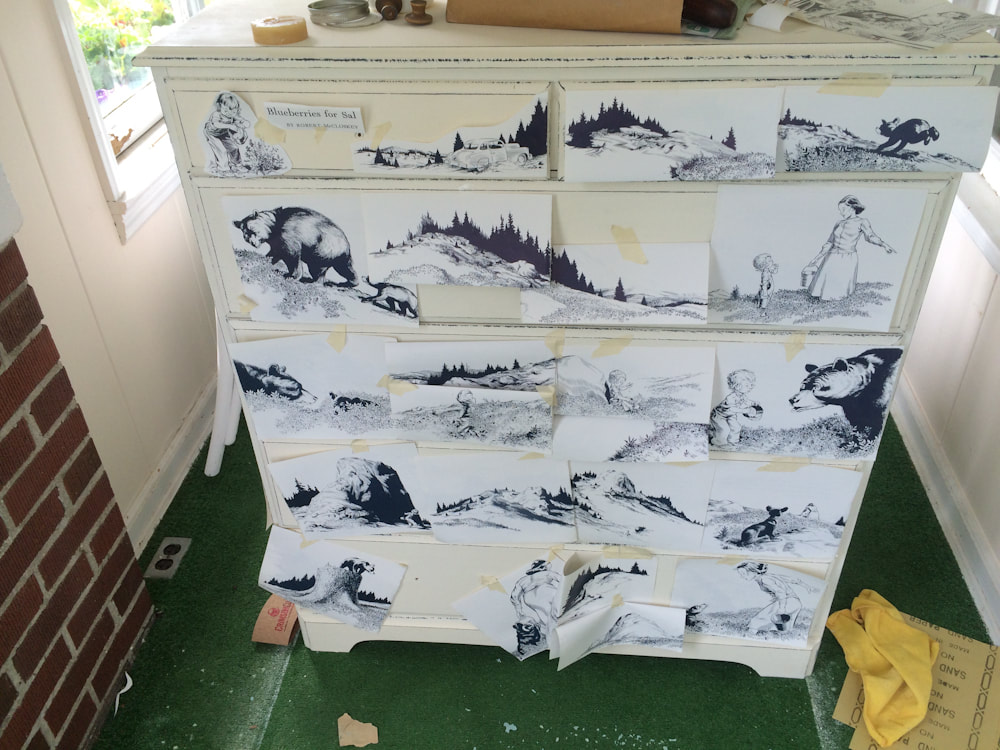
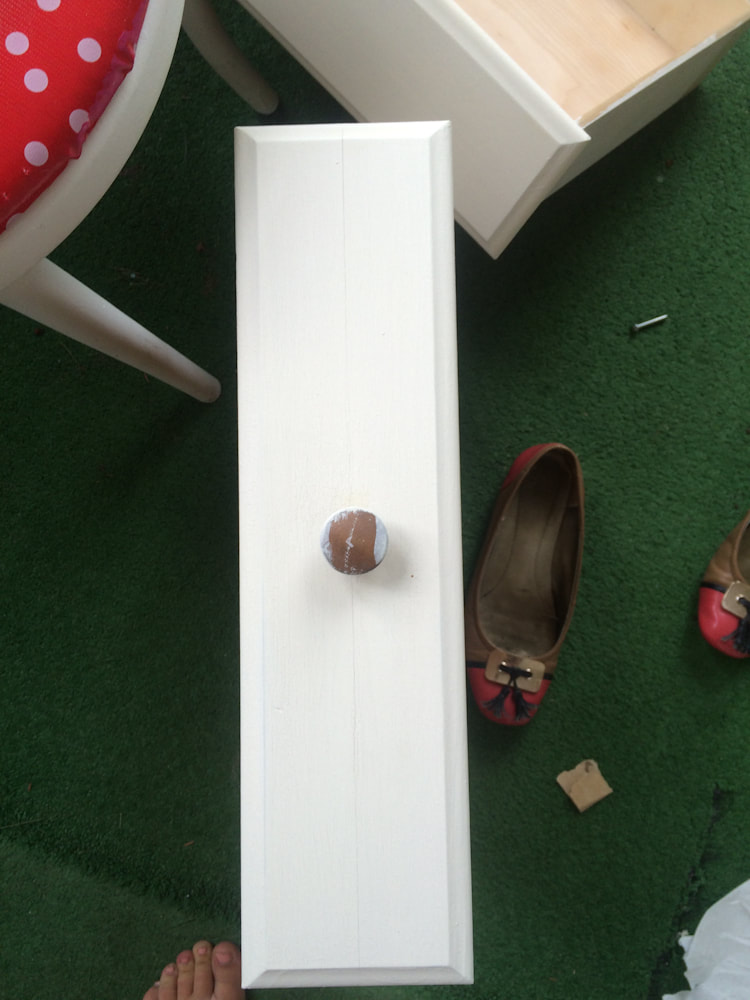
Once I got the look I liked I cut out the illustrations and used Mod Podge to attach them to the drawers. Ive always struggled with getting that nice, smooth, bubble-free, wrinkle-free look when using Mod Podge and after several frustrating attempts to remove the bubbles and get a smooth finish, I found nothing worked better than a credit card. Once the pieces were glued down I gave each drawer 3-4 top coats to seal it so the pictures now have a nice glossy protective coat from the wear and tear of a baby. 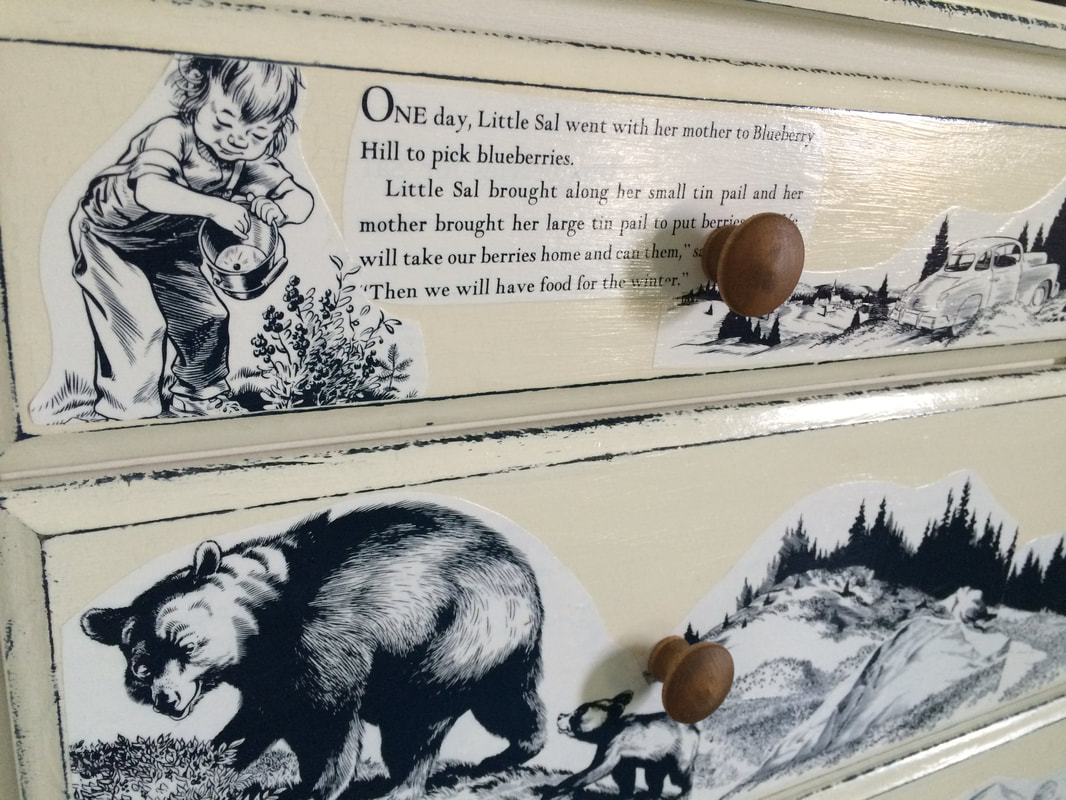 For now I attached the same knobs, although I still cant find two because I hid them from Otis who kept stealing them, but I think I would rather have them navy so they blend in, drawing the eye more to the illustrations. Once I find the final two Ill eventually get to painting them, but for now it still looks cute and is functional.
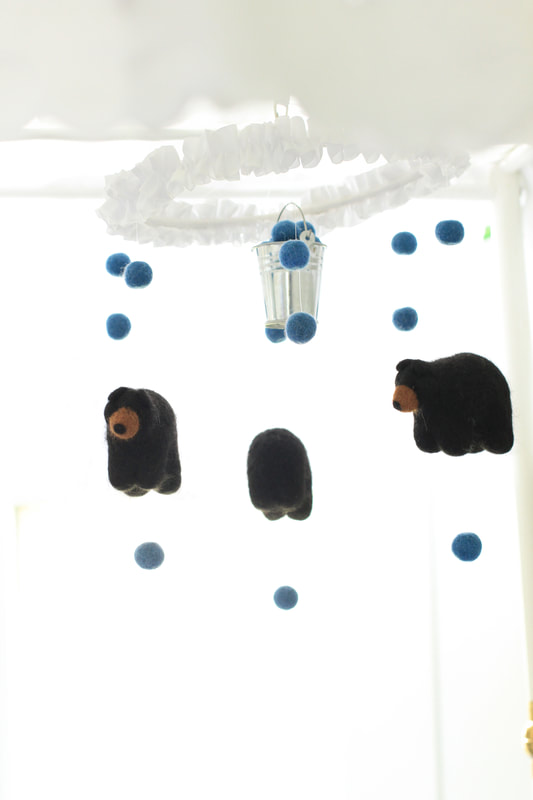
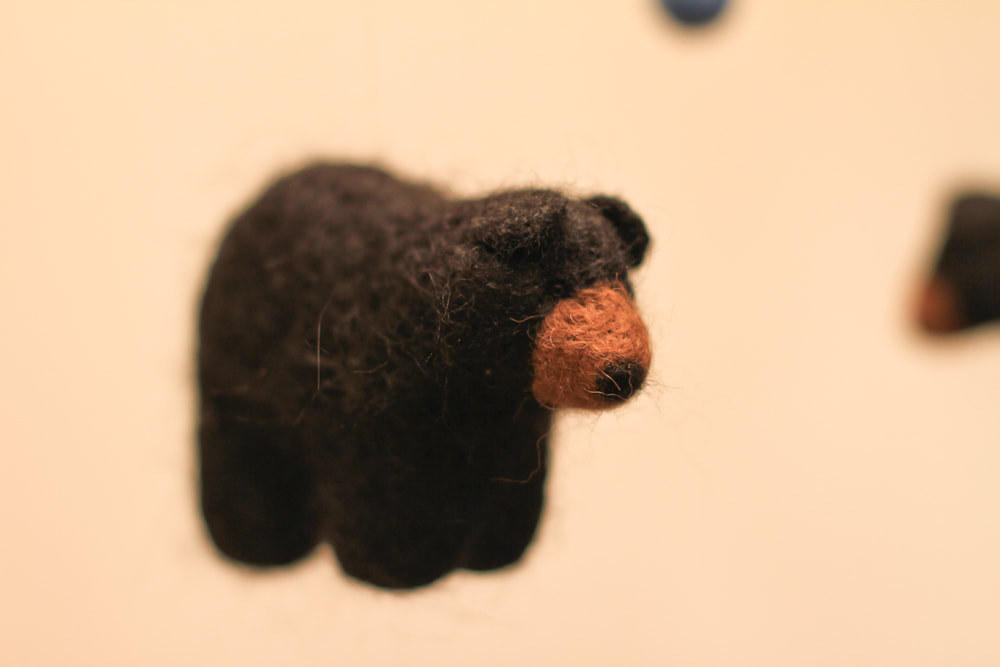
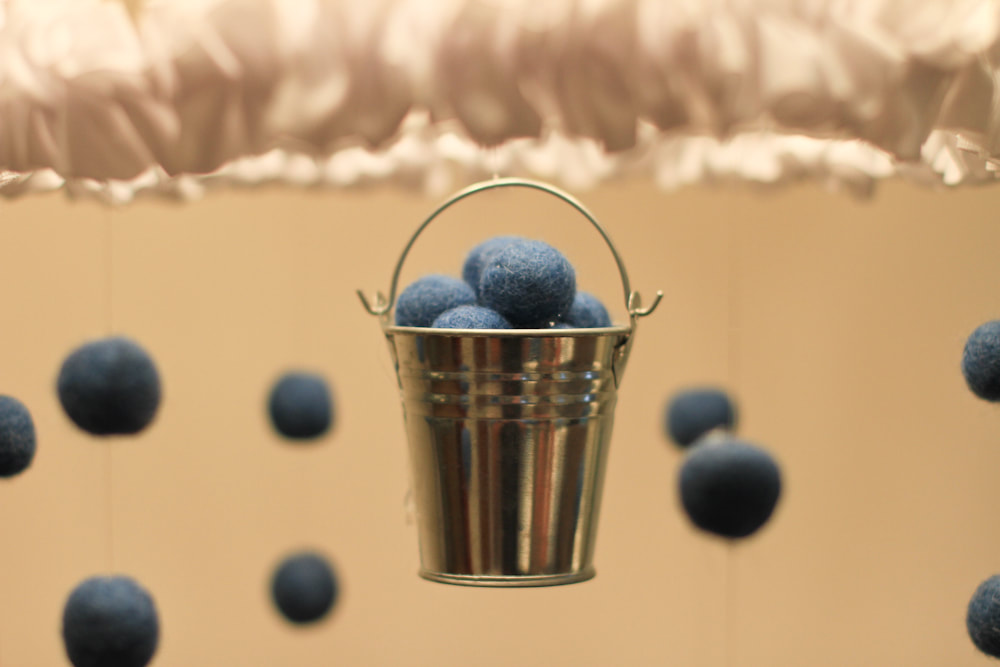
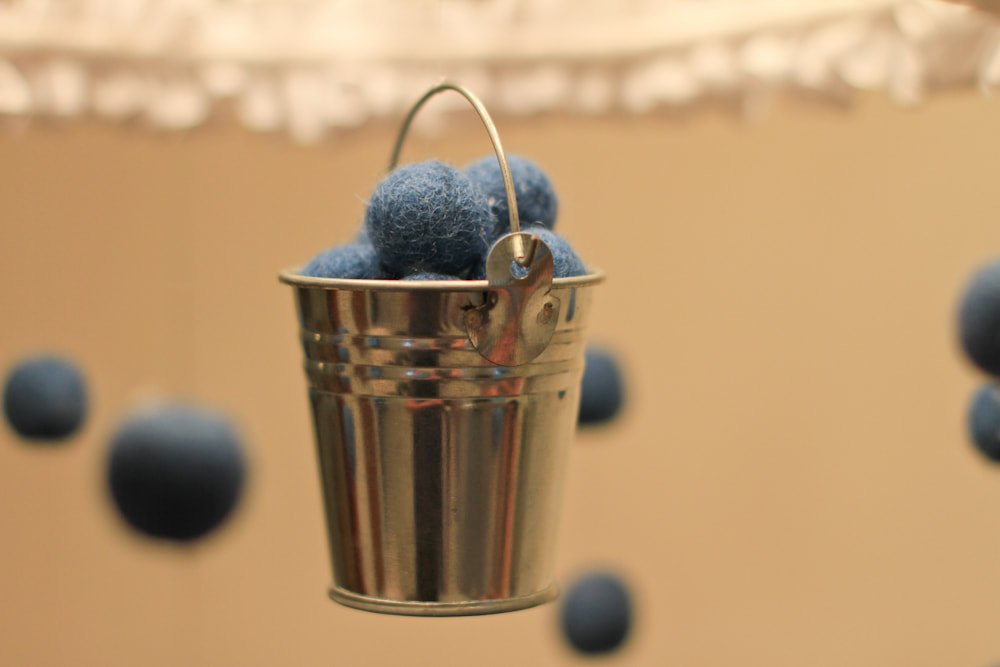
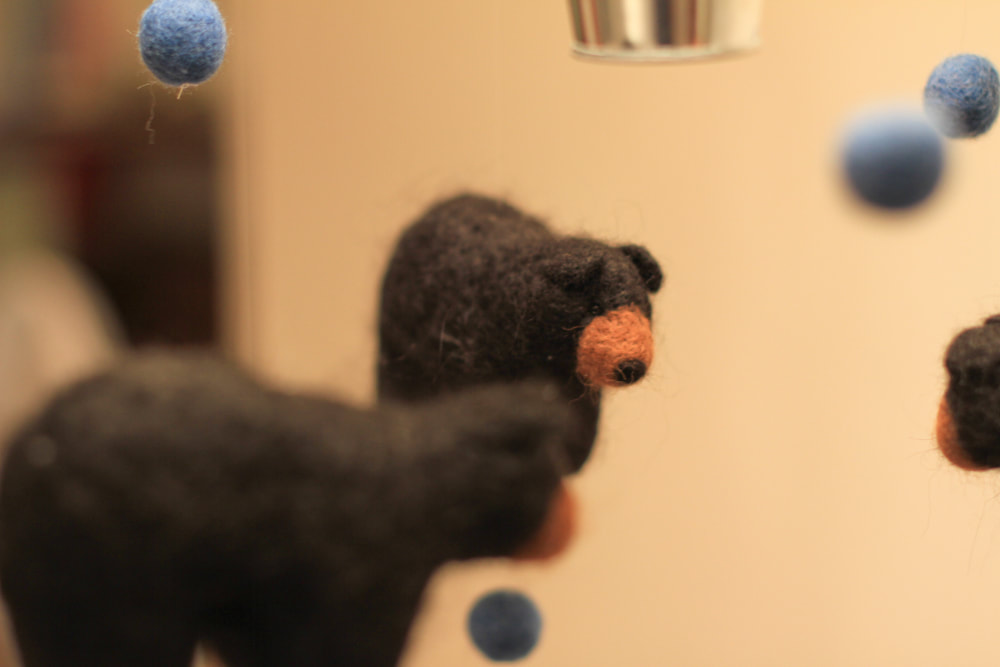
Even with the brown knobs, I love how it turned out. It is perfect for the nursery and I never could find anything like it in a store. 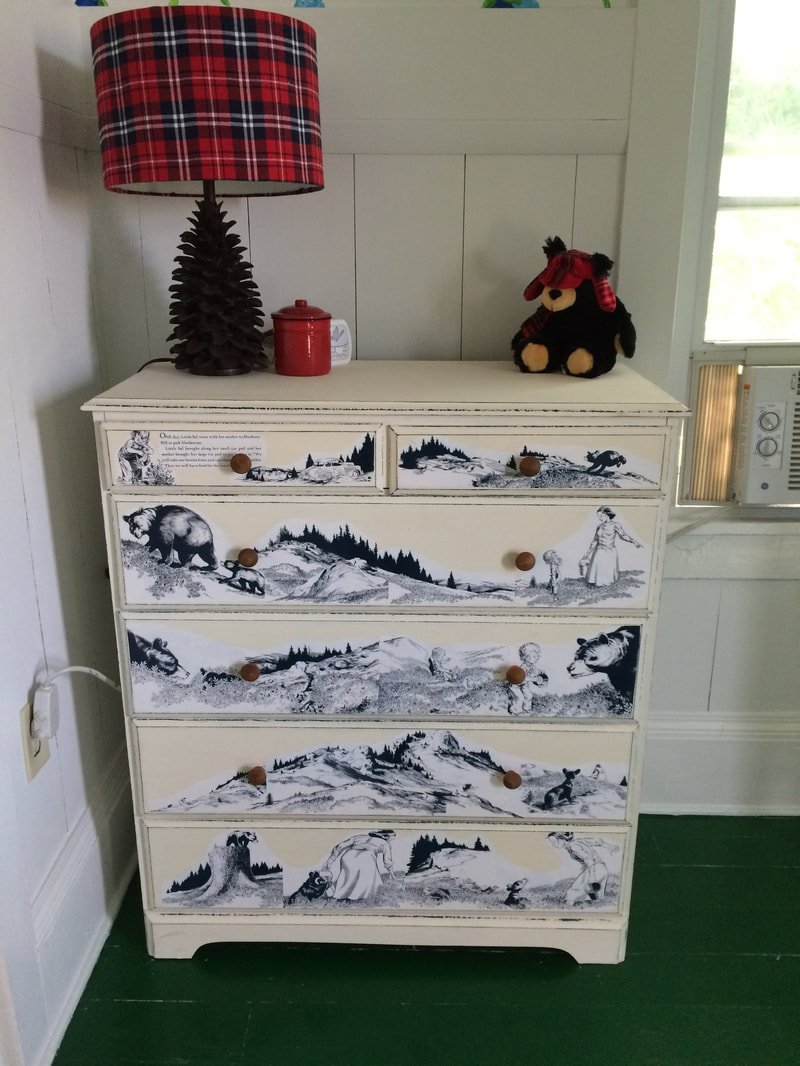 It feels good to be able to check things off our to-do list, no matter how small, and I can finally say that Baby Kelley’s mobile is finished and ready for the nursery. When I decided on having a Blueberries for Sal themed nursery, I knew that meant I would have to DIY a lot to pull it off, since most people have never heard of the book, much less designed a nursery after it. Last fall I saw these cute felted black bear ornaments at the Country Living Fair and snatched three of them up for “someday.” 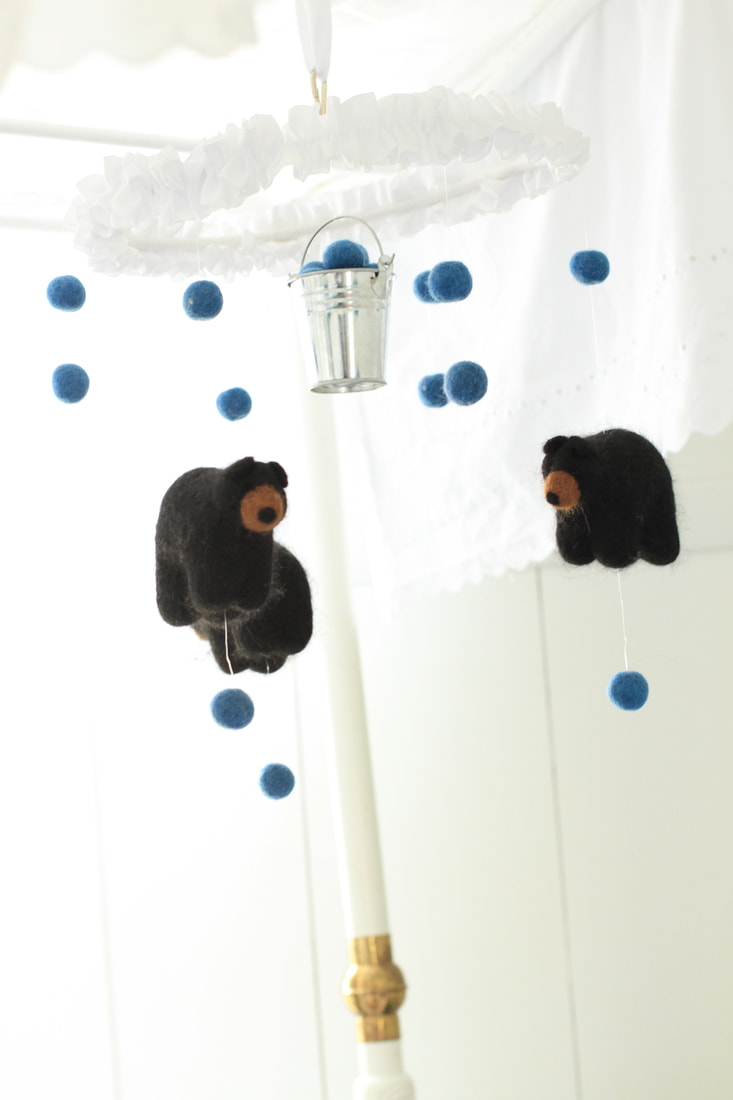 I made the ring using some wire we had, wrapped it in white yarn, and added a white, grosgrain ruffle. The blueberries came off of Etsy and I attached them and the bears with fishing line. I toyed around with the idea of adding a pail, which is very true to the book, and Danny and my mom both thought it would be the perfect finishing touch. After a few different ideas, I decided to hang one in the center and hot glued the leftover blueberries inside. As always, I have to give Danny credit for helping me with the math part. He stepped in during my frustration, helping me figure out how to evenly space everything, and he will be helping again when it comes to hanging it, so it balances correctly in the crib. I must say I’d really be pretty helpless without him.
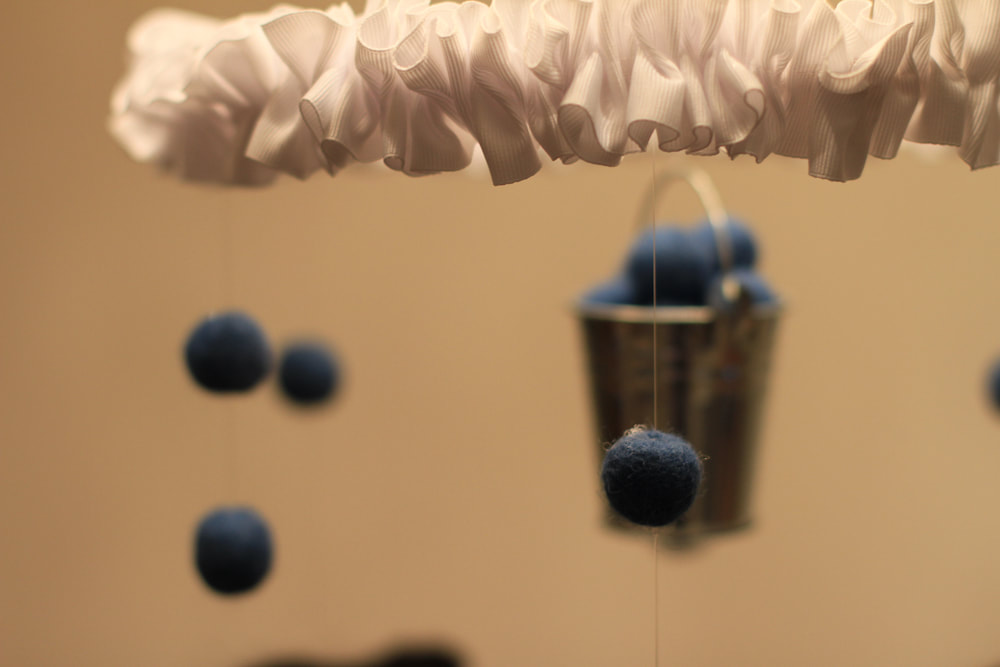 I love it and can’t wait to have it hanging above the crib and out of Harvey’s reach.
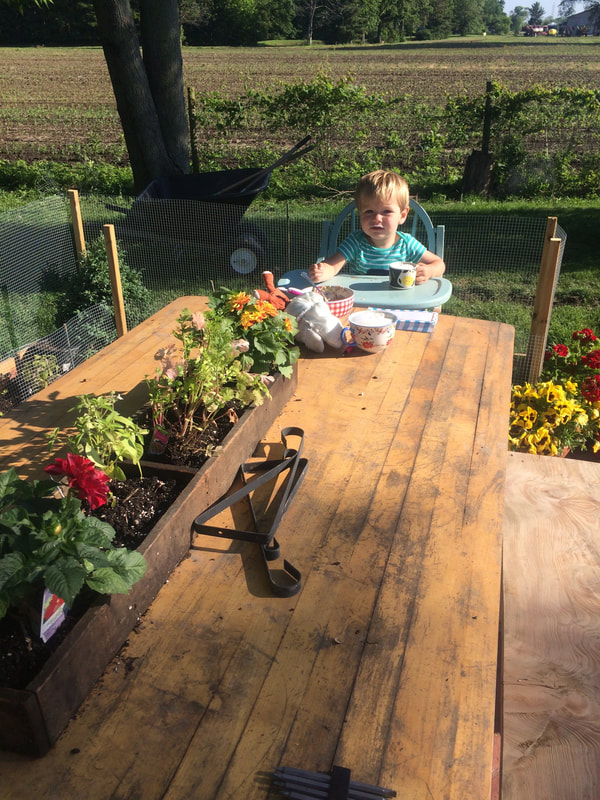
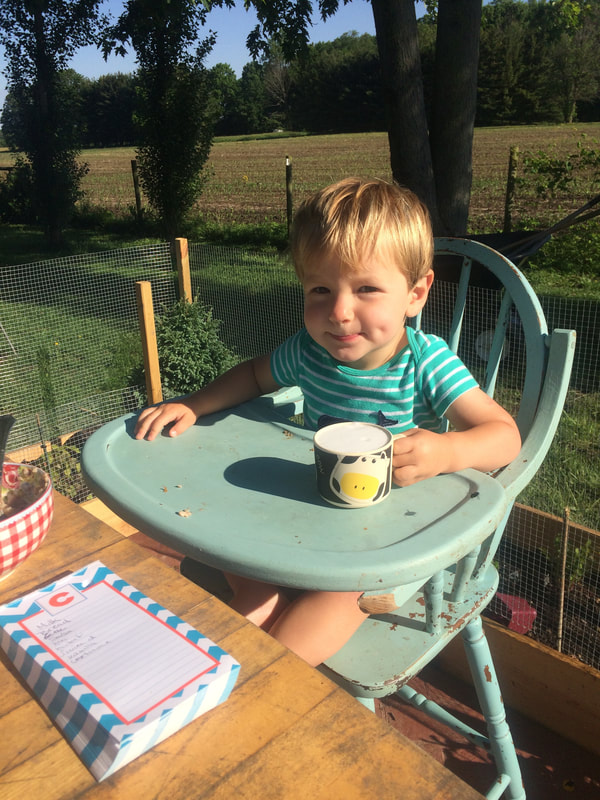
The curious little guy really wants to eat the blueberries and enjoyed the multiple times blueberries went rolling across the floor while I was working. I think he is preparing me more than anything for the baby. I’m am so excited to say that I have finished Baby K’s highchair, not that we really will be needing it anytime super soon, but it is one thing crossed off my baby to-do list. I knew whenever a baby was on the way I would be looking for a vintage wooden highchair, so when my friend was discarding her broken old highchair she used in the classroom, I asked to have it. (Thanks Meredith!) Little did I know that by this summer I would be expecting and am glad I didn’t have to hunt any farther than my basement for my must-have highchair. The tray was missing, with one of the screws broken off in the side, and one of the legs was broken, so I didn’t know if it was fixable but I decided it was worth a try. Thanks to Danny’s amazing skills, the leg was secured back on with some wood glue, and he assured me he could figure out how to get a tray to work, so I went ahead and ordered one. 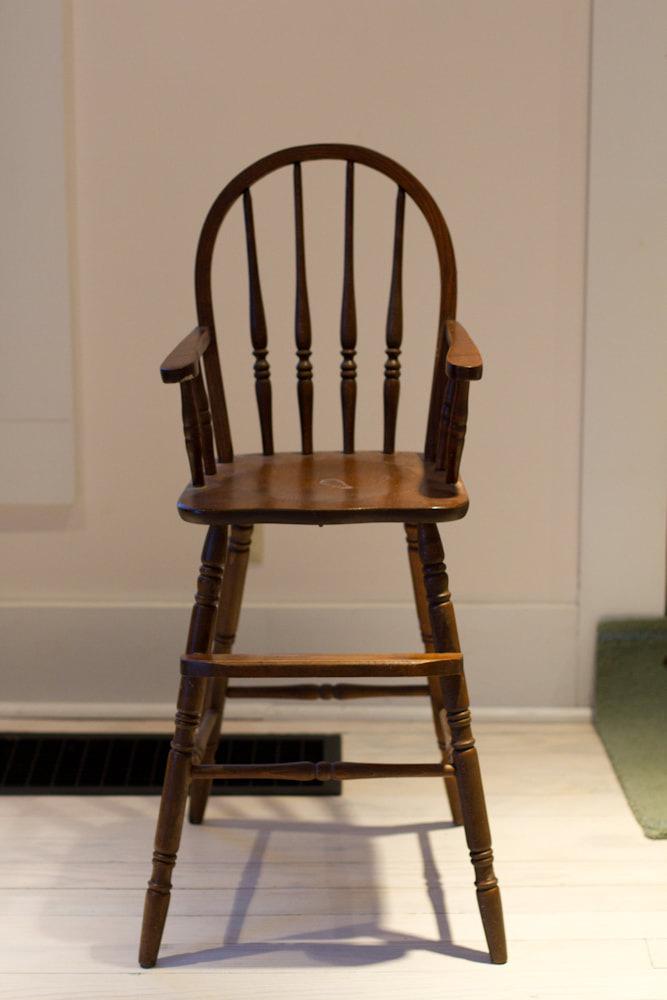 I purchased a new tray and set of arms online and crossed my fingers they would work, since I really only had one option (I guess not too many people want old wood highchairs these days.) It arrived in a very mangled, poorly wrapped box but it fit (barely) so they shipped. The arms were too long, the tray wouldn’t sit flat, and the broken screw on the old chair meant we had to drill new holes. Danny worked his magic and I had a working tray in about an hour. I think He really enjoys fixing a project I deemed unfixable, but I’m not bothered to call for help and am happy someone is at least smart enough in this house to figure things out. I am completely amazed again at what he was quickly able to do, and after some sanding of the pieces and adding a shim to the bottom of the tray everything works smoothly. 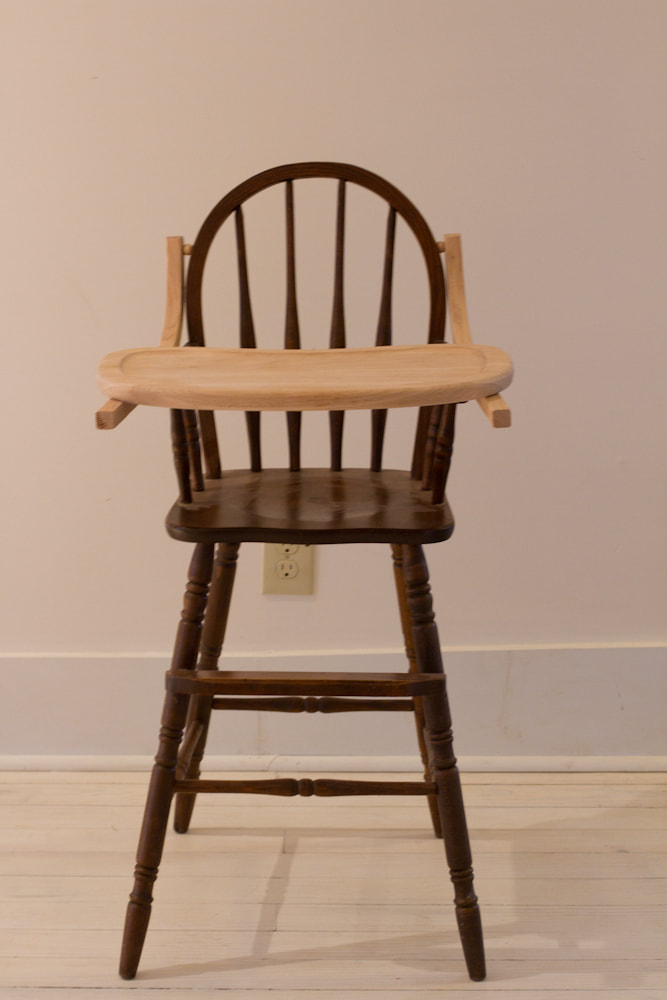 Since my baby would be eating directly off a painted surface, I needed to make sure my paint was food safe. After looking at all different sealers and reading up on everyone’s opinions, I decided to forget the latex paint and go with milk paint. I have always wanted to try milk paint and since it is an all-natural paint it is great on something like a highchair. Milk paint comes in a powder form and you mix it with water, which means you can make your own custom colors. Milk paint also is a great way to get the aged, distressed look. Depending the piece, the paint will peel and chip to get the worn look, however you really don’t have control over where it chips. I was leaning towards an aqua, mint, or yellow and after looking at the milk paint colors, I finally decided on a mint, but I wanted it different than our kitchen cabinets. I purchased Miss Mustard Seeds Milk Paint in Luckett’s Green and Eulalie’s Sky with the plan to mix them, along with a small wisk, bonding agent, and furniture wax. 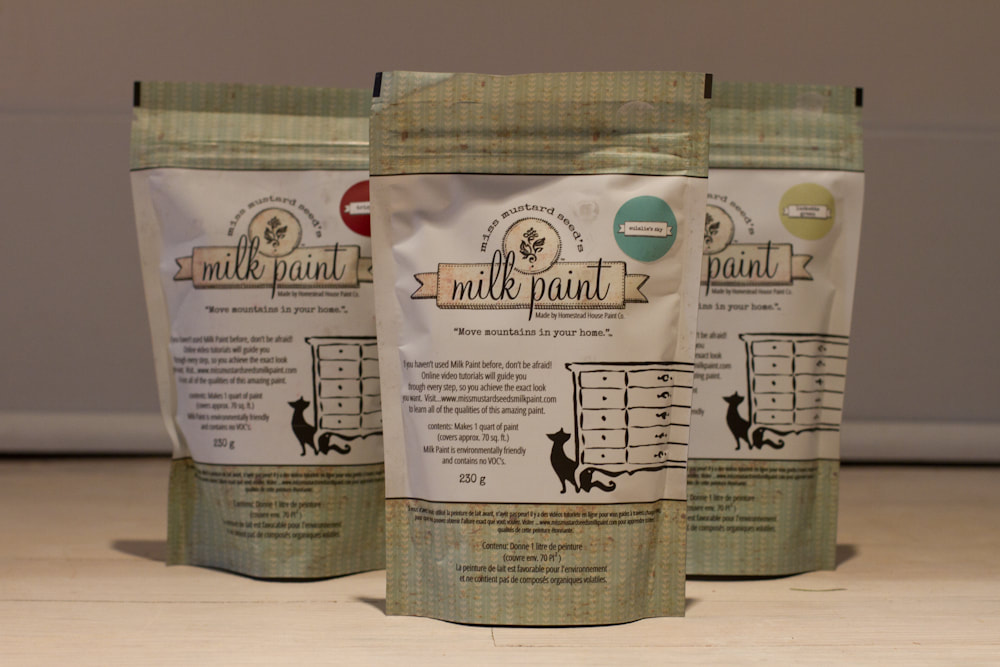 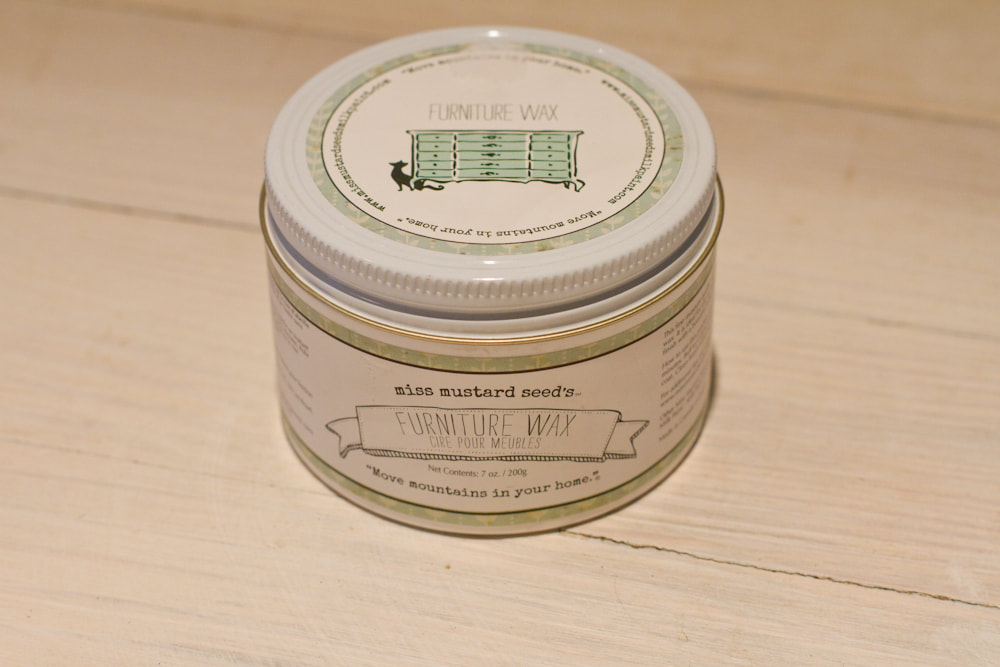 The green far away isn’t too bad, but most of the time I’ll be looking at it up close. At first I loved my color, but it wasn’t chipping. Then as the lighting changed and I lived with the color, I hated it! 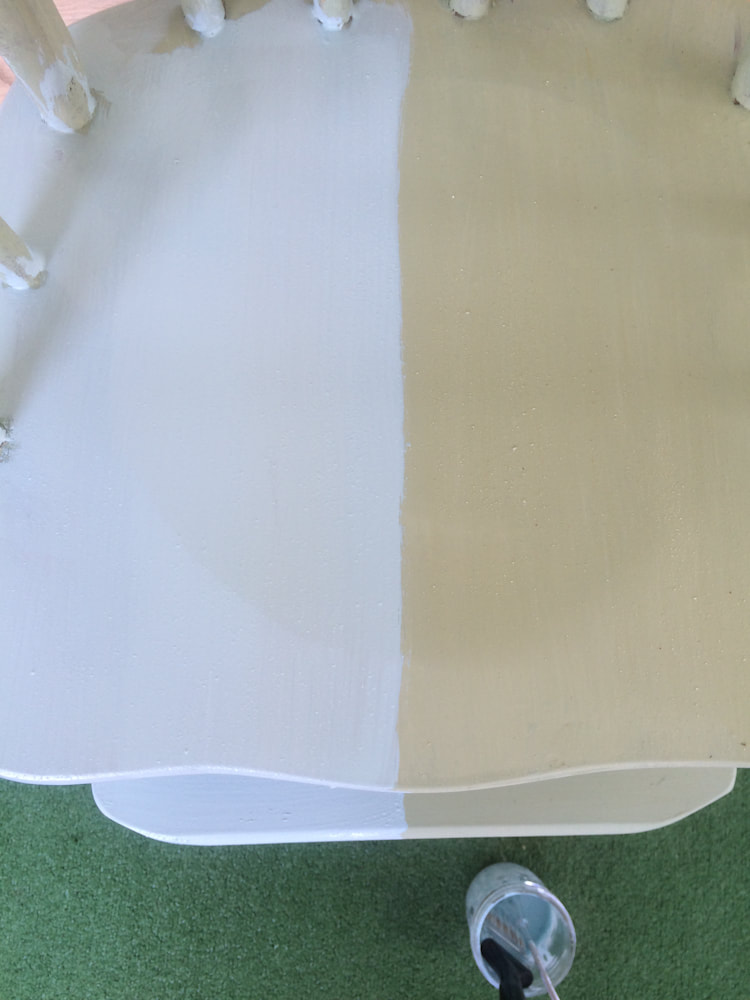 Well as the old saying goes, first if you don’t succeed, try, try again. 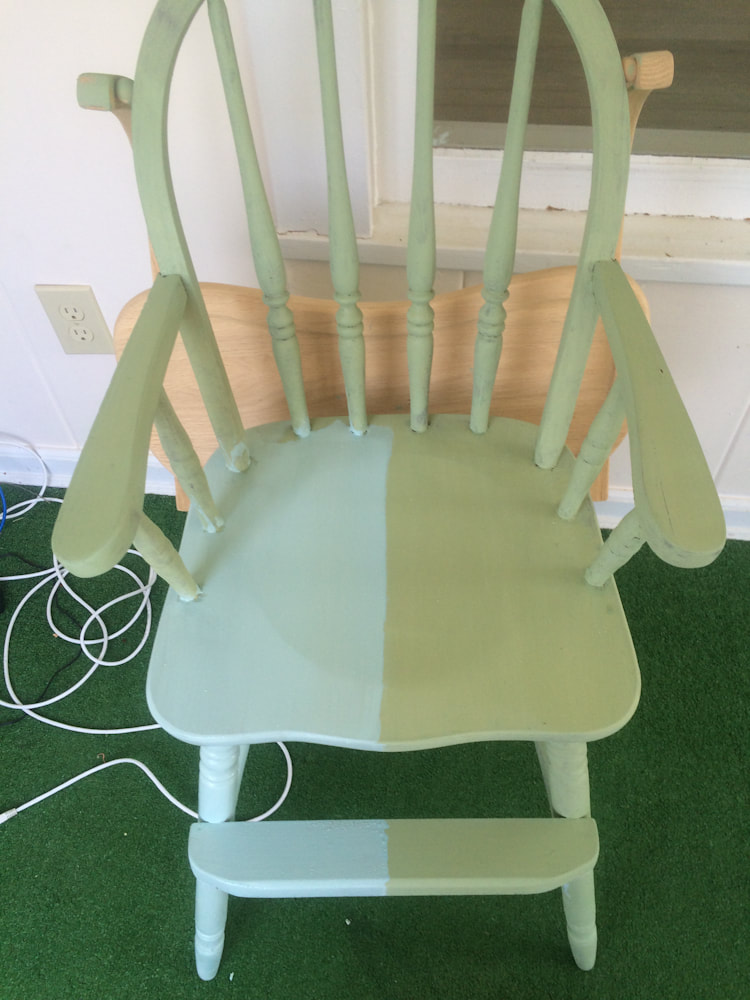 From far away it had the minty look, but up close it was a gray green, almost sage, which if you know me, is my most hated color ever. (I truly loathe it.) I tried mixing different portions of the two colors with water, but nothing seemed to work. Finally I decided to go with my second color choice, aqua, but now the paint was beginning to chip and I didn’t know what would happen painting over a flaky surface. As I worked, I tried to not get my hopes up about the color, since I loved the other one first, but I painted, waited, and watched, and thankfully I still love the color. After a few coats, I lightly sanded the entire thing to remove some of the gritty surface and get any lose chips off where it was pealing. Then with a rougher grit sandpaper, I went back to distress the edges where I wanted chipping but wasn’t getting any. I chose to not distress the tray since I liked the idea of a smooth clean surface for Baby K to eat off of, and I loved the darker wood peaking though which wouldn’t be the case for the tray. I sealed and buffed it with the Furniture wax and it now has plenty of time to cure before it really gets some love and hard use. I love distressed furniture, because life happens and wear and tear is inevitable, so one more knick or scratch really won’t matter. 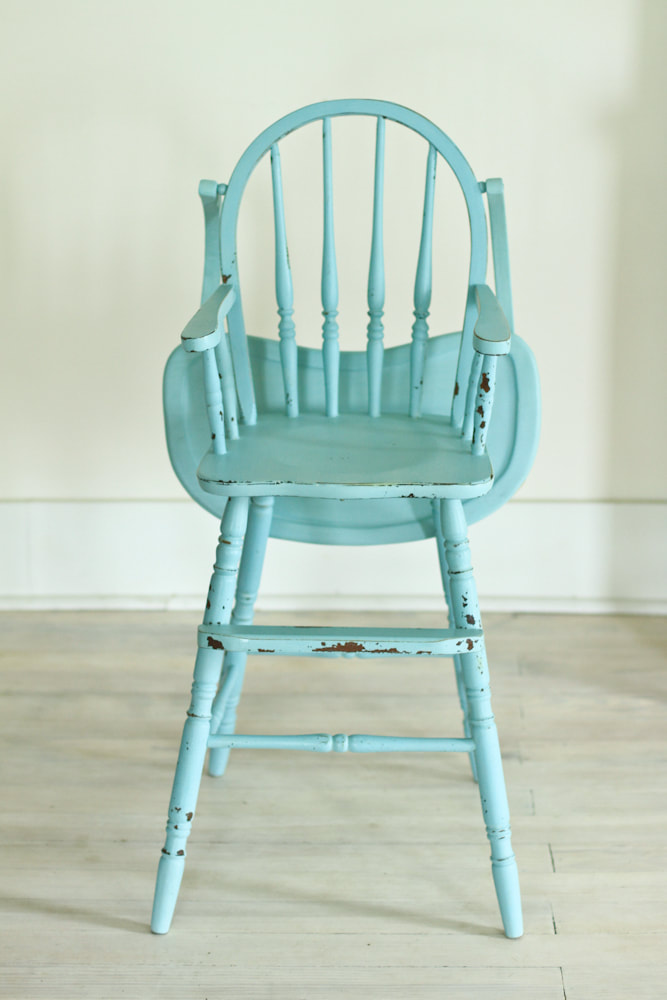 To some people, using an old highchair is extremely dangerous, but in my mind babies used these for years before the fancy plastic ones and they were just fine. My dad was always referred to by us as Mr. Safety because of the many safety lectures we received as kids and he hasn’t said a word about a wood chair, just that it needs a safety belt. I of course in no way will put my kid in something that I feel is a safety risk, but I also know myself and what will bother me. Even with race car engineered harnesses, I wouldn’t feel comfortable leaving my kid in a highchair unsupervised, so I’ll end up treating the fancy, escape-proof chair the same as my vintage one, and if my old chair reminds others to pay more attention when Baby K is eating, I’m okay with that. I know that my dad will let me know of any safety concerns if they are there, and I’m sure my fear of leaving baby alone in a highchair stems from one of his many safety lectures we got as kids. 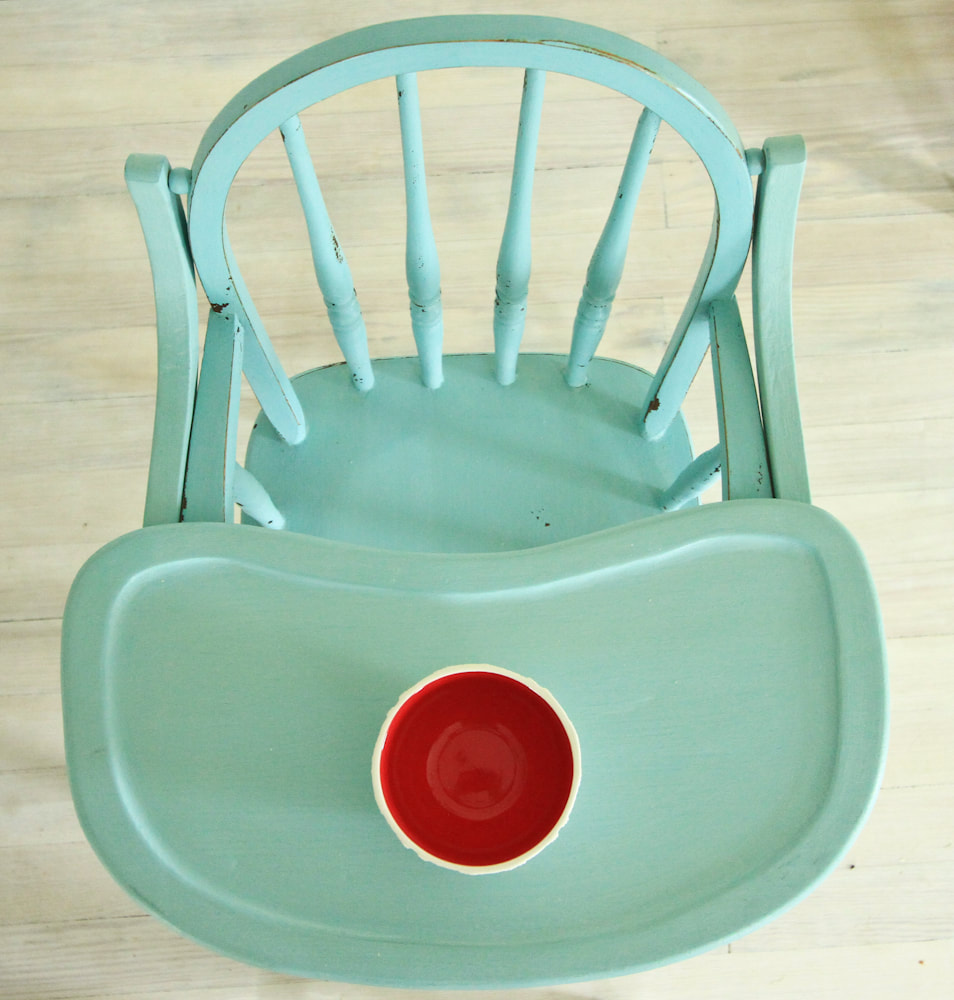 Despite the color not being what I originally planned, I really like it and maybe even more than my mint. It goes really well with the house and pulls out the aqua in the rug and furniture in the front room. 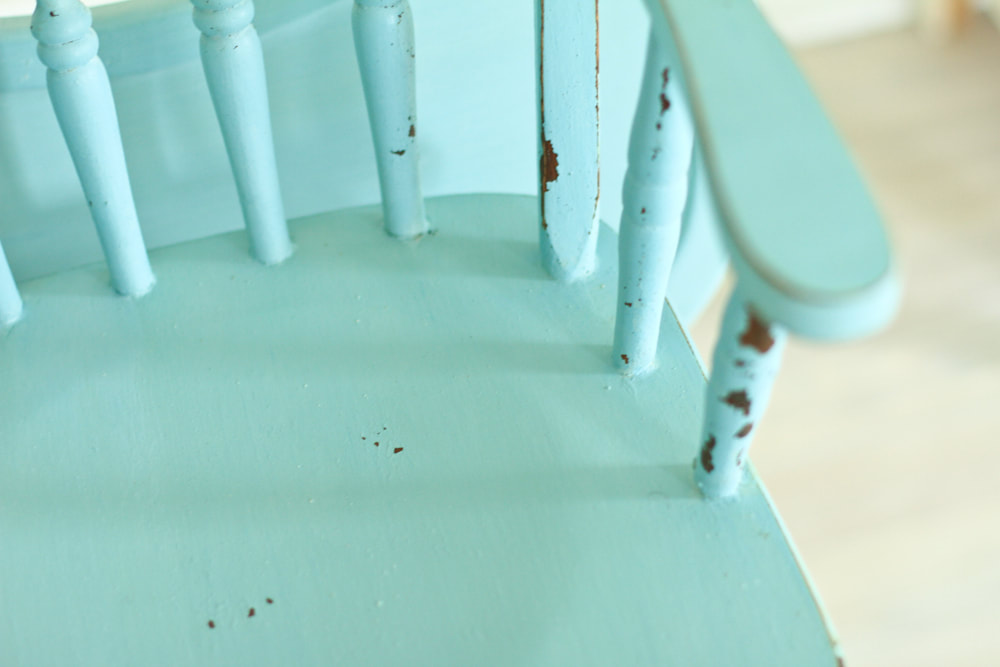 I painted before Danny trimmed the edges of the arms so there are two spots left to paint, but I’m currently out so the little edges are still bare. I also need to add a safety strap to keep the tray from being able to be unwantedly flipped over, (I’ve seen a picture of toddler me doing that at my grandmas, and although the dogs would love it I will not) as well as order a safety seat harness. Baby K won’t be using it anytime soon so I have time and I want to let everything cure first before attaching the safety pieces. 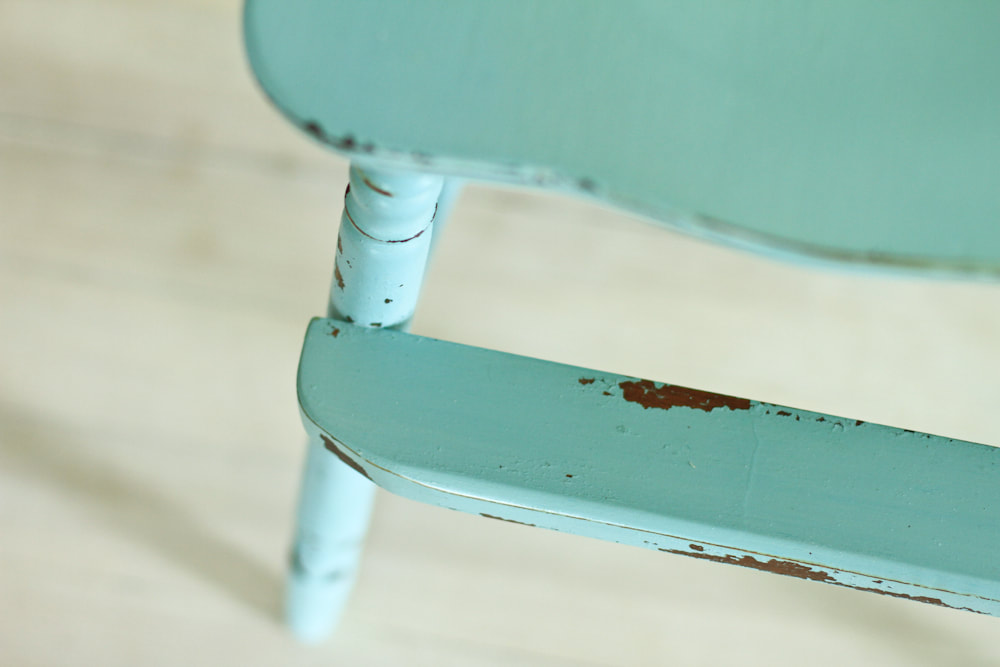 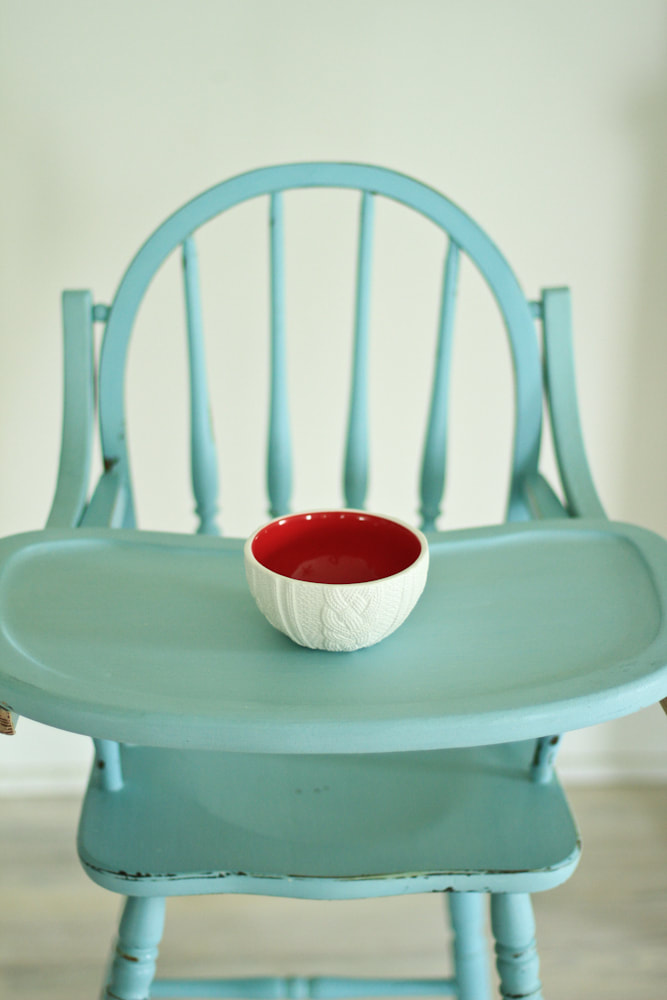 |

About The KelleysThe Choosing Home PodcastCategories
All
Archives
September 2022
|


 RSS Feed
